It was really only a matter of time before Mod Podge appeared in my crafting supply.
I've often seen cute projects that use the glue but I'd never owned any. I picked some up at Michael's the other day for a craft that we'll just not talk about. I abandoned it before I'd really even begun and before I'd sunk any money into it. Instead I sat there looking at my Mod Podge wondering what I could do with it.
I have a magnet board in my kitchen and I had 6 magnets with words on them. I'd never loved them but couldn't be bothered to do anything about it, they were functional. This was the perfect time, I peeled off the words and picked through my scraps. I think they look lots cuter hey?
After I was done I discovered two that I'd missed so I'll have to continue this project later but for now this was all I could be bothered to do.
L
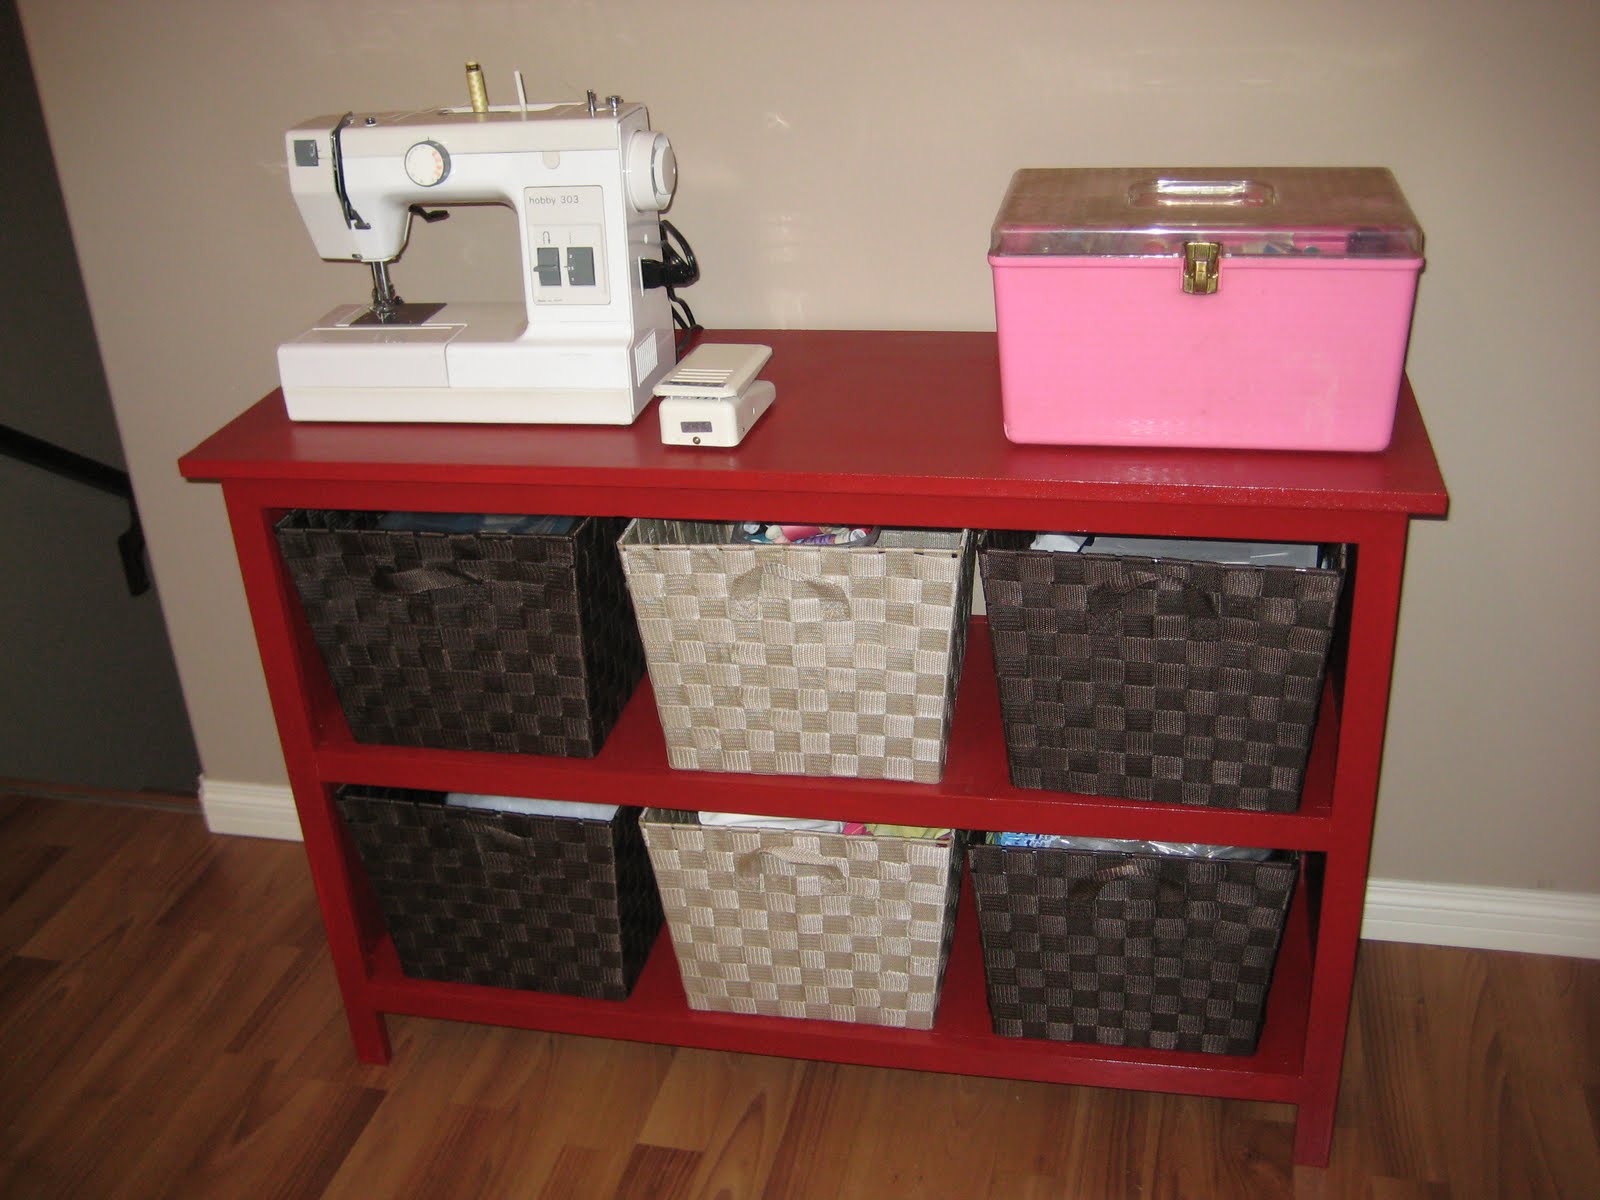
There were a few additions I knew I wanted to make to the shelf and lately they've really come together.
I was worried about my sewing machine scratching the surface since it will be moved a lot so I came up with a simple place mat to put underneath it. I love the way the fabric looks with the pink box and the red shelf (it's the same fabric I used for Catie's chair).
I also wanted a pretty dish to sit on top where I could keep the items that get used the most often like a seam ripper, scissors and pins. I had planned on stopping by Value Village to find something that I could spray paint but I found this glass, black dish at Walmart for only $6. I figured a can of spray paint would cost about that much and I really liked the dish. It's the perfect size and hold just what I need it too.
I keep seeing all these women doing great alterations to their clothes and today I tried my hand at my first.
I bought a shirt at Old Navy a while ago and it's a fine shirt, not the best I've ever owned but I like it. One day while doing the wash I threw it in the dryer because I couldn't be bothered to hang it. It actually turned out to be a happy accident because it ended up fitting a whole lot better. Before the shrinkage it had been too big in the armpit area, you know when it hangs funny? After the wash it fit just like it should except that the sleeves ended up looking like this. Which in case it isn't clear is about 3 inches too short.
I've just been pushing them up and dealing with it but they don't stay and it's really annoying. I finally had the brilliant thought that I should cut them off. Tonight that's what I did/ They're now short sleeves and 100 times more comfortable. I'm really happy with the turnout.
As planned I took apart the saucer chair. I added a second layer of batting and cut off a half inch all around. I sewed it back together, replaced the bias tape (sadly not quite as beautifully the second time around) and replace my zig zagged tuffting. The tuffting was a great improvement over the first try.
Here's the new chair, though it's hard to tell in the picture it really is a big improvement. It now looks soft and comfortable and less floppy around the edges.
Here's a photo of the original, before the addition of the second layer of batting. See how this one is all smooth but the above one is all puffy?
And here's a new picture of Catie in the chair, just because she's adorable.
About a month ago I sent out a request for one of those saucer chairs for kids to recover for Catie, I wanted a really cheap second hand one and Julie came through finding one for under $2. I was thrilled and finally picked it up the other day.
Turns out there was a reason it was only $2. Julie had mentioned that as she purchased the chair she was actually a little embarrassed and wanted to explain to the sales lady that is was going to be recovered, I can understand that because this chair was disgusting! I didn't want to touch it never mind use the original batting as I'd planned but it was perfect for my plans. The picture doesn't due it justice. At one point while we were in Calgary Brad's niece asked to sit on it and we were quick to refuse and move the chair.
I quickly cut off the cover, used it for a pattern and happily discarded it (there were stains that went all the way through!)
I had already bought my fabric so I got to work (it actually took me quite a bit longer than I had anticipated).
I'm calling this project a 50/50 success/failure. I love the fabric, I love the bias tape and it was easy to put on, unlike the last time I used it on a chair. I was a lot more careful so it turned out much better. The thing I love most is that the cover is removable. I used heavy duty snaps on the bottom so it can be removed and thrown in the wash and they worked even better than I had hoped.
I'd never used the pound on snaps before so let me give you a tip. If you try to attach them at your kitchen counter using a cutting board to protect your counter you will curse the snaps over and over as you pound the daylights out of them and they still don't attach the way they should. Instead just go outside, use your sidewalk and two or three pounds later you're done. After my first test at the kitchen counter I was really worried because I had a lot of snaps to do (there are 12 pairs in total) and if they were all that awful I was going to hate this project but 20 minutes outside was all it took and they're beautiful. I also used our heaviest hammer and that made a big difference.
There are two very important parts of the chair that I’m not happy with though and so that’s why I’m calling it a failure. Since the chair was so filthy instead of carefully picking it apart to use the pattern I cut it instead and added a seam allowance but I really think I added too much. The edges look kind of floppy and not awesome. I also hadn’t considered the weight of my batting. I think the stuff I used was much thinner because the chair isn’t very soft and comfortable. I think the bar’s are too noticeable and it looks very flat instead of puffy.
If the batting was fine I wouldn’t worry about the seam allowance but since I have to take it apart anyway I’ll just pick off the bias tape and then rather than having to do a lot more unpicking I’ll just cut around the edges and fix the seam allowance while I’m at it. Then I can add more batting and re-sew the whole thing back together. I think I’ll be a whole lot happier with it and when that’s finished I’ll post pictures so you can see both together.
For one more photo, this is where it sits in my living room and I really love the way the fabric co-ordinates with the couch pillows and the purple legs of the chair. Who knew purple and red could work so well together.
It didn't take long after I started sewing again for me to adopt the following motto, "It wouldn't be a Laura project if I didn't have to do it twice."
Brad and I were just joking the other day that the next talent night I'll bring a volunteer up to the stage and we'll have an unpicking race, I'm really very good at it as I've had lots of practice. This project will just help me improve that particular skill :)
L
There's a playground not to far from our house that Catie and I have visited before. On a previous trip she tried out the swing and was very indifferent towards it showing no reaction. I had thought she'd love it so I was a little dissapointed but shrugged it off.
I decided today it was time to try again and it was a good thing I did because today she loved it. She giggled and smiled and swung her legs and had a great time.
or the past several weeks I've been trying to come up with a solution to a problem in our house. The problem being this.
Crafting and sewing takes space and we have a lack of that here. As a result everything ended up on my kitchen table. When it was time to put it away it would get stacked on the ironing board and our little freezer or the floor and was a complete mess. The more I acquire the worse it gets. See that box on the stool? It's the box that frozen chicken breasts come in from Costco and it's holding all my fabric, nice hey? There's too much of it so the flap won't stay closed.
I knew I wanted some sort of shelf but shelves are expensive. Plus everything these days is that crappy laminated furniture and I've decided I'm not buying that stuff anymore. I'd finally come to the conclusion that I'd have to wait and look at garage sales for something I could make work but then one day this post came across my Google Reader.
She had made these two amazing shelves for $60 and it was exactly what I wanted. Not only had she made them but she had included plans so that others could make them. Brad and I talked about it and decided that yes, using his Dad's workroom we could make one of these.
We headed up to Calgary and declared we weren't going home until this shelf was built.
It surprisingly turned out even better than we thought it would, ended up being really solid and I didn't even hate painting it as much as I had thought I would. We made one small mistake that required a quick second trip to Home Depot but it was a cheap mistake.
Somewhere in the process this project became sponsored by Starship's, We Built This City. On more than one occasion during painting I would exclaim, "We Built This!" Which was inevitable followed moments later by, "We Built This City, we built this city on rock and roll"
Before we started I priced out all the supplies we would need and she's obviously in the States because it was not going to be as cheap but we were able to use a scraps from my Father-in-law and some of his supplies. We figure our total cost was about $35 but there were lots of little things we didn't have to buy. We didn't need to buy nails, wood filler, sand paper, paint brushes or varathane to protect the top and most importantly I have an awesome Father-in-law who bought our sheet of MDF. You can only buy them in full sheets even though we only needed half so it was going to be a big expense. We were hoping to use some scraps that were on hand but nothing worked right so he offered to buy the sheet and keep the scraps, that ended up saving us a lot. We did buy spruce 1x2's for the trim, wood glue and paint.
The baskets for the shelf were a whole other story... no matter how I priced it out I couldn't make it cost less than $60 and that was with them being 50% off at Micheal's. So most of the cost came in the form of $75 worth of baskets but I love them. They also didn't have enough of the ones I wanted so for now I have 4 dark brown ones and 2 light ones but I'm going to try to get two more dark ones.
So here is the shelf! I'm so proud of how it turned out! Every thing you saw in the last picture is now in one of those baskets, they hold so much!
And here's a before and after together so you can see what a difference it has made.
I feel a little bit like Superwoman and I think I can now do anything. Do you need a house built? I'm pretty sure I could do that.
L
Brad and I are in the middle of making this awesome shelf that I'll blog more about later. It's been such an interesting project and I'm learning all sorts of things.
I've never been a big woodworker. In shop class I made this plastic ring once, it had three colours all stuck together but when I used the belt sander to smooth the edge I ended up with two colours. I also made a cage for our guinea pigs and I can't tell you how crappy it was. That's really the extent of my woodworking.
While working on this project I've learned...
I've always known I hated sanding but I just hadn't experienced a nice palm sander.
An air nailer makes all the difference.
Using wood filler is just like icing a cake. Load lots on, scrape 90% off. That skill transfers right over.
I know the inch mark, I know a quarter and I know a half, but the marks in between means nothing to me.
Photos to come but we still have the tedious task of painting. Can't wait to see the finished product.
Recently Catie has been a sick girl. She was throwing up a lot and so in an effort to help her stomach we stopped with solid food, it's only been recently that I restarted and each time I've been reminded just how fun it is to share our dinners with Catie.
So far I've discovered that she loves tomatoes and the orange was a big hit too. She doesn't care too much about cheese but yogurt is yummy.
Tonight we has Spaghetti & Meatballs, though messy it was by far the most fun.
She also loves to drink from a cup like a big girl
This crafting obsession is pretty new for me but there is one item that has made every single project possible, I go back time and time again and I'm never let down. My best craft tool is the pink box.
The pink box belonged to my Grandma who passed away 15 ish years ago. When she died it was passed on to my Mom who has loaned it to me.
Inside is the best supply of thread I've ever seen. There will be not just orange thread but 8 different shades so I can find exactly the colour I was looking for. Without it my quiet book wouldn't have been nearly as cute and it's saved me tons of money on thread. (This photo makes me wish I had a better camera along with the skills to operate it because this could have been such a beautiful picture.)
Underneath the tray are even better gems. Snaps, Hooks and Eyes, Bias tape and buttons. And just when I find a new project there's something inside it to help make it possible, like a kit to fabric cover buttons.
The box has it's quirks, don't even think about carrying it by the handle (that was the tip Mom gave me, she found out the hard way). The thread is old so sometimes it causes problems, it's so tightly wound that occasionally it winds itself around my needle and I'm surprised every time that it can still smell so much like stale cigarette smoke but it only adds to the character of the box and it makes me think of Grandma every time I craft.
L
I saw these hair clips on Make It And Love It and I knew immediately I'd re-create them.
These will sit for quite some time because Catie needs significantly more hair before she uses them but I love how they turned out and I had everything on hand so they were free.