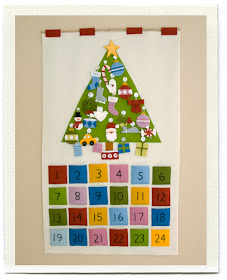
So I've mentioned it a couple times but I'm sewing with along with Jill to make this adorable Advent calendar by Inchmark Journal.
Jill gives us an assignment every Wednesday and we show our progress until we all have the above, adorable calendar, just in time for December 1st.
This week she tasked us with cutting out our main backing piece, cutting and embroidering our felt squares and sewing the squares onto the backing. I started this project a couple days late so I felt like I was rushing and would never finish in time but surprisingly completed it all by yesterday early afternoon.
I started by going to Fabricland and picking up this beautiful selection of felt.
In the past I've used dollar store felt but I decided I want this project to last so I should use better materials. I also really wanted to use real wool felt but who can afford that stuff?
Then I worked on my numbers and here's the tricky part. Inchmark Journal gives a really handy tutorial on how to transfer your number temlates to the felt using an iron-on transfer pencil. I went to pick one up at Fabricland where the employee there told me that crayons work too, I'm always looking to save a buck or two so I skipped the pencil and learned that crayons really don't work, unless there's a trick I don't know.
It was late and I wanted to start so I got creative. I traced all of my numbers onto freezer paper and ironed them onto my squares. Since they're a mirrored image I ironed them onto the back of my felt and stitched through the paper, the paper side being the back. I'll make that more clear with photos.
Here is my square of felt with the freezer paper ironed onto the back, see how my number is backwards?
Once I did my stitching I really carefully pulled off my paper and it looked like this, still looking at the back.
Once flipped over it looked like so...
I used a chain stitch to do all 24 of my numbers.
Once that was done I laid my squares out on my backing piece, that I'd previously cut. I made a handy grid on PowerPoint to help me line my squares up nice and straight. I slipped it behind the backing piece and the squares showed through so I knew where to pin.
Once I'd pinned 9 or so, (that was as many as my grid would let me do since we don't have bigger paper) I stitched them on. I repeated that process a couple times until all of my numbers were stitched.
So here is my end result for this week.
So far I'm thrilled with how it's turning out and I'm excited to see what our assignment is for this week.


Ooh, I wish I had time to join you on this one. I want an advent calendar that's not filled with really bad chocolate!
ReplyDelete