Showing posts with label Stroller Re-cover. Show all posts

Tuesday, June 28, 2011

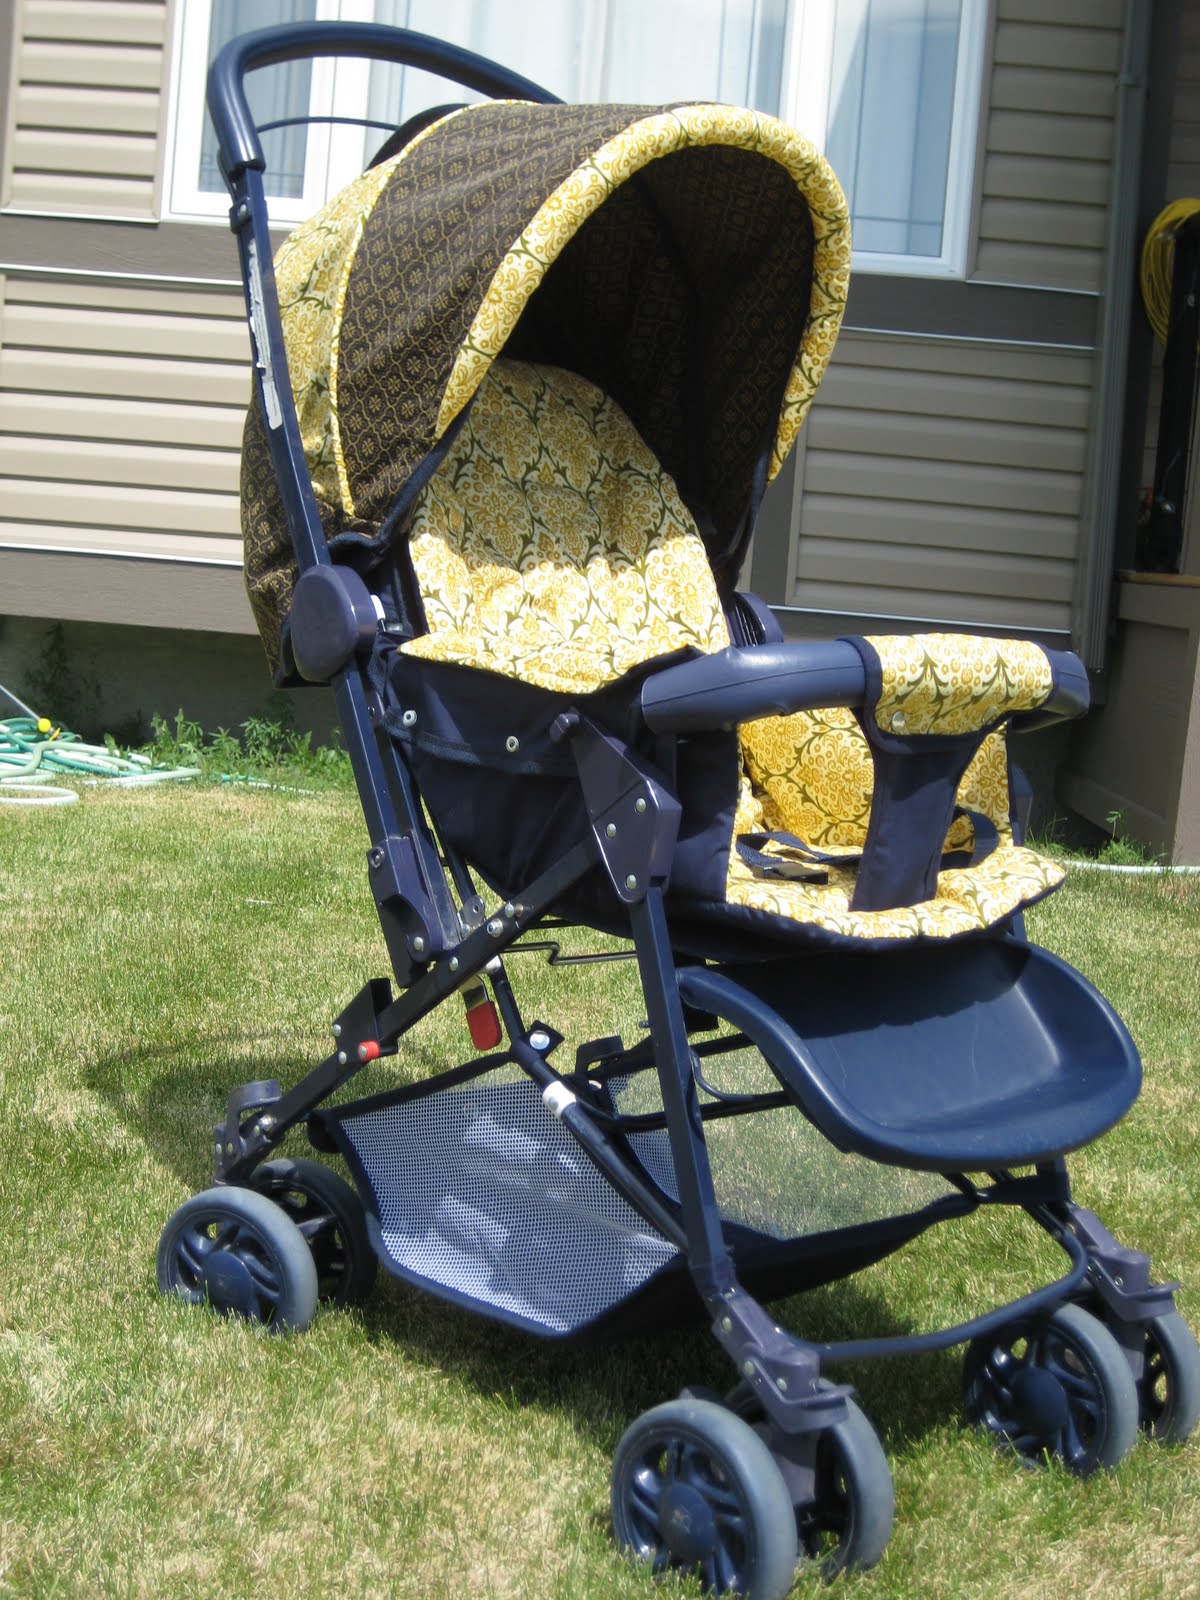
Stroller Re-Cover (AKA the DAMN Stroller)

I've done enough strollers re-covers now that when my sister-in-law asked me to work on hers I didn't hesitate.  It was a Graco that she'd bought second hand and was now using it on her second child and it was in really terrible condition.  Apparently I should have been more careful to look at what I was volunteering for.  Never have I come closer to failure than this project and it wasn't long before it was deemed the DAMN stroller.


You'd never tell by the after pictures though because it turned out so well.  The fit of the new cover is amazing, despite the near disaster.


Take a look at this lovely before pic.  Notice how faded the front of the sunshade is?  This needed a make-over almost as badly as the Navy Stroller.


Every stroller is different so there isn't really a tutorial, more like a process. Here's how my process goes.
  1. Break the stroller down into sections.  So the sunshade is one section, the basket underneath is one section, the cushion is one section and the lining fabric is another.  If you're lucky the stroller will be in decent condition and you'll just need to re-cover the cushion and the sunshade, those are ideal and a lot less work.  Whatever the condition of your stroller you're going to work on one section at a time, so any time you're overwhelmed you just need to remind yourself that your current project is your one small section, forget about the big project and focus on the small.
  2. I always start on the sunshade so I'll use that section as my example.  You're first going to figure out how to remove the sunshade from the stroller, it's usually held on with 4 screws.  Once it's removed you can slide the shade off of the metal supports, there are usually two.  Put them aside for later.
  3. This next step is the most tedious, you're going to carefully unpick all the parts to your sunshade so you can use them as your pattern.  It's important not to forget how the pieces you take apart went together because you need to be able to put them back, I find it helpful as one piece is removed to pin it back in place with one or two pins just so I don't forget how it's constructed.  Sunshade's also normally use two thin plastic supports, as you remove these put them aside for later.  
  4. Once your pieces are unpicked you can unpin one piece at at time and use it as a pattern to cut out your new fabric.  Once it's cut out I pin the old piece back where it was (not taking any chances with my memory here).  A tip, those two plastic pieces that were removed will need casings to put them back in and that fabric should really be cut on the bias to make it look smoother, I always use bias tape or piping with the cord removed.  Makes your job easier and you want a contrasting fabric anyway.
  5. Once your pieces are all cut out of your fabric you can use your old pinned together mess (it's now a mess by the way) to see how you sew everything back together.
  6. Add your two plastic supports back in and finish all your raw edges off with some sort of binding.  I like to re-use the original just because you need so much but if you re-use the original keep in mind that you should stretch it while you're sewing it back on or you'll run out.  You could also use twill tape, nylon webbing or bias tape.  I've used all three and twill tape is my favourite and I think the easiest to work with.
As for fabric amounts you'll have to try and figure that out on your own stroller but to give you an idea here's what I used on this last stroller. 
  • 1 meter of the stripe  (For you American's a meter is 39")
  • 1 1/4 meter of the flower
  • 4 meters of plain brown broadcloth (I always double broadcloth because it's so thin, I really needed one more meter of the brown though, I ended up taking a chunk from my stash to finish)
  • 12 meters of twill tape (I hardly had any left)
  • This is the first stroller I've done with mesh, I happened to have a mesh laundry bag from the dollar store that I'd used on a previous project and it worked great.
  • Also, if you're going to replace the backing and the basket underneath you'll probably need to replace some pound on snaps.
So why was this project so difficult?  As I mentioned in my steps above, the cushion and the backing fabric are normally separate but that wasn't the case on this one, they were attached.  That meant I had to sew together all these strange pieces for the backing and then put right sides together and flip the entire thing.  I hope it sounds complicated because it really was!  In the end I won though even if it brought me near tears.  I actually think the fit on this stroller is better than some I've done in the past so the difficulty ended up being worth it.

Okay enough talking, more pictures!


I think the pop of yellow on the cushion is perfect and I love how comfy it looks.

I particularly love this shot. That really washed out fabric is supposed to be dark navy blue, and I love that you can see the holes in this one.  There were quiet a lot of holes (anywhere there were holes I re-enforced my fabric to hopefully make it a little more durable).
 I love that in the after you can see how neatly everything is secured.

One last picture where you can really see the cushion attached to the lining.


  Linking To Monday - C.R.A.F.T., Making The World Cuter, Polly Want a Crafter, Simpsonized Crafts, Sugar Bee Crafts, Sumo's Sweet Stuff, The Girl Creative   Tuesday - All Things Related, Creative Itch, Domestically Speaking, It's Sew for You,  Ladybug Blessings, Sassy Sites, Today's Creative Blog, This & That, Topsy Turvy    Wednesday - Blue Cricket Design, Me and My Bucket   Thursday - A Glimpse Inside,  House of Hepworth, It's Sew Stinkin Cute, Somewhat Simple, The Train to Crazy, What Allie's Making Now   Friday - Creation Corner, Finding Fabulous, Tatertots & Jello, The CrEaTiVe CraTe

Monday, March 28, 2011

Jenn's Stroller

Remember the stroller/car seat combo I bought for my sister back in July?  The one for $15 that the cat had kittens in (still so gross), the stroller just waiting to be re-covered?  Well the worst happened and my sister miscarried.  We were all so sad about it that the stroller went into my parents basement out of site.  I'm happy to report that not only is my sister expecting again but she's having a girl, her first after 3 boys.  To say we're excited is an understatement and Mom and I went and found some adorable pink fabric, no gender neutral here. 


Today we're going to look at the stroller and tomorrow you can see the car seat.

Here's the finished stroller and a reminder of what I started with.
I can't really tell you how gross this stroller was with a very pink kitty birth stain over most of the cushion.  I threw it in the wash and then Proxi'ed it multiple times and was really surprised just how clean it came.  I didn't think I'd be able to use any of the batting but it all came clean enough to use except a little bit of binding that I could easily replace with bias tape.  

Once the cushion was clean I started in on the sunshade.  I had decided to keep all of the browny-beige fabric but it all felt so dirty I wanted to wash every scrap of fabric, it's a good thing I had decided that because it turns out the fabric was all one big piece so it all had to come off anyway.  Once I took off a very large pile of screws I was left with this.
I washed everything, replaced the ugly, faded plaid with the new flowers and then re-attached it all.  The cushion took a lot more time with a ton of unpicking but as usual the end result was worth the trouble (sorry there's no photo of the cushion on it's own).


This project came together surprisingly easy with very few problems, just the way I like them to go.


Here are a bunch more photos just because it's so beautiful.


So come back tomorrow, see the other half.


Linking To Monday - C.R.A.F.T., Making The World Cuter, Polly Want a Crafter, Simpsonized Crafts, Sugar Bee Crafts, Sumo's Sweet Stuff, The Girl Creative   Tuesday - All Things Related, Creative Itch, Domestically Speaking, Ladybug Blessings, Sassy Sites, Today's Creative Blog, This & That, Topsy Turvy    Wednesday - Blue Cricket Design, Me and My Bucket   Thursday - A Glimpse Inside,  House of Hepworth, It's Sew Stinkin Cute, Somewhat Simple, The Train to Crazy, What Allie's Making Now   Friday - Creation Corner, Finding Fabulous, Tatertots & Jello

Monday, January 10, 2011

Baby Stroller Re-Cover

My friend Teddi called me up and asked if I was interested in working on a project for her, and was I ever.  This little baby stroller is adorable.  Not a little umbrella stroller like we're used to seeing, this stroller was very similar in design to the full size navy stroller I covered here.

It started out like this and it was in pretty rough shape.  The fabric was torn in a bunch of places and it was really dirty and just plain boring.

I took the old cover apart and used those pieces as my pattern.  I then cut pieces out of my new fabric and put them back together.  The solid pink is broadcloth that I doubled up and I finished all the edges with narrow pink bias tape, it's secured to the frame with heavy duty snaps.  The original had a seat belt for dolls but it closed with D-rings.  I can't really imagine a child being able to use D-rings so I replaced them with the kind of clip you'd use on a high chair.  I know all my nieces love clipping and un-clipping those so I think it's a nice improvements.  I think this stroller is adorable so I'm going to show you a bunch of after photos.


I put a doll in this one so you can see the size and how the belt clips.


Love how the handle changes position.


Now all I need to do is find another one of these for Catie because she loves it.  She won't stop pushing it around and she keeps putting random things in it.

Monday, August 23, 2010

Umbrella Stroller Re-cover, Completed

The stroller is finished. You can read up here about how I turned my Umbrella stroller from it's ugly state into into it's half finished state. The rivets on the sunshade made me work a little, hence the half finished project, so this is a story about rivets.


Before I started this project I examined the construction and that's when I discovered the 6 rivets that held the sunshade in place.  A rivet is a metal piece that looks like a bolt without the threads.  It hold parts together really tight so holes are drilled in both pieces it's intended to hold together and then the rivet is slipped in.  A machine folds the end down tight so that everything is held in place, a lot like grommets only more heavy duty.  They aren't removable though and you need a special machine to put them in.  I figured I'd worry about the rivets later so I went ahead and re-covered the seat of the stroller, it was held on by screws.  That left me with this though, and later was now.


I read up on how to remove rivets and it involved a drill so I waited until Brad could help me and we broke a drill bit.  Not surprisingly our wood bits didn't work so well.  I next took the stroller to my brother and his metal drill and he removed all the rivets for me.

Here's a side view of the sunshade, you can see the 3 rivets there, there's 3 on the other side as well.


We flipped the stroller on it's side and he took a drill bit small enough to fit inside the back end of the rivet.
He started by drilling straight down.


Once that's done the goal is the break the little lip off the back so he made small circular motions until the back of the rivet popped off and we could slide the parts out.  Sounds easy, and some of them were that easy.  Some of them were far more difficult and there were many broken drill bits, go slow.


Also, not surprisingly the metal gets really hot!  If you're using an old picnic table that's covered in plastic as your work table put something between the plastic and the metal.


Here's what I was left with once my rivets were all removed.


I then took everything home and re-covered my sunshade.  In the rivet removal process I'd discovered that my brother has access to a machine to replace them, I just needed to provide new rivets so I headed over to Home Depot to buy some replacements. Then I went to Home Hardware and finally ended up at Canadian Tire.  I needed two different lengths of rivets, the two bottom ones being longer, only they don't sell any that are that long so I switched the bottom two for bolts.  I then purchased a package of 100! rivets for the other 4 I needed, that was the smallest package I could find.  Then I waited two weeks until Rob's work schedule and my schedule lined up.  I headed to his work and we went to add my rivet only to discover that they were too short.  Back to Canadian Tire where I discover again that I can't buy rivets long enough so those 4 were replaced with bolts as well and the two weeks I waited for my Brother was unnecessary.

So it's put together and it's okay.  I would have preferred rivets and the sunshade doesn't open and close as smoothly as before but at least it works and it's really beautiful.  Here's  a shot of the 3 bolts in the sunshade, both of these are views from underneath.  I used rounded caps for the bottom two and I may replace the others with these as well, we'll see.


Here's one more before and after.


I like that my two strollers match now, fun that they're the same pattern.

Thursday, August 5, 2010

Umbrella Stroller Re-cover


So I have a beautiful stroller that I re-covered and I'm very happy with it but it's kind of big.  Sometimes you just want the easy little umbrella stroller so I've been using this. 


 One day I realized that I push around this beautiful large stroller and an awful Umbrella so it's time to do something about it.  Let's be honest, this stroller obviously isn't finished.  As much as I love the classy black circles with the multi-coloured animals I do have plans to make them match.  The problem being that the sunshade is held on with rivets.  I looked up instruction on how to remove them, it involved a drill so I waited until Brad was ready to help me.  We got all set up, put in a bit and started to drill.  The rivet looks exactly like it did when we started and now we have a broken drill bit.  Time to come up with plan b.

This stroller cover was just like all of the others.  Take it apart, use the original as a pattern, put it all back together.  The only snag being I took my sewing machine in for some maintenance so the putting back together waited about a week.  I made sure to pin things how they should go so I wouldn't forget and it was a pretty smooth project only involving a small amount of unpicking.

My favorite part is the bright blue on the back.  The original fabric was kind of heavy duty but I wanted to use what I had on hand so I bought some cheap broadcloth and doubled up my fabric, black on the front and blue on the back.  I'll do the same on the sunshade and it will show a bit more.  You can see it best down by the seat of the cover.


Now I just need to get that sunshade taken care of, any suggestions on how to remove rivets?

Wednesday, July 21, 2010

Stroller, Carseat and Base for $15!

I have a confession... remember the navy stroller that I recovered and raved about?  That stroller was supposed to be for my sister but a carseat wouldn't clip onto it.  Well it also turned out that the stroller was a piece of crap.  I didn't mean to lie, I thought it was great but the afternoon after I blogged about it I took Catie for a walk in it.  The seat was super long so Catie couldn't lean back comfortably, her neck would crick.  To fix that problem I made a cute pillow that worked really well but it also had a broken piece.  Remember how I talked about the handle that moved back and forth?  One of the pieces that held it in place when pulled forward was broken but with a trip to Home Depot, $5, a drill and some screws Brad and I fixed that problem too.  Two down, one to go.


Sadly the last problem could not be fixed... the bearing on one half of the wheel was not good so the whole stroller pulled to the right.  The wheel and all it's parts were attached by rivets so there was nothing we could do about that problem.  I feel a little bad about trying to sell it but wanted to recover some of my costs.

**Update - a little WD-40 fixed that problem right up (Mom's a genious), it's now in great shape and has a new happy owner!**

After going through that whole process Jenn still needed a stroller.  She needed a carseat too so I looked up Kijiji and found a carseat (with base), stroller combo for $60.  I asked if she'd take $45 and she said yes.  She sent me pictures and it looked pretty rough but since I was going to re-cover it I didn't care.  I made arrangements to go look at the set but before we could meet she contacted me to say that the stroller was no longer available because her cat had kittens in it! (Gross)

I asked how much for just the carseat and she dropped the price to $15 which I thought was not too shabby and figured I'd take the gross stroller anyway if she'd sell it to me for $5.  As stroller, carseat combo for $20 is not to bad and I can get rid of all the gross stroller parts.

I went to see it and the stroller wasn't as bad as I thought it would be, the Bratz saucer chair was worse, I offered her $5 and she told me to just take it.  Score!  (For any safety cautious out there, the carseat is not expired and hasn't been in any accidents.)  I learned from the last stroller so I pushed it a bunch and it rolled really well.

It will be a while before any re-covering happens but I thought I'd give you the before so you can wait in anticipation for the after.

Wednesday, July 14, 2010

Stroller Re-cover, Take 3

I have a sister who's pregnant (hopefully it's common knowledge and I can post about it here), her youngest is old enough that they've long gotten rid of their stroller so she needed a new one.  I happen to be walking through the Salvation Army and saw one that would be perfect to re-cover but I was in a really big hurry so I left and sent Mom over to pick it up.  Sadly by the time she got there the next day the stroller I saw was gone and she came home with a different one.  I took one look and knew we were in trouble.  Here she is after all of my hard work which I'll explain in far more detail than you probably care about.


And how it looked when I got it.


The biggest problem with this beast is that a car seat will not clip onto it.  This is really the only problem that wasn't fixable.  We knew that this wouldn't work for Jenn and I thought we were just out the $20 Mom spent on her.  But then I gave her a push... she moves like a dream!  She has, like every other stroller, 4 wheels but the difference is that all 4 of them rotate.  There's no dragging two wheels while you wait for them to turn the right direction and it moves anywhere you want it to.  I currently have a cheap stroller and the difference was immediately noticeable.  The other feature I fell in love with is the handle, it rotates so your baby is either looking out at the road or looking out at you, I would love this feature.  Catie would have liked walks a lot more if she could have been looking at me.


These two features were enough that I figured I could re-cover it and sell it to hopefully cover our costs.
I had no idea what I was getting myself into.

There are usually 4 fabric parts to each stroller, a sunshade, a cushion, fabric covered supports for the cushion to sit on and a basket underneath.  My previous two strollers I re-covered the sunshade and the cushion and that was all it needed.  I of course planned on doing the same with this one.  We bought fabric (for 50% off) and then Mom brought me the stroller and I finally got a really good look at it.

She had obviously been kept outside for quite some time.  The fading in the fabric was the first thing I noticed, take a look at the edges of the photo below, nice and dark fabric where it was covered in a seam, the rest is faded from the sun .  No good.


I briefly considered trying to re-dye the fabric but that wouldn't fix the tears or the very worst part of this stroller... having been kept outside there were many remains of spider egg sacks... I know, so gross!  No one wants to put their baby in that so I went back to fabricland, bought more fabric (no longer 50% off) and about 30 heavy duty pound on snaps.

It was also incredibly filthy, there were leaves and rocks underneath the cushion and look at all the sand on the foot rest below.  The original fabric looked bad and felt just as bad.  I stripped it all off the frame (luckily it was all held on with either snaps or velcro) and gave the frame a good wash.

Eventually I ended up with this (this is pre-wash of course).


As usual, I unpicked the pieces, used them as patterns and cut out new fabric then re-assembled using the original binding.  I did make a few style changes, she was built in 1991 and apparently quilting was big back then because there is a very quilted feel to the entire stroller, especially the seat.  I knew I would replace the padded squares.  Because of the changes and my refusal to unpick the quilting I had to use my own quilt batting but I had some on hand.


So I re-sewed, I pounded on a TON of snaps (in the rain, the wind and a very mosquito infested night) and then I re-assembed only to discover that I'd put a piece on upside down.  This led to the post about postponing and after a weekend away I took on the task of unpicking and fixing my mistake.

The difference is staggering and I'm hoping someone will want to own her.  She's now so chic and stylish and just begging to be taken for a trip around the block.


The removal of the ruffle and the quilted squares really updates the look and I love the cheery yellow fabric.


This picture shows the handle in the second position and you can also see the window in the sunshade that closes with velcro.


See the nice big pocket on the back to hold anything you might need?  And the window flap is closed and lovely in this photo.  You can also see how nice and crisp and clean the basket underneath looks.  That would easily hold a diaper bag and a couple toys.


One more before and after.  I'm almost wishing I could keep her.


This is an old Avalon stroller but it's a model they don't make anymore.  Interested in owning?  Let me know and we can talk.

*Update*   The stroller sold and I was thrilled to hand it over to someone new


I'm so excited to be featured