Thursday, December 30, 2010

A Blog Year in Review

I'm not a bandwagon jumper, normally when a trend starts I hop off and try to do something unique but this time I'm jumping up next to everyone else.  On just about every blog these days you can find a list of most popoular posts in 2010 and I've loved reading them.  Since I already have a list of those on the sidebar to the right I thought I'd share my personal favorites.  Now I do have a favorites tab and so most of these will be repeated but I'm doing it anyway, hopefully you'll enjoy.
 
10. Office Chair Makeover

Our dumpster chair got a makeover and looks so chic and is comfortable.  This project turned out so beautiful but gets the number 10 spot since the paint never did adhere very well to the plastic.  I learned though and I'll be smarter next time.

9. Bouncy Chair Re-Cover
I feel like this bouncy chair re-cover was the project that started it all.  I'd never re-covered anything before but I loved the end result so much that it made me look at baby items with new eyes.  This project took 7 hours the first time, I've since done another and plan on doing 3 more in the coming months.  My time has gone down significantly.

8. Quilled Monograms

I did three of these this year and I loved them all.  If frames weren't expensive and heavy to mail I'd do giveaway after giveaway so I had a reason to keep making them.

7. Craft Shelf

Ana White makes us all feel like furniture building pro's, thanks to her plans my husband and I built this shelf to organize all of my craft supplies, 8 months later I'm even more thrilled with it.

6. Quiet Book

I finished this book so long ago and when Catie was little that I almost forgot to pull it out now that she can finally do a few of the activities.  So far she loves to pull the apples off the tree and that's about it.  I've made this a Sunday church activity only so we don't play with it during the week but if I forget to put it away Catie will find it and carry it over to me so we can play with the apples.  It makes me feel like all that time was worth it.

5. Door to Headboard
 

This super simple project had problem after problem but the end result was beautiful.

4. Stroller Re-Cover

I felt like this project was my finest work until this point.  I was really proud of the sewing and the quality of my work and the before and after is still surprising to me.

3.  Art Bucket Tutorial


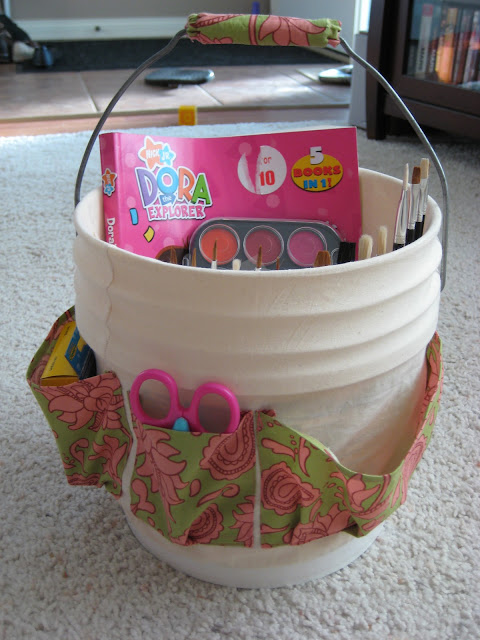
So many project I do are just ideas I found from another blog but I felt like this idea was fairly original and turned out just how I'd imagined it in my head.


These chairs speak for themselves, the stencil added just the right touch.


Every time I get in the car I see this and I'm still so pleased with it.  I think the fabric choice was a great one and like the stroller the sewing was quality and it ended up looking very professional. 

A Video for Grandma

Grandpops and Grandma Wiebe found this cute toy that all the little girls loved.  When they picked it up their arms would vibrate and wiggle, so cute.  It was the hit of Christmas Day.

Sadly, it appears there isn't any sound so you can't hear the cute noises that went with her actions.

Wednesday, December 29, 2010

What Catie Wore Wednesday - #17

I really tried this week but with it being Christmas and me forgetting our camera at home it was extra difficult.  Sorry it's so bad, let's be honest and just next week is going to be just as bad since we're still out of town, we may skip it next week.

Wednesday (I think)

Polka Dot sweater - Superstore
White onesie - Carters
Ruffle Jean Skirt - Children's Place
Tights - Sears?
Yeti Boots - Old Navy

Saturday (Christmas Day)

She did wear real clothes for some of today but since the marjority of it was spent in pj's this is what you get.

Polka Dot Sleeper - Sears


And that's it.  Two crummy photos is all you get, sorry.

Tuesday, December 28, 2010

A Menu Board & Hand Stamped Jewllery

Now that Christmas is over I can share two of the gifts that I made and was pleased with.

They both went to the same person, the first was a menu board.  I made one for me here, but I wanted this one to be a lot nicer so I had some vinyl made up and I pressed that onto the inside of the glass so when you're wiping you won't need to worry about wiping over the letters.

I think it turned out really cute and the sharpie is fancy, you click the top and the pen comes out, like a ballpoint.  No need to worry about replacing the cap.

The second gift is this hand stamped necklace.

The initials are for her daughter and it turned out so cute with the square disc behind, thanks KD for making it happen.  I love it so much I'm making one for me soon.

Monday, December 27, 2010

Project List

This post is really just for me.  I'm still away from home but I was starting to think about my upcoming project list.  I don't want to forget anything so I'm going to post it here, I can transfer it to my project board when I get home after new year's.
  1. Mandy's Car Seat Re-Cover
  2. Carla's High Chair Re-Cover
  3. Jody's Bassinett Re-Cover
  4. Faux Chenille Blanket
  5. Bouncy Chair Re-Covers
  6. Onesie appliques
For now that's all I can think of but I may add more as they come to me.  I'm excited for all of these projects and wish I could start on them RIGHT NOW.

Thursday, December 23, 2010

4 Things

We've gone away from home this Christmas which means I'm not at home with my craft supplies meaning there has been no crafting and no fun blog posts.  We'll probably be here until New Years so posting will be light.

Michelle posted this cute Christmas list on her blog and I thought I'd post it as some Christmas filler, enjoy.


4 Christmas shows I watch:
1. A Christmas Story (it's even better if I get to watch it with my siblings)
2. White Christmas (although I always end up being surprised how boring it is)
3. Christmas Vacation
4. This year I watched Garfield's Christmas Special for the first time and it was pretty special, perhaps I'll have to add that to the yearly program.

4 Christmas things I am passionate about:
1. Music - in our house we've been listening to Christmas music since October
2. Cornbread on Christmas morning
3. Spending time with family
4. Not getting so caught up in the stress of everything.  I try really hard to be relaxed about things and not fit in too much, we only do the things we want to do.

4 Christmas phrases I say a lot:
1. Merry Christmas!
2. Brad, what do you want for Christmas?  (He's so difficult to buy for)
3. I'm excited for you to open your present (When I finally come up with something to give Brad)
4.What are your plans for Christmas? (the small talk of Christmas season)

4 things I have learned from the past Christmases:
1. Brad is really difficult to buy for
2. I'm a decorating scrooge
3. When making treats for the neighbors deliver them earlier.  This year both neighbors on either side were out of town by the time I was ready to deliver their gifts.
4. Taking a 15 month old to a live nativity that's significantly busier than you expected (meaning you have to wait in line for 40 minutes before you can see a 15 minute performance and you won't really get to see the performance because the over tired and cold 15 month old will start to cry and you'll go back to the car and watch Sesame Street on your iPhone instead) is NOT worth the trip and will not leave you feeling anything but angry and frozen.  This was the lesson learned tonight that I will carry with me for some time.

4 places I'd like to go for Christmas
1. I'd love to spend Christmas with my entire family, it's been at least 15 years since we've all been together.
2. I'd love to go to Hawaii.  Out of all the places I've vacationed that was my favorite so I'd love to spend Christmas there with my family.
3. Next year I'd like to be right were I am this year only in our own house, not guests at my in-laws.
4. One year we went to Disneyland for Christmas.  We camped and woke up Christmas morning in our tent, opened stockings and then went and rode rides all day.  That was a fun day that I wouldn't mind doing again.

4 Christmas things I did yesterday:
1. Went Christmas Caroling with family
2. Helped eat a massive Toblerone bar
3. Packed up to be gone for 10 days
4. Delivered treats to the one neighbor that hadn't gone out of town yet

4 Christmas things I am looking forward to:
1. Being able to enjoy Brad's gift with him
2. Christmas dinner with all the Hudson's
3. Giving Renee and Rhiannon their awesome gifts
4. Helping Catie unwrap her gifts

4 things on my Christmas wish list:
1. A tart pan.  It's been on my wish list for the last couple of years, maybe this is the year.
2. New tweezers for my serger (the ones I have are real crummy)
3. A palm sander (I happen to know this one is under the tree and I'm so excited to own my very own)
4. An olive oil dispenser for my dish soap.  I love the way they look and have been so tempted to go buy one but since it was on a wish list I had to hold off.  If Santa doesn't bring one I'll go buy one.

Merry Christmas everyone, I hope your day is lovely and filled with family.

Friday, December 17, 2010

Ties

I went to a baby shower a while ago for the cutest little boy.  I brought these ties and onesie for him so he can be a stylish boy on Sunday's.

They're an easy gift but so adorable.

Thursday, December 16, 2010

Chaps

That's right, I said chaps.  This project was certainly a different one for me, I've never worked with leather.

My brother is making these chaps, and you should be amazed to know that every stitch in the picture below was sewn by hand.

My part in this project was actually really small, he wanted a fringe sewn onto each leg but he either lacks the sewing machine or a strong enough machine to handle the job (I'm not sure which) so he handed them to me.  I felt confidant that if my sewing machine can handle car seats and strollers it could handle chaps.  I picked up a leather needle and some heavy duty thread and sewed them on.  It wasn't quite as smooth as that and I learned that sewing with leather is no fun but the job got done and the difference is amazing, they look so good now.
The chaps don't have all the buckles yet, they still need the ones to attach around the leg but I did my best to show you what they'll look like when finished.

Wednesday, December 15, 2010

What Catie Wore Wednesday #15

Turned out I missed showing what Catie wore.  I thought it would just be a relief not to have to take all the photos but I felt like she had these cute outfits that no one else ever got to see.  I've decided to start again though I had a hard time getting back into the swing of things and so I missed a bunch of days, especially towards the end of the week.  I'll get better.

Also, it was really cold and snowy so we didn't go outside most days, that means she's shoe less in almost every picture.

Wednesday
Brown Shirt - Anabanana (it has a cute pink tank that goes over top but it doesn't fit yet)
Jeans - Old Navy

Thursday

Shirt and Pants - Children's Place

Friday
Lone sleeve white onesie - Carters
Grey Sweater - H&M
Skinny Jeans - Children's Place
Yeti Boots - Old Navy

I'm pretty sure these are the cutest boots I've ever seen so here's a close up

She LOVES them.  She carries them over to me on the couch and wants me to put them on her.

Saturday
Blue Shirt with Cherry applique - Superstore
Jeans - Old Navy


Linking up to

the pleated poppy blog

Tuesday, December 14, 2010

Catie's Christmas Dress

I don't know where this Christmas dress tradition came from but I'm not one to go out an buy Catie a fancy dress that she can only wear once or twice.  Lucky for Catie she has an Aunt who works at an awesome second hand store and found this dress for her.

It fits her really well and has cute silver threads that run through the dress, it also has a little crinoline underneath to give it some shape.  The ribbon though I just couldn't get on board with.

It's that fuzzy, velvet ribbon and I thought it made the dress look like it came from Walmart (it does come from Walmart), so I did what I do best and pulled out the seam ripper.

Using some raw silk I created a new sash that has tails hanging down the back.  I think it's a huge improvement and look so sweet now, not over the top Christmas either (which is what I was going for).

and the back


Here she is modelling.

I'm pretty sure her shoes won't fit by Christmas.

This back shot was ridiculously difficult to get.  Normally when taking pictures of Catie all I get is her back but today she would not co-operate, I finally got this crummy shot.

Monday, December 13, 2010

Belgian Waffles - SAMM

Before I get to this yummy recipe you have to read through two stories.

I have this cool cast iron Belgian Waffle iron that my Mom gave me, I traded it to her for my electric iron (Belgian waffles have much deeper holes).  You set it on the stove, when one side is cooked you flip it over and cook the other. (Please don't judge the sorry state of my filthy stove)

I like the waffle iron so occasionally I make waffles but every time I've been disappointed and wondered if I should have kept my crappy electric one.  My waffles have come out dense and really not good.  It was probably the recipe but when I thought of making waffles I'd end up making pancakes instead.

Story two... I went to London once and it was awesome.  I shopped and saw Broadway shows and ate some really delicious food and while I was there it was the coldest winter in 10 years (or something like that).  One of my favorite memories is of walking down a cold street on our way to shop and finding a Belgian waffle vendor.  I bought a waffle and it was so warm and crisp and sweet and awesome that it's stuck with me 6 years later.

I've always had it in the back of my mind that I should make real Belgian waffles (they have yeast in them and have to rise) but I finally got around to it and now I'm kicking myself for not trying it sooner.  True, they have yeast so you have to let them rise for at least an hour but they bake up sweet, crisp and taste slightly like scones, they are delicious.  I've made them a couple times and we eat them for dinner since I'm not prepared enough to make them for breakfast, you could make the batter the night before though.

While we were eating these I asked Brad why he would want these instead of regular waffles and while he couldn't put his finger on it he was adamant that these were better.  They have a slight sourness that comes from the yeast that makes them feel a lot more substantial and delicious.

Belgian Waffles
3 cups warm milk
1 envelope (2 1/4 tsp) active dry yeast
3/4 cup butter, melted and cooled to lukewarm
1/2 cup sugar
3 eggs
2 tsp vanilla
1 1/2 tsp salt
4 cups all-purpose flour

Whisk together yeast and milk and let stand until the yeast is dissolved, about 5 minutes, then stir until smooth.  Whisk in butter, sugar, egg yolks, vanilla and salt.

Add flour in 3 additions, beating with a large spoon until smooth after each addition (I used my Kitchen aid).

Cover tightly with plastic wrap and let rise at room temperature until doubled in volume, 1 to 1 1/2 hours.  Stir to deflate batter.  Beat egg whites until soft peaks form and stir into batter.

Scoop onto waffle iron and cook until golden on each side.

Here's what your batter looks like when it's all ready (or in my case half gone)

And dropped onto my iron.  Belgian waffles are so big that I never fill up the entire iron, it means we don't end up with perfectly square waffles but I don't care.

And here's a waffle, cooked and ready to be eaten

Now it's bathed in syrup.

Ideally I think you'd eat this with whipped cream and strawberries but I have a crazy husband, it doesn't matter how many topping options you give him he'd still choose just plain syrup.  It never seems worth the effort to whip the cream for just me.

My Dad tried these in their regular waffle iron so even if you don't have a deeper holed Belgian iron you can still enjoy these


Linking to Share a Meal Monday

Wednesday, December 8, 2010

Little Girl's Apron - For Emily

After my friend Melissa saw Catie's cute apron she asked me to make one for her little Emily which I was more than happy to do.  Her's turned out so cute and I hope she's happy with it.


I also had a couple people interested in making an adult sized apron so I finally managed to track down some measurements, they're listed below.  If you're looking for a tutorial you can find it here, it's for a child's apron but the adult will be the same except for sizing.

Cut List
Front - 23" sq
Back - 25 1/4" Sq
Bottom Trim - 2 1/2" x 26" - cut two (back fabric)
Neck Strap - 3" x 23-25" (back fabric)
Waist Ties - 3" x the width of your fabric - cut two
Pocket template - cut two (one the front fabric, one the back)


Monday, December 6, 2010

Art Bucket Tutorial - Light

As promised it's Tuesday so time for the second half of my gift that I'm so excited about.  I didn't get a comment from the person this is going to so I'm going to assume I'm not spoiling anything.  The first part of this gift is the art smock that you can read about here, that part of the gift will be included in the awesome art bucket that I've made.

This bucket will hold all of the cute girl's art supplies so when it's time to craft you can just pull out the bucket and she's good to go.  There are pockets all around and most of them are empty just waiting to be filled.  I got the idea here at a blog called Kotori.  She used a bucket tool belt but I wanted mine to be a little cuter and the belt was a little more than I was willing to spend.

One quick side note... I called this a light tutorial because I had a very sad thing happen while crafting this project, I filled up my Picasa storage space.  For those of you unfamiliar, Picasa is the site that automatically stores all of your blogger pictures.  Once your space is gone you can no longer add photos to your blog posts and you need to buy more space.  I've been really un-happy about my free hobby suddenly costing $5 a year (I know, it's only $5).  I was a little poutty about it so I just didn't take photos during my creation of the bucket, sorry.  I have now come to terms with the necessary $5 (unless you have an awesome suggestion for me) so the many photos can continue on future posts.  On to the tutorial...

Here's my bucket, naked and ready to be re-used.

I used a plain canvas type fabric for my cover and I started by tracing around the bottom of my bucket and then adding some seam allowance.  I also cut a rectangle that was wide enough to fit around the widest part of my bucket.  I made sure it was long enough to extend from the bottom of the bucket up to the top, over and down to the bottom again.

I sewed up the sides of my rectangle and slipped it inside my bucket to see how it fit.  I wanted the cover to fit nice and snug so I checked the fit a lot.  I thought a rectangle would work well because my bucket seemed really straight up and down, I was surprised just how much I ended up needed to cut off my original rectangle though, the slant was subtle but definitely there.  I placed the fabric in my bucket and then pinned the excess fabric so I could move my seam in where necessary.  I did this a bunch of times until my cover finally fit how I wanted and then I cut the excess fabric off the width leaving my length the same.

I would do one thing differently next time, the circle is going to fit the inside of the bucket which is smaller than the outside of the bucket which meant my circle was too big and I had to trim it, next time I would trace the outside and not add any seam allowance.  That extra size on the outside will become the seam allowance and the circle will fit the bottom.

I next pinned my circle onto my tube of fabric and sewed it together (a photo!)

At this point it looked like this.
I wanted the cover to stay snug on the bucket so I made a casing at the bottom and inserted some wide elastic.  I pulled the elastic as I went so everything is cinched into place.  You can see in the picture above the little hole where my handle goes (I removed it before I started), I marked that hole and then made a button hole.  I did the same on the other side so my handle could slip back into place (but I didn't put the handle on until my pockets were finished).

From this point I made my paintbrush pockets on the inside of the bucket (such a pain but it's like making a crayon roll), I then put pockets on the outside.  I made my pockets poof out a bit by not sewing them flat, I would pin one side and then lay the pocket flat but before pinning I'd move the second side an inch or two closer to the pinned side.  I'd make a little pleat on the bottom to give it the space to put stuff inside.  I did that all the way around the bucket making as many pockets as I had room.

Here's what I filled the pockets with (this little girl LOVES Dora)

I also plan on making some homemade play dough but I can't do that until closer to Christmas.  The art smock will slip in the bucket as well.  I've left plenty of room for supplies she already owns.

Here are some more pictures of the completed bucket (I added a few things to make it look more full).

I think the paint brush pockets are my favorite part and I just hope this Mommy and little girl enjoy it.


I'm going to link up to these fun parties and this one
Visit thecsiproject.com.