Showing posts with label Sewing. Show all posts

Monday, April 13, 2015

Laundry Hamper Update

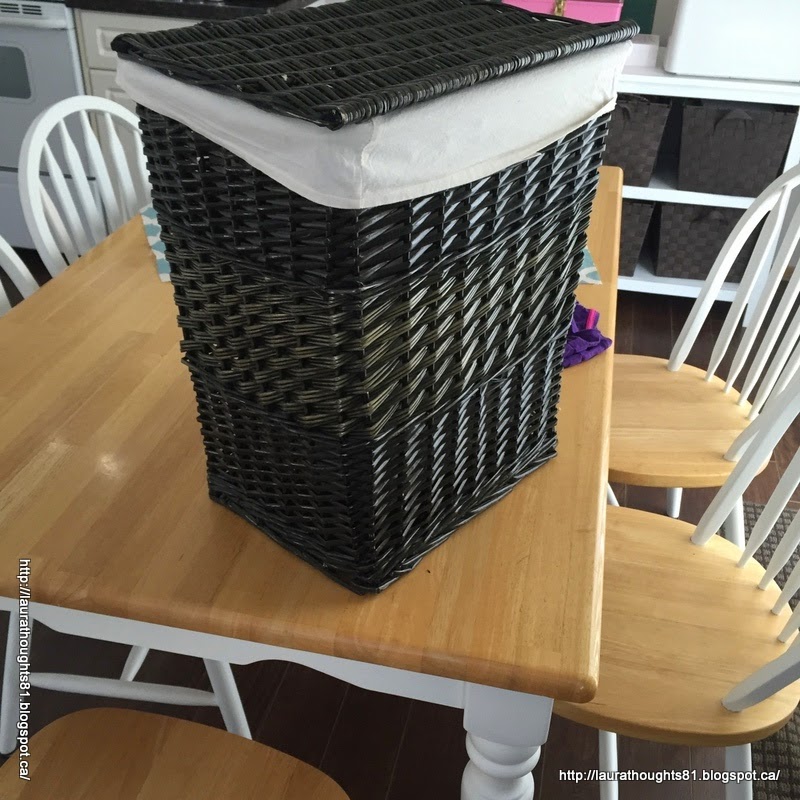
Here's a super simple update that has made me so happy! Catie has a laundry basket in her room that we've had forever. It's cute and wicker and has a lining inside but one day I washed it and dried it, not realizing that was a bad idea and the liner shrunk. I can make it fit if I try really hard but after you put one sock in it looks like this. Irritating.

Here's it's super stretched to make it fit like it's supposed to.

One day I was feeling especially motivated and my sewing machine was already out so I pulled out some scrap fabric and added a really thick band to the top, so now the shrunk fabric can sink in like it wants to and the new band hold it all in place.

A simple fix that I'm happy about every time I add laundry. Sadly, Catie doesn't share my sentiment. I showed her the finished product and she said, "I liked it better before". You can't win them all.

Wednesday, March 11, 2015

Barbie Tent

Guys, I'm having major flashbacks to my childhood. Look what I just made. Did you have one of these because I sure did. I'm pretty sure you could find them at every craft fair.

And what's a tent without a sleeping bag?

It has the mesh window in the bag and the door and window roll up and secure with elastic loops, just like you remember.

I was really surprised that I couldn't find a free pattern and I was too cheap to buy one so I made this without a pattern, it turned out surprisingly well though. I did think Catie wasn't nearly as grateful as she should have been though so we'll see how much use it gets.

It even folds down flat, just like yours did.


I think these are next on my list to make, because how cute are they and let's be honest, there's no way Barbie is sleeping on the floor.


I originally wanted to make this version because I thought it was super cute. But I was also aiming for free and I didn't have anything I could use for poles and I did have wood dowelling. But this one is ridiculously cute and there's a tutorial.


Pin It

Wednesday, March 4, 2015

Deer Silhouette Pillow

I had a Women's Christmas party to go to and needed a gift under $10 (yeah, this was a while ago). I finally settled on a pillow. It's one I really want for myself but since I already have deer silhouette coasters I figured enough was enough so I might as well make one for someone else.

I really didn't take a finished photo, I forgot but I did take this one. The pillow is black fabric with a plaid deer and a sparkly bow. Super cute and I was sad to give it away.

Pin It

Monday, March 2, 2015

Quatrefoil Couch Upholstery

Alright, I finished this couch quite some time ago and have put off blogging about it for long enough. I'm super happy with how it turned out, writing about it is just such a long process and I'm always worried that I add in details that no one but me care about. So heads up, this will be a long story with lots of pictures.

 This couch started with a completely different couch. A friend of mine found a couch, with a matching chair that looked a lot like this. We were both in love with the potential and though completely out of my experience we were convinced we could do it. So we borrowed a truck and made an appointment to pick it up and then we got there and we were stood up. The person apologized and wanted us to come back but by then I'd lost all momentum. I'd also started to look into how much covered buttons would cost (between the two pieces there were hundreds of them!) and it was going to be a lot. I was also pretty concerned with what we would find under the fabric since they're so old. In the end, and I'm sure it was for the best, we passed on the furniture.

I felt bad though and wanted a couch for my friend so when I came across this one, also for free and I knew I'd found a winner.


I am aware that it's super ugly. But here's what I imagined the finished piece looking sort of like.
This one obviously isn't my photo. I should credit the original site but I can't remember where I found it. We decided to not use piping so mine doesn't look quite as crisp as this one but no piping was the way to go. Just a little bit better hey?


So one more time, here's the original couch, sad and droopy.

And how I transformed it.

Now let's get down to details, starting with fabric. I like to order from Fabric.com. They have such and incredible selection at prices no where close to what I can find in Canada. Shipping to me is really expensive but I ship it to the states and have family pick it up for me. It takes longer to get to me but saves me at least $50. So we spent a lot of time on fabric choice, finally picked one and here's what it looked like. Cute hey?
I was horrified. I had messed up. The fabric was gorgeous but wasn't upholstery weight at all. It wasn't wide, it was just a basic cotton and could not be used for upholstery. So here's my final plug for Fabric.com, they have a 30 money back guarantee. You send it back (at no extra cost) and they'll refund it. So I was much more careful and my friend and I ordered a similar fabric that I think was a much classier choice.

Once the proper fabric came it was time to make some box cushions. I like to make them first so when I'm done upholstering the couch I am actually finished, not just starting on cushions. I knew I hated the look of the four cushions on the back of the couch and my Mom happened to have some foam I could replace them with so I created a cardboard template and used that to cut two new cushions. Then I wrapped new batting around the old cushions, it made them seem brand new.

So I made the best box cushions I've ever made, lined up the pattern, they were perfect the very first time (I should have known it was too good to be true).

The main challenge with this couch was the importance of lining up the fabric so each piece continues onto the next. Here's the bottom cushions, the first ones I sewed and I about fell over when I saw how great they turned out.

Look at those sleek zippers and how the patterns continues from one panel to the other.

And then the back cushions. Everything was moving along so smoothly and dreamy.

Brad and I hauled the couch inside  but I wasn't willing to put these beautiful cushions on a disgusting couch so I threw some sheets over the base and tried them out. I didn't take a pictures with both of them on the couch so you'll have to use your imagination.

They were perhaps a little tall but perfect otherwise, or so I thought until I sat on them. That new foam was so hard! The couch wasn't going to be comfortable at all. I really couldn't leave it like that so I took the old cushions and glued them together to make two large cushions instead of four small. Then I wrapped them with batting and they were a pretty good fit. So I took apart my first covers, cut new ones, sewed them, put them on and somehow they were way too small. I had super compressed them and now they were too small for the couch. I took them apart again, cut and sewed new covers again and sighed, because this time they fit. They're perhaps a hair too big but I was too afraid to make them smaller.

Luckily this couch needs lots of strips of fabric and I was able to use almost all of those scraps so I didn't end up wasting as much as I initially thought (make sure you notice the pattern matching on those back cushions :).

Finally done with the cushions it was time for the base. Staples were removed and I stripped it down.

Not surprisingly it was disgusting and I ended up throwing away all the old padding. I posted this pictures on Facebook and I loved my friend Jane's comment, "Every time I think you've bit off more than you can chew... Can't wait to see the reveal!" I got a good chuckle out of that.

This couch was interesting though. The nasty fabric on the bottom couldn't easily be removed, it was hooked to the springs and I was not messing around with that so I vacuumed it really well and I left it where it was. I hand stitched the foam to the fabric to keep it in place, then I stretched nice new fabric over top.

Also, this couch is extra long so the foam I used wasn't long enough so I also hand stitched that together. You can see the seam on the left there on the back and the front but the two sides came together surprising seamless, I also stapled it at the bottom to hold it all in place.

I didn't want the foam on the arms to look puckery so that also got some quick stitching.
And at this point it was a couch I'd actually let my daughter sit on .

I added a layer of batting to the arms to make them extra puffy and then the pieces went on one by one until it was all done (the buttons were finished a little later).


My favourite is the contrasting piping and that piece on the front and how well the pattern matches, this picture is my favourite.

The original couch had ugly gold wheels for legs and they got swapped out for these simple wood ones.
How about a side by side before and after.

And some with the cute buttons after it was moved to it's new home. 


There is a matching chair for this couch so I had planned to cover that in the same fabric but instead we've decided to toss the chair and add two wing back chairs in a co-ordinating fabric to complete the set so you can look forward to those in the future.

Pin It

Monday, October 27, 2014

Halloween Bunny

So Halloween is coming and every year I dread making costumes. But then I start and realize that Halloween costumes are hilarious. They're easy to make because they don't have to last and you can skip steps.

That being said, Catie wanted to be Sofia the First this year and it would involve a big sparkly ball gown, that I could buy at the store for $40. I can't make the dress for less than that so we bought her costume this year.

That just leaves Eden.  My sister made the cutest My Little Pony costume for her daughter using a great tutorial on Sugar Tart Craft but Eden's a little young for My Little Pony.

My only goal for her costume was for her to put it on and think it was cute so I needed something recognizable. I also think toddlers with painted whiskers are super cute. I decided to go with a bunny, using the same tutorial but altering it. It was surprisingly easy, came together quick and it turned out great.

Eden thinks it's very cute and I can't stop chuckling about that big bunny tail.

She was hopping like a bunny here


She thinks her tail is funny too

Pin It

Wednesday, October 15, 2014

Love Seat Reupholstery


So I moved into this new house and it has a bonus room upstairs and room for a sitting area off the kitchen.  I only have one set of couches though so I thought I'd do a quick search on Kijiji and see if I came up with any little love seat's for a good price.  This beauty was waiting for me, two of them in fact, and even more amazing, they were free. I had only planned on taking one but Mom convinced me to get both, one for her, one for me and we'd re-cover them together. I've never re-covered a couch but I've felt like all my projects have been leading me in this direction and it was inevitable. It killed me to have it sit in the garage for a month until I had fabric/time/moved into the house.


I called a friend and she so willingly offered her husband and his truck to go pick it up with Brad and I was set.  It was only used in an office, meaning it was in great condition though the padding on the arms was pretty weak but I loved the shape of it, now to decide on fabric.  I knew I wanted to go with something dramatic, I wanted a statement piece, something showy and not even a little bit safe and I'm also in love with emerald green right now.  With that in mind I searched and came up with Bankura Emerald, it was love at first sight :)

I suppose I should prepare you now for a ton of photos that are to follow and probably more detail than you wanted.

First lets see how the couch fit in the space.

Despite being super ugly it really is the perfect size and if you have a little vision you can see how that mess above will turn into something awesome.  So notice those couch legs?  (the crooked one is only crooked because it had to be removed in order to fit in the house) Apparently it wasn't tall enough so they added some painted 4x4's as legs, awful and they were first to go.  I found some curvy legs to replace them and then the staple removing started.  Two days of it to be exact, that is a serious job that I don't wish on anyone.  My hands were sore by the time we were done and I think there were about 1000 of them, but we finally got it to look like this.

The foam on the arms was disgusting though and disintegrated if you looked at it leaving an orange, crumbly mess everywhere so we bought a eggshell mattress pad and used that to cover up that ugly grossness. Eden's favourite activity was to hit the arm and watch the foam fall. The back wasn't too bad so we left it as is though we did cover it with a layer of batting later. The seat got some new batting too so it looked like this. Better already.

From there the real fun started though.  The seat was first and then the arms and they were super satisfying. The green piping really makes them pop.

It's coming together.

And here's my Mom, she was the main stapler while I was the sewer and cutter and everything else-er. So Mom keeps getting mad at me because I only ever post pictures of her in her work clothes, I promise she owns other clothes :)

The back was the most satisfying though, it starts out looking like this, a hot mess hey?

Then you add some burlap

Some batting and fabric until you get this really professional looking finished piece, though I didn't have quite enough fabric and if you look close my back is in multiple pieces. Not as noticeable as you would think though.

And here it is, all finished with the new legs.

My favourite part is how the pattern on the back looks like one piece and it continues up from the seat, that was definitely not an accident.

 I love the puffy back.

And how about a side by side comparison.

It looks so much better in the space but you'll have to wait to see that until tomorrow, I have a couple accessories to show you first.

Moral of this story, if you think you can re-cover a couch you are right. Now my couch was easier than some because it doesn't have removable cushions but that still would have been very doable.

Here are my inexperienced tips if you decide you want to try this.

  1. Use the right tools.  Mom has one of these staple remover that was worth it's weight in gold, I was wishing I had one too, her hand was far less sore than mine, I just used a screwdriver and pliers.
  2. Don't even attempt this without a pneumatic stapler (one that hooks up to a compressor). You'll hate the process if you have to pound in every one with a hammer after.  Ours worked like a dream.  
  3. Give yourself lots of time, this took almost 4 complete days.
  4. Don't take shortcuts.  You'll spend a lot of money on fabric and probably some on a couch too, it's not worth a shortcut if the end result is compromised. Working with someone else really helped with that, we kept each other from doing things improperly and we would also remember steps that the other person forgot.
One last point, I mentioned above that we re-covered a couch for my Mom too but we didn't have enough time to finish hers before she had to go home so you'll have to wait a bit to see hers, it's awesome too though in a completely different fabric.
Pin It