Tuesday, November 30, 2010

Pins & Needles Giveaway Winner

Time to pick a winner for my Giveaway.

Like usual I used Random.org to find a number and it was
The 12th comment just happened to be from my sister Jenn!  I'm so happy you won Jenn, I may just send this down with Mom when she comes for Christmas, we'll see if I make it to the post office before then.

I think this will be my last giveaway for a while, my project list has grown to unmanageable levels so I need to  get some work done.  Perhaps I'll have another giveaway after Christmas.

Monday, November 29, 2010

Cajun Chicken Pasta - SAMM

I know I'm supposed to announce my giveaway winner today but I've been recovering from our very full weekend so that will have to wait until tomorrow.  I didn't participate in SAMM last week though so I wanted to make sure I linked up a recipe.

Brad made this meal for me on our first Valentine's Day together and it was so delicious it's stuck around.  We've made it for family and after tasting it they've all added it to their favorite meals as well.  It's also one of those recipes that I read and I'm uninspired thinking it's going to be an average meal but it surprised every time that it's so delicious, I always think it's something you would eat at the Olive Garden.  It's yummy with some good bread too.

Cajun Chicken Pasta
4 oz linguine pasta (I use spaghettini)
2 skinless, boneless chicken breast halves
2 tsp Cajun seasoning
2 tbsp butter
1 red bell pepper, sliced
1 green bell pepper, sliced
4 fresh mushrooms, sliced (I always skip them because I hate mushrooms)
1 green onion, chopped (I usually skip these too because I don't have them and I don't notice a difference)
1 cup heavy cream
1/4 tsp dried basil
1/4 tsp lemon pepper
1/4 tsp salt
2 cloves garlic
1/8 tsp ground black pepper
1/4 cup grated Parmesan cheese (the good stuff, not that horrible Kraft stuff)

Bring a large pot of lightly salted water to a boil. Add pasta and cook for 8 to 10 minutes or until al dente; drain. Place the chicken and the Cajun seasoning in a plastic bag and shake to coat  (I never do the bag thing, I season one side and then place my chicken in the pan season side down, and season the other side.  Just be generous with the Cajun seasoning and it'll be yummy).  In a large skillet over medium heat, sauté
the chicken in butter or margarine until almost tender (5 to 7 minutes).  Add the red bell pepper, green bell pepper, mushrooms and green onion. Sauté and stir for 2 to 3 minutes.  Reduce heat.

Add the cream, basil, lemon pepper, salt, garlic powder (put real garlic in with the green peppers and skip the powder) and ground black pepper.  Heat through.  Add the cooked linguine, toss and heat through. Sprinkle with grated Parmesan cheese and serve.

Linking to Share a Meal Monday

Wednesday, November 24, 2010

Advent Calendar - Week #3

Time for my Advent Calendar update.  If you're new to the blog then I'm doing a sew along with Jill and we're all making this super cute advent calendar by Inchmark Journal.  Each week Jill gives us a new assignment and so far we're on week 3.  The first week we cut out and embroidered all of our numbers and sewed them onto the backing piece.   Week two we cut and sewed the tree on and made 8 ornaments.  At least we were supposed to, I thought the assignment was only 5 so at the last minute I managed to come up with two more but was still one behind this week.  Our week three assignment was to sew on our buttons and make 8 more ornaments, or in my case 9.

Here's mine looks like after week three.

See all those loops sticking out of the pockets?  those are finished ornaments, 17 of them to be exact.  So not only did I catch up my one last week but I made an extra one this week.

Here are the two I made to catch up last week but didn't post about.  They were both easy just to get me almost caught up.


And here are my 10 new ornaments.

I think Santa's my favorite.

An up close of the partially decorated tree.

Come back next week to see my progress.

Tuesday, November 23, 2010

Spirit of Christmas Popcorn - SAMM

Brad and I have a thing for popcorn, you might call it an addiction really.  We love it and eat it almost nightly.  We use a Stir Crazy oil popper and butter/salt flavouring to get popcorn that is just about better than theater popcorn.  We don't usually make any sort of candy popcorn because we love buttered so much but for this recipe I made an exception.  It's gingerbread flavoured popcorn which sounds odd but is just so yummy.  It was the perfect thing to bake today while it's super cold outside.  The popcorn bakes so it's crispy and sweet and delicious.  It's easy so you should make some too, it would make a great gift for neighbors or friends.

Spirit of Christmas Popcorn
16 cups popped popcorn
2 cups packed golden brown sugar
1 cup butter
1/2 cup fancy molasses (I used cooking molasses because it's what I had, it was delicious)
1/2 cup white corn syrup
1 tbsp ground ginger
1 tsp cinnamon
1/2 tsp salt
1/2 tsp baking soda

Line a large roasting pan with non stick foil.  Place popcorn in prepared pan.  Combine next 7 ingredients (brown sugar through salt) in a heavy Dutch oven.  Bring to boil over medium heat, stirring frequently.  Boil, without stirring, for 5 minutes.  Remove pan from heat and immediately stir in baking soda.  Mixture will foam vigorously.  Immediately pour foaming mixture over popcorn and stir to combine.  Bake at 205"F, stirring every 20 minutes, for 1 hour or until popcorn is glazed and crisp.  Cool in pan on a rack.  Store in an air tright container in a cool dry place for up to 1 week or freeze for up to 6 weeks.

Note: 1/2 cup unpopped popcorn = 10 cups popped popcorn

I realize this isn't a Meal, nor is it Monday but I'm going to link this to Share a Meal Monday anyway.

Monday, November 22, 2010

Pins and Needles Giveaway

Like I mentioned earlier I love giveaways.  It's so much fun to make something and have other people want it.  I enjoyed the last one so much that I have another.

There are two parts to this giveaway and they are two of my favorite sewing items, and with both I didn't know just how much I'd like them.

First there is Ned.  He's such a cute little pin cushion and a great way to show off the pink pins that my husband Brad gave me for Mother's Day.  I made him for myself back in May and every time I use him it makes me smile a little.  I made a new one for the giveaway and I've made a couple improvements to the design, he's now a Weeble.  He wobbles but doesn't fall down, he always lands on his belly so your pins stay upright and handy.  I found a free printable pattern for him here that you can check out if you just want to make your own (he's super easy to make).  Sadly this Ned will not come with the pretty pink quills, you'll have to pick those up yourself but you can get them at Michaels.


The second part of this giveaway is a needle book.  I found the tutorial on Little Birdie Secrets.  This project was initially just something to keep me busy one night, I didn't know just how useful it is.  There are lots of projects that need some needle work, whether it's closing up a final seam on Ned or hand stitching my advent calendar.  It's so convenient to never have to hunt for a needle, you just grab your book and your set.  I went through a phase where I made necklaces and sometimes the beads would require a smaller needle, I didn't have to search I could just open the book and find a smaller one.

When my Mom saw my book she wanted one too so I made her one and she's commented as well on just how handy they are.

The book is made of felt and the closed with a vintage button (from my Grandma's stash)

Inside the book there are four felt pages for you to slip your needles inside.  The book won't include the needles, you'll need to provide your own.


So there you have it, a fun, two part giveaway.


All you need to do to enter is become a follower and comment letting me know.  If you already follow then leave a comment telling me your interested in the giveaway.

You can also have a second entry if you blog or Facebook about the giveaway.  Make sure you leave a second comment to tell me.

That's it, good luck!  I'll pick a winner in a week.

Passport Cover Giveaway Winners!

This is now my second real giveaway (the call for projects doesn't really count).  I've discovered that I love giveaways, I love them so much that if you come back later today you just might find another one. It's a fun one that would be great to add to your sewing room or as a stocking stuffer for someone else, but we'll save that for another post.

This post is all about picking the two winners of the Passport cover, and I couldn't be happier about the random numbers that were chosen for me, both winners sound like they'll use the cover a lot.

The first winner is Cara
She said, "I would LOVE to win this! I've been looking for something exactly like this, with no success (until now)! I'm leaving to go to China in a few months to adopt my daughter and this passport cover would come in oh so handy! Love your blog!!!

Congrats on your new daughter Cara, glad I could help make the trip stylish.

Second we have the Goss Family.  When she commented I really wanted her to win and I'm so excited that she did.  She said, "Living overseas due to the military, we are required to carry our passports with us just in case we are ever stopped. This would be a much cuter way to carry it then what I've been using =)"

I'm so thrilled to have such deserving winners.

Ladies, contact me and let me know where I can ship your covers and I'll do my best to get them in the mail, lets be honest the overseas one is going to slowest route possible... sorry but shipping can be pricey.  You can email me at westlaur@gmail.com


So that's it for now but like I mentioned, come back later to see what's coming.

Friday, November 19, 2010

Jersey Scarf

A while ago I came across a scarf online that I thought was really cute and I wanted to re-create, I have looked and looked for the original but I can't find it which turns out doesn't matter because I ended up making a completely different one.  I wanted to make it out of jersey but I was too cheap to actually buy some.  I'd mentioned to Michelle that I wanted to make this scarf but didn't want to buy the fabric and then she had the genius idea to cut up a yellow duvet cover that she was no longer using.  We had both seen this tutorial by Make it and Love it ages ago and Michelle knew she had to have one.  Honestly I thought it was okay but I was more interested in the other I'd found.  That is until Michelle got half done and it looked so darn cute that I abandoned mine to make one of my own.

This was a fun project that should have been easy and quick but three kids makes for a lot of poor productivity.  What should have taken us no time at all took 4 hours and in that time only Michelle finished.  I cut out the strips for us, (all 56 of them) and finished assembling mine at home later once Catie was asleep.

The only change we made to the original was the length, I'm not sure how hers looks so long in the photo because ours were much too short.  We ended up adding 20 extra inches of fabric to the length.  Here are a couple more photos.


I gave it a real test today and wore it out on a Home Depot run, I stayed nice and cozy despite the cold weather.

You should check out Michelle's, it's super cute too.

Thursday, November 18, 2010

Little Girl's Apron Tutorial

I went to a craft day on Saturday and learned how to make these adorable aprons.  There were adult size and child size, I thought the child ones were so cute so that's what I made.


I made a second one that's going to make a great Christmas gift for a cute little girl and I made a tutorial at the same time, here's the second modeled so you can see the finished product.


This next part involves a ton of pictures so if you don't want to make one of these aprons you may want to stop here.

We'll start with a cut list.


Front 14 1/2" sq
Back 17" Sq
Bottom Trim 2"x16" - cut two
Neck Strap 3"x19"
Waist Ties 3"x26" - cut two
Pocket template - cut two


Your pocket should be 6" from the top of the point to the bottom.

You'll start by taking your two waist ties and your neck strap and sewing them along the side, right sides together to make a tube. On the waist ties you'll angle the ends so you get a point.  Turn the three right side out and press them flat.  You'll end up with this.

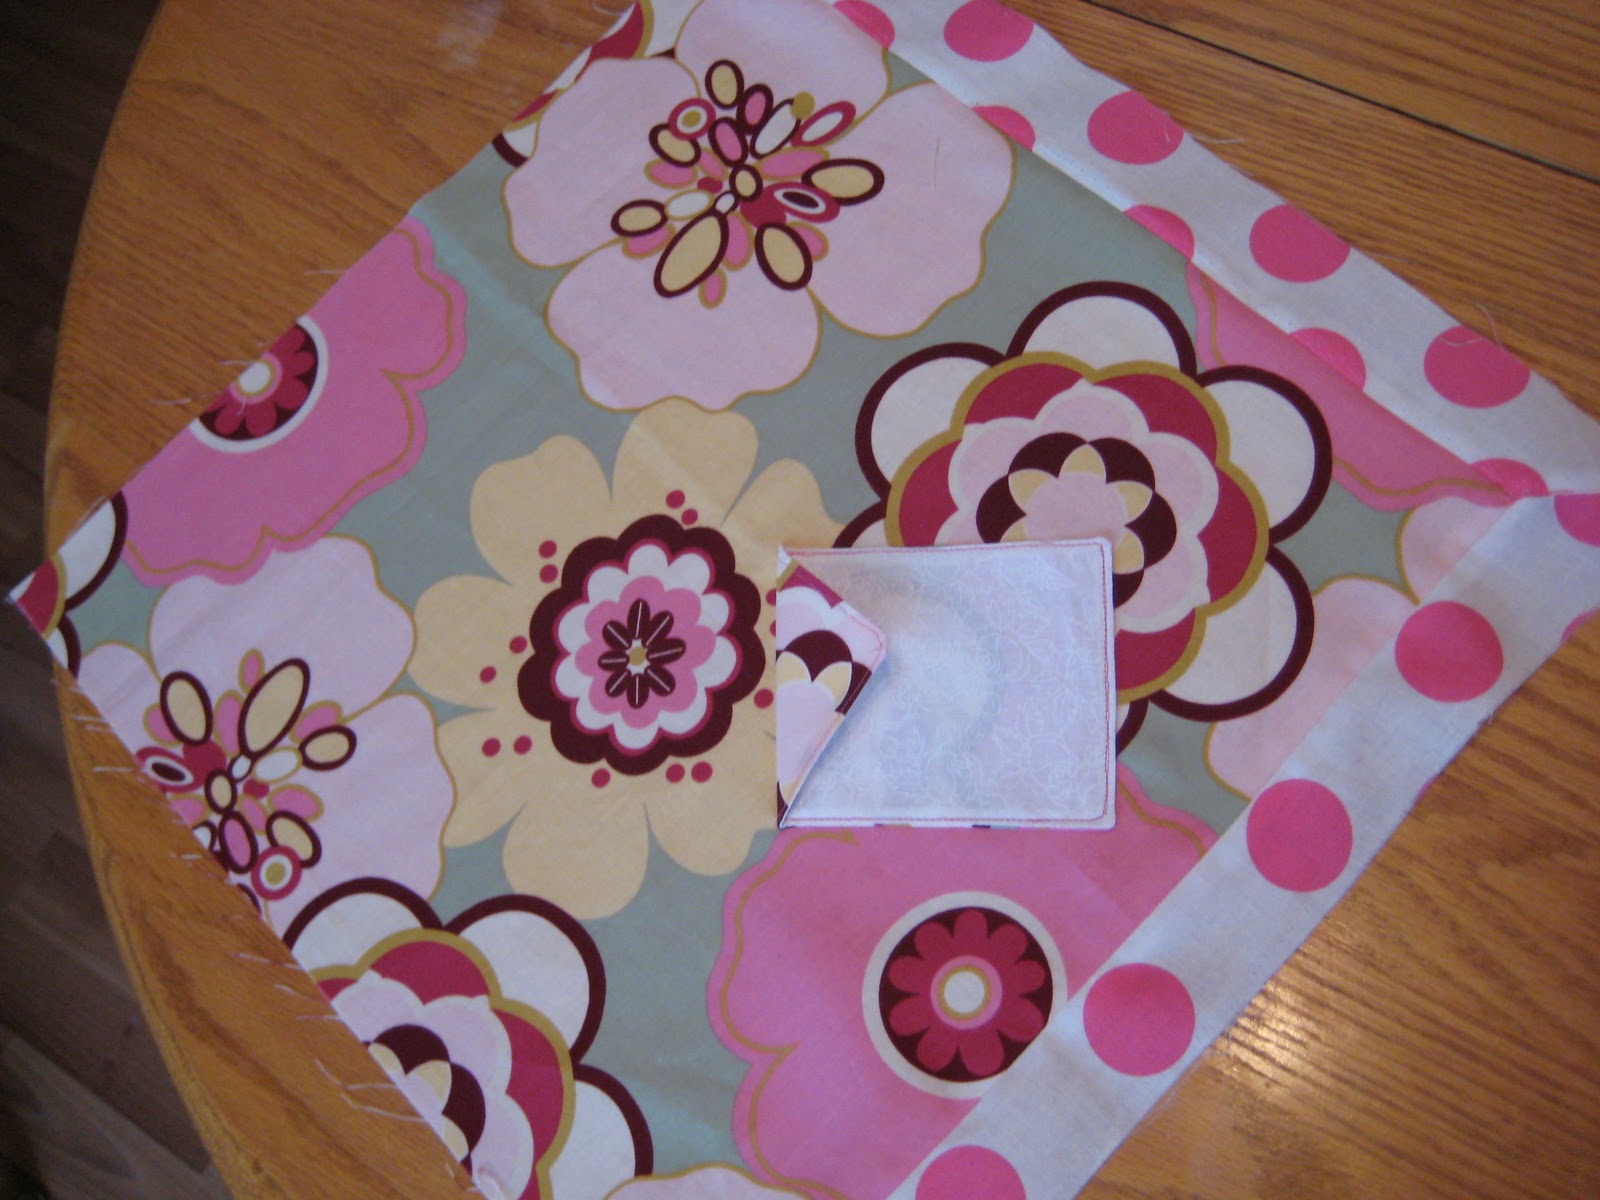
Next we'll work on the pocket.  Now ideally you'd want one side to be the flowered fabric and the other the polka dot but I used a fat quarter and just didn't have enough for the pocket.   The white made a nice stand in though.  I also think the neck strap would have been cute polka dot but I had to make do with what I had.

Take your two pocket pieces and put them right sides together, sew around leaving enough room to turn it the right way.  Trim your corners, turn right side out and press nice and flat.  Topstitch all the way around closing up your open gap.


You can see that after I turned my pocket my point is no longer very straight, I must not have sewn straight enough.  Oddly enough I did this later too giving a cute effect but try to sew nice straight lines.  For now put your pocket aside.

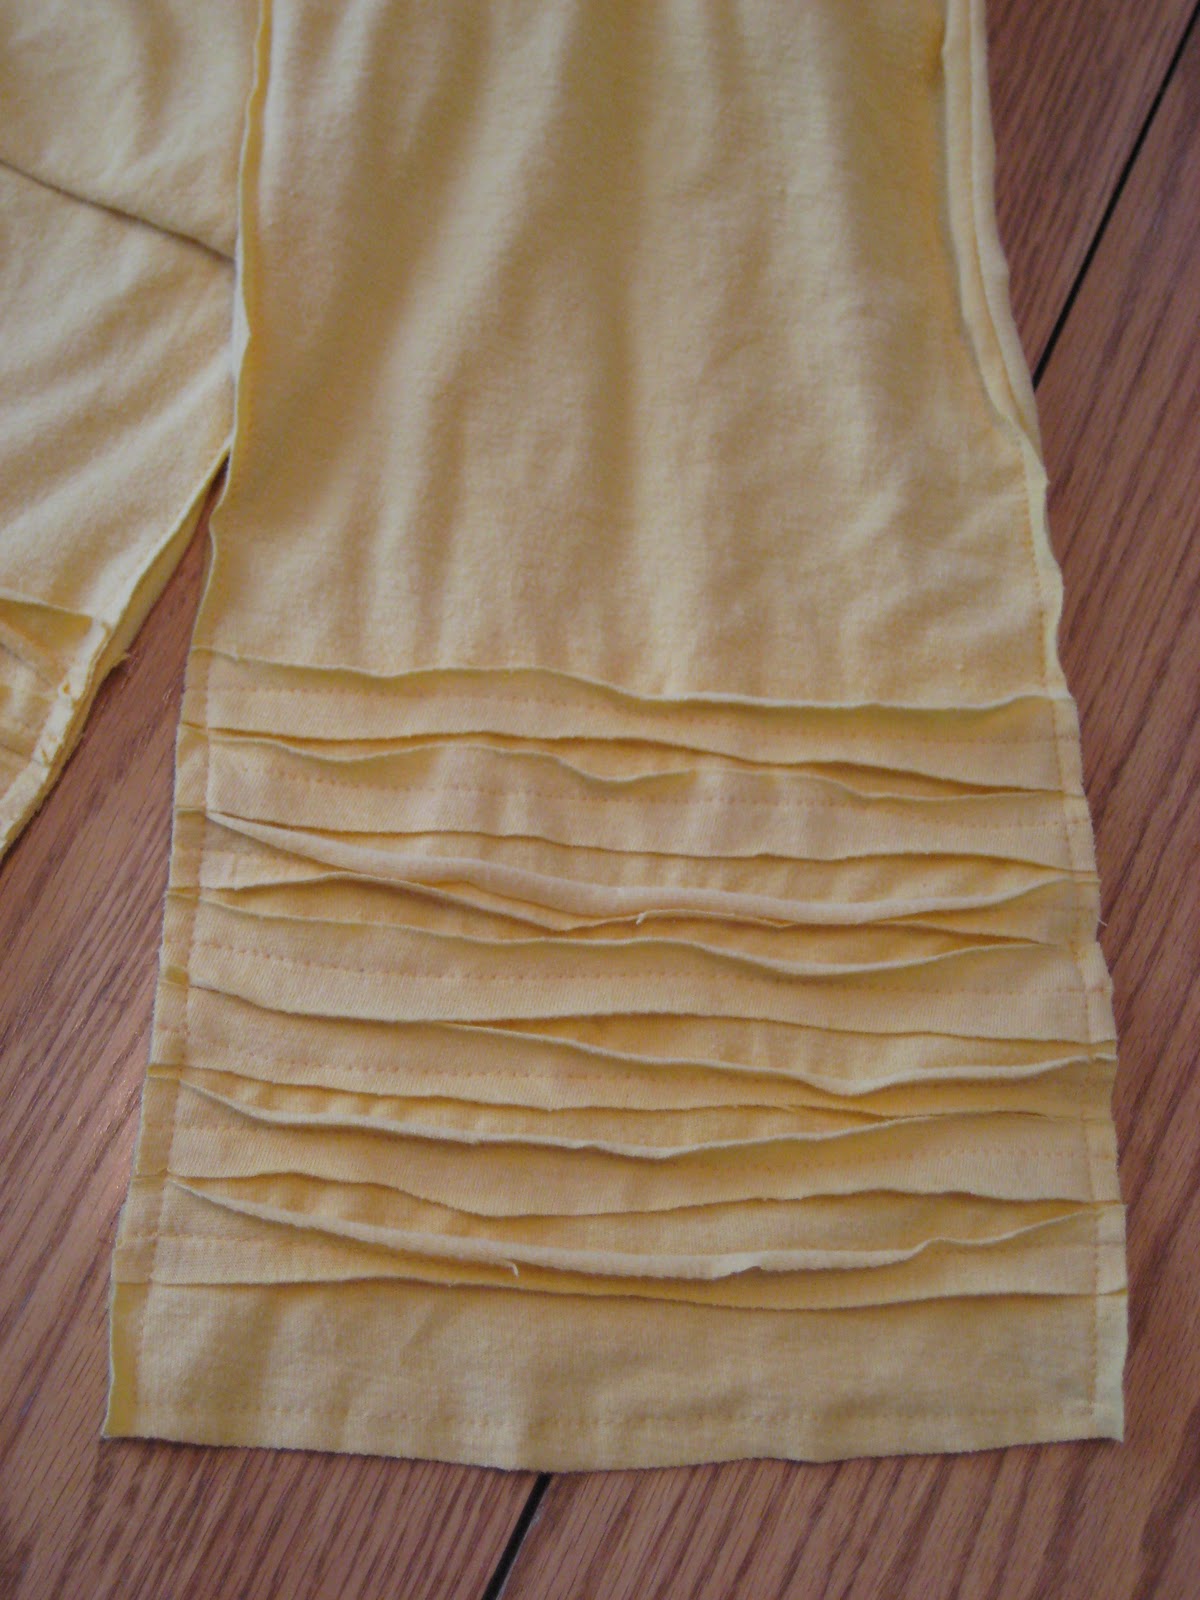
Next we're going to attach our bottom trim.  One quick note, since I had so little fabric my bottom trim is just a little bit more narrow that it should be, still worked great though.

Lay your front piece on the table and with right sides together layer your bottom trim on top lining up your raw edges, like so.  Line up the edges on the right side too, this will give you some over hang on the left but just leave it.  Sew this piece on and then move onto the next side.

Line it up opposite the first strip, like so

See how those two flaps overlap at the bottom?  The right one is sewn already, the left is the one we're working on.  When you get to the bottom you're going to lift up that right hand flap and sew as close as you can to your seam.  I put a pin in so you can see where my seam is going to end.

This is what it looks like with both sides sewn.

Now before these pictures get confusing let me point out that the fabric I'm using for the front of the apron is leftover fabric that I used to cover my ironing board.  See how one fabric is the right side and one is the wrong side?  The right side is the ironing board.

Press your seams open.  On the bottom trim you have a bottom flap and a top flat, fold the top flap out of the way for now.  Twist the bottom flap until you get that nice 45 degree angle like above.  Then fold your top flap back over top and pin in place.   If you flip everything over you can see that you'll end up with a perfect line.

You're going to sew right down that nice line where my thumb is.  Once it's sewn turn it to the back, cut off your excess and then press your seam open.

I swear that was the only complicated part, from here on out it's smooth sailing.

Time to attach the pocket.  Fold your fabric in half like this.

Your pocket goes on about 6 inches from the bottom point.

Place it on, unfold your fabric and sew in place but don't forget that this is a pocket.  Don't sew across it.  Your also only going to sew up to the bottom of the triangle so you can fold the flap over.

Once it's sewn on, fold and press your flap and add a cute button.


Time to add your waist ties.  Place your fabric wrong side up and measure about 4 inches from side point (I only did 3 1/2 since my trim was narrower).  Place your waist ties on and pin in place.  The tie goes on at an angle, if you're looking at your diamond shape of fabric you'd want to line your ties up parallel (sorry, I forgot to take a picture, I made this lovely diagram for you though).


Do the same on both sides sewing into place.

Now it's time to put the back piece on.  I felt quite certain that I would end up sewing a waist tie into this seam so I gathered mine into the center of my fabric and pinned them in place just to keep them out of the way.

With right sides together line up your fabric.  There will be some overlap but you cut it off later.

Pin in place and sew around making sure to leave a section open so you can turn it later.  Before you turn these pieces trim off your excess polka dot fabric and clip your corners.  Turn and press really well and then top stitch all the way around.

Fold the top point down about 3 1/2 inches and stitch in place going over the same seam you used to top stitch.

See how both my folded over points are kind of angled?  I don't know how I managed to angle both of them but since they match I like them.

Now all that's left is the neck ties.

You could just sew both sides nice and secure and I did that on the first apron only to come home and find out the strap was way too big.  I could have just made it smaller but instead I measured the fit on Catie and left one side sewn on and the second side I unpicked.  I put two button holes on the strap a couple of inches apart so that as she gets taller the strap can grow with her.  Don't judge my buttonholes, not sure how they turned out so wonky.


I sewed a button to the inside of the apron to attach the strap too.

Once it's buttoned you can't even tell they're there and it fits really well.

You could also choose to put some buttons right where the neck straps get sewn on, that would look really cute.  I chose not too on either of my aprons because my fabric was so busy.

I hope that seemed easy because it really was.  I made mine during Catie's nap.  These aprons are adorable and even though I have no reason too I want to make more.

Pretty nice bruise on her forehead hey?  Perhaps she should take note of where the wall starts.

Wednesday, November 17, 2010

Passport Cover Giveaway Update

When I posted this giveaway I was honestly concerned that no one would want one, I've been so happy to see all the comments that during Catie's nap yesterday I made a second one.

So on Monday when I give this away I'll choose not just one winner but two.
Good luck!

Advent Calendar - Week #2

I just looked up Jill's site to find a link to remind you all of this sew along advent calendar that I'm making and noticed that my assignment this week was 8 ornaments, not 5 like I thought.  So now I'm 3 short.  I may or may not make three more, we'll see if this post gets updated.

Week two went okay, I felt really behind but managed to complete the assignment with time to spare (or so I thought).

Last week I embroidered all of my numbers and sewed them onto my backing piece.  This week I cut out my tree and sewed it on.

A quick side note... don't you hate how the second time you do a project you end up so much happier with it than you were the first time?  I want this advent calendar to be my second attempt because I'm already doing things I wish I could change.  I wish my tree could be taller but I'm limited by to the size of the rectangle I cut out.  It'll work but there are things I would change if I could.

So I cut out and sewed on my tree.

Then I made 5 ornaments

You'll notice that lots of them are white but that's because I was so busy with the car seat that I started a bit late, meaning I chose easy ornaments.  They happened to mostly be white, I will add some colour though.

Here's a close up of the individual ornaments.


He sure is a sad snow man hey?  Not sure how that happened.

Hopefully next week goes okay even though I plan on tackling the high chair re-cover.