Showing posts with label Paint. Show all posts

Friday, November 14, 2014

Orange to White Dresser

As with the Catie's bedside table this move brought on a need of furniture. Eden hasn't ever had a dresser because we used my in-laws.  My Mom happened to have the perfect dresser in her basement that I've been eyeing for years, the time was finally right though and she happily passed it on to me.  I didn't however love that it was a brilliant orange. This picture is after I've sanded it and started to prime and in a very dimly lit basement, it's still very bright though (I swear those drips in the back are not from us, that was from a previous paint job).


Using a paint sprayer we made it a nice clean white.

The original handles were incredibly cheap white plastic so I ordered some satin nickel pulls to replace them.  This is the project that I accidentally ordered the wrong size that ended up being used for the spice shelf which means this dresser has been handle free since August.

Here it sits, notice how the drawers are slightly open?

I should have been more irritated and ordered them right away but it just didn't seem that big of a deal.  When you wanted to open a drawer, any drawer you had to start from the bottom and work your way up, Brad hated it far more than I did and lately we've both grown especially tired of it. I finally got around to ordering the right size and installed them and we both cheered a little at the luxury of only opening the one drawer you need.

Here's a close up of the handles.

It's nice to finally check this project off my list.

Lastly, if you need drawer handles I highly recommend this website, D. Lawless. They have a huge selection and their prices are amazing.  Shipping to Canada isn't awesome but I've always been able to ship to the US.

Wednesday, November 12, 2014

Refinished Dresser

This dresser has been 4 years in the making. 4 years, how ridiculous.

When Brad and I were first married we had two of these Ikea Malm dressers. They were super functional. The drawers were deep and they rolled smoothly. They worked great until we moved 3 times (that takes a toll on Ikea furniture). A couple of the drawers needed some work and they were just so tall and imposing. I really didn't like how they took over the room.


I started perusing Kijiji and I firmly believe that if you look for something you'll find it and I sure did. I found this dresser for $20.


It's here where I mention that I have a very accommodating husband who is so supportive of this hobby. Sure, this dresser has 9 drawers but what you can't tell is that the drawers are significantly more shallow and just so much smaller than the Ikea one. So in the name of style we seriously downgraded the storage room in our dresser and he hasn't complained even one time. In all the time we've been using it I haven't ever regretted the change.

 I found this inspiration picture and kept it in mind for 4 years.

So we used the dresser as is for 1 year and then we moved again. In a productive push I sanded down the outside frame and then quit and we used it that way for 6 more months. Then we moved into my in-laws house and it sat in storage for two years and now finally I'm here, ready for a change.

I took the legs off, sanded them and stained them Espresso. I lined the drawers up and painted them heirloom white and replaced those awful ugly knobs. I had picked up new nobs 3 years ago and couldn't wait to reattach them.

 I have the same blue in my curtains so they're a good fit.

Then I reattached the legs and worked on the base. I'd sanded it really well previously but in the moves and in storage it needed some spot sanding in a couple places. I've stained a few things in the past and every time I buy my stain I look at the wood conditioner and wonder if I should use it so for this project I actually bought it. I'm not sure I noticed a difference but perhaps I would have if I hadn't used it? I'll use up the can I have on future projects but I don't think I'd buy it again.

Look, an actual picture with me in it! How crazy. Wish I had a little make up on but whatever.


I only used one coat of the stain and then I put on three coats of varathane. I think that's the key, I love a satin finish and the three coats gave me what I was going for. I think the picture shows the finish really well.

The wood grain is so pretty on this piece hey? The dresser turned out exactly how I wanted it too and we're loving it.

Check out the difference in the top finishes.


Here are a few before and after's

Nice to finally check this piece off my list.

Pin It

Monday, November 10, 2014

Red Shelf Update

Years ago Brad and I built a shelf to hold all my craft supplies. It's been really handy and I still love it but we initially painted it bright red, I'm over the colour and was ready for a change.


I had initially planned on painting it emerald green but this shelf sits in my kitchen area and with the couch and chairs and pictures I though it would make for a busy area.  I decided to paint it white instead.

And it turned out very nice, but so very boring. Every time I looked at it I was annoyed at how boring it was.  To fix it I decided to try my hand at a stencil so I bought all the supplies and set them aside to work on the couch and chairs. The shelf got covered (and is still covered) in all my materials and for now I've decided I don't care if it's boring, you barely see the top anyway. Perhaps I'll get to it eventually but for now it's fine as it.

Pin It

Tuesday, October 14, 2014

Kitchen Table and Chairs

My family was in desperate need of some new chairs.  The table we had was nothing great either, it was free and had that orange stain on it that was so popular but it did the trick.  The chairs however were another story.  We had 4 and were afraid to sit on 3 of them.  One of them especially had become Catie's chair.

For the past two years we lived in my in-laws house and used their very nice and sturdy table but as it came time to move to our own space we started to remember our chairs.  I follow a Facebook buy and sell page and one day a table and 6 chairs came up for $50.  Even if we only used the chairs that's still a steal.  The only problem is they were hunter green.  Not my style at all.  I couldn't pass up the cheap price tag though so I bough them.  I forgot to take a before picture but it looked a lot like this, only the wood parts are more blonde and less orange.

I did however take a picture of the chairs.

I knew it would be a ton of work but my Mom and I tackled the project anyway, and now it looks like this.

We sanded and taped for days.  Then used a paint sprayer but ended up with such a dreamy, white finish.  I love it more than I expected to and it's been perfect in our new house.

Here they are, all taped up. ready for painting


A couple of the legs had been chewed on by a dog so I filled the marks and they turned out so nice.


I'm especially proud of the parts where the spindles on the chairs meet the seat.  We tried to be careful with our taping and it paid off.


Here's an in progress shot

And check out these table legs. The far one has been painted with a brush, looks so awful hey? The front ones have a coat of paint sprayed on top. Love the difference. Paint sprayer is the way to go.

One thing that makes this table so perfect for us is that it was previously owned by someone who used a wheelchair. To accommodate that they removed the skirt from the end you can see here, it is a perfect fit for Eden's high chair. She slips right under, love it.


I'd love if the stain on the top and chairs was darker and perhaps one day I'll tackle that but for now I'm really happy with them and the finish is perfect for this house, it matches all the other trim in the house.
Pin It

Monday, October 13, 2014

Spice Shelf of Awesomeness!

I am so super in love with this piece of furniture.  This house has a really nice kitchen with a pantry but despite the room I just couldn't figure out what to do with all my spices.  I have so many and they always seem to end up in a basket so I have to dig every time I need one and it's such a pain.  I started searching Pinterest for spice storage solutions and this one from Classy Clutter was so perfect, I even had the space by my fridge but Brad and I aren't the handiest people.  Sure I can sew and paint but when it comes to the actual building I defer to Brad who is capable but does not have a love of it, meaning it probably wasn't ever going to happen.  I was still dreaming of it but figured it was nothing more than a dream. I mentioned it to my brother and he immediately got up and started measuring.  I knew my spice shelf would happen, if he was interested enough to measure then surely he would help me build it.  We went that very night and bought supplies.  Here it is all finished.

And here is my favourite brother (hope the others don't read this), helping me build my shelf.  He did all the cutting and designing, I was an awesome assistant doing my best to anticipate his every need.

We didn't use Classy Clutter's measurements, just her basic plan and we assembled it different to. We mitered the corners and didn't drill all the way through to add dowels like she did but the idea was all hers.

Once the pieces were all cut he went home and I sanded and painted all the individual pieces.  He then came back and we assembled it.  My favourite part of the painting though was the back.  I loved how Classy Clutter added a chevron design to hers and I knew I'd do the same only with stripes.  I used a tutorial from here on painting crisp lines and I can't believe how great they turned out.
I took this picture and would occasionally check it out on my phone to remind me of how nice they looked and on my phone screen it looked like a digital background.

So here is the space in the kitchen without the shelf

And the same space with the shelf
The handle I actually bought for a different project you'll see later but I accidentally bought the wrong size.  I'd bought it online so I didn't want to return it and this was the perfect use.  And hey, if you want to re-create this shelf and need a handle I have one more up for grabs :)

So the shelf sits on castor wheels and gets pulled out when needed. When not being used it gets tucked flush with the fridge. See how tall those top shelves are?  They even fit the large spice containers.

I also plan on using this for canned goods

 I can't wait to use it!
Pin It

Thursday, October 9, 2014

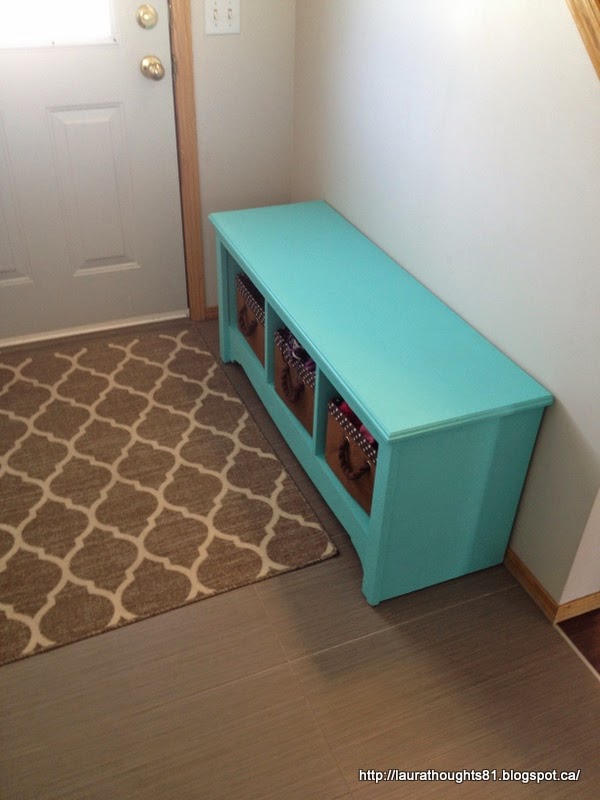
Brown Bench Be Gone

For a wedding gift Brad and I were given a bench that we've lugged around to every house we've lived in. We love it despite how heavy it is.  It came primed so years ago we painted it brown and I found these cute baskets to go inside.

You can see in this picture it sat at the end of our bed but in the last house it sat by our garage door and in this house it's used in the front entrance, it's pretty much the first thing you see when you come in the door.  It worked well but move after move resulted in some chipping and scratches so it was time for an update.

I'm deciding more and more that what I love in pictures of house is furniture that pops so I went for something bright. It's perhaps slightly brighter than I would prefer but I love how it looks with the rug and the tile and it's super cute so it'll do.


Pin It