Showing posts with label Tutorial. Show all posts

Tuesday, May 31, 2011

Jewelery Holder

I've been wanting one of these for quite some time now but I kept waiting for the perfect frame.  Something like my Make-up Magnet Board but I think that was just a lucky find because I kept coming up empty handed.  I finally settled on just a frame.  Despite the plain frame I love it, and it's super useful and was a cinch to make.


I'm sure you can see exactly how it was made but I'll give a little tutorial anyway, starting with my supplies.

For the wire I used this Welded Hardware Mesh, it was exactly what I wanted except I had to buy a big roll.  If you live close to me and want a Jewellery Holder you should let me know, I'd be happy to help you out with Mesh for real cheap.


I picked up the paint at Michael's at 2 for $1.00.  The purple wasn't quite what I wanted so I added some black and it was just the right shade.
To hang necklaces I used these little "S" hooks I got from Lowes.

So once you have all your supplies, remove the glass and the picture from the frame.  They were held in with staples so I pulled those out two.  Then I nailed a hook to the back of the frame.

I lightly sanded the frame and then painted it with three coats.
Using the original picture as a template I traced around it on the mesh and cut it out with tin snips.  I flattened it as best as possible and then my lovely husband stapled it in place of the picture.
That was really all there was too it.  Here are a couple more photos and one last point, no judging the amount of earrings I own, in the last three years I've purchased two of them, the rest are just really old.


And a picture of what this looks like hung on the wall.


And one last plug, if you need mesh you just let me know.


Linking To Monday - C.R.A.F.T., Making The World Cuter, Polly Want a Crafter, Simpsonized Crafts, Sugar Bee Crafts, Sumo's Sweet Stuff, The Girl Creative   Tuesday - All Things Related, Creative Itch, Domestically Speaking, It's Sew for YouLadybug BlessingsSassy Sites, Today's Creative Blog, This & That, Topsy Turvy    Wednesday - Blue Cricket Design, Me and My Bucket   Thursday - A Glimpse Inside House of Hepworth, It's Sew Stinkin Cute, Somewhat Simple, The Train to Crazy, What Allie's Making Now   Friday - Creation Corner, Finding Fabulous, Tatertots & Jello, The CrEaTiVe CraTe

Tuesday, March 15, 2011

Make-up Magnet Board

We all know with craft blogs that original ideas are often hard to come by, we find ideas we love and make them our own but we didn't come up with the idea ourselves.  I feel like I've finally done something original here and I'm excited about it.

I'll show you the finished product and then explain.  

Behold my Make-up Magnet Board.

I have a friend who is beautiful and stylish and has always loved make-up but recently took a course that intensified her love.  Her renewed interest has worn off on me and it made me remember eye shadows I'd hidden away that were gathering dust.  I pulled them all out and was shocked at just how many I had.  My old make-up organization/storage consists of a basket that sits on my bathroom counter, I put all my hair stuff and make-up stuff in the basket and used maybe 3 shadows in my daily rotation.  With the addition of my pile of eye shadows it now looked like this.
The basket was a mess and I was overwhelmed with all my choices never knowing what to use, digging through to see what I had and find what I wanted was a pain.  I needed a way to display them all and my brilliant mother and I came up with this idea.


I started by making a magnet board, (nothing original here), I used this super ugly frame I found at Salvation Army.


I painted it (The hard way, with a brush instead of spray paint.  I look forward to spring when the weather lets me spray paint again.) and then glazed it.

I went to the hardware store and picked up some metal and had them cut it to fit inside my frame.  Then I used spray adhesive to stick some fabric to the metal.  I put it all back together and it looked like this.
Here comes the brilliant part though.

Here's the stash of eye shadows we're talking about (I've even added a couple since this picture).

I went to the dollar store and picked up a bunch of magnets and hot glued one to the back of each shadow (I actually needed 3 magnets for my bronzer).  I considered using a stronger glue but when the makeup is empty I want to be able to peel the magnet off, hot glue lets me do that and it's held up really well.


Next I wanted a place to store my brushes and liners though.  An orange pill container with some oil rubbed bronze spray paint made it beautiful and 3 extra strong magnets glued on the back holds nice and secure.

Now it hangs in my bathroom wall and every morning I'm excited to play with my different make-up.  It feels sort of like art and an expression of me.  

I thought tomorrow I'd do a little feature of how I use some of this make-up and talk about my favorite products so come back and check it out.


Linking To
Monday The DIY Showoff, C.R.A.F.T., Making The World Cuter, Polly Want a Crafter, Simpsonized Crafts, Sugar Bee Crafts, Sumo's Sweet Stuff, The Girl Creative   Tuesday - All Things Related, Creative Itch, Domestically Speaking, Ladybug BlessingsSassy Sites, Today's Creative Blog, This & That, Topsy Turvy    Wednesday - Blue Cricket Design, Me and My Bucket   Thursday - A Glimpse Inside House of Hepworth, It's Sew Stinkin Cute, Somewhat Simple, The Train to Crazy, What Allie's Making Now   Friday - A Craft a Day, Creation Corner, Finding Fabulous, Tatertots & Jello

Monday, December 6, 2010

Art Bucket Tutorial - Light

As promised it's Tuesday so time for the second half of my gift that I'm so excited about.  I didn't get a comment from the person this is going to so I'm going to assume I'm not spoiling anything.  The first part of this gift is the art smock that you can read about here, that part of the gift will be included in the awesome art bucket that I've made.

This bucket will hold all of the cute girl's art supplies so when it's time to craft you can just pull out the bucket and she's good to go.  There are pockets all around and most of them are empty just waiting to be filled.  I got the idea here at a blog called Kotori.  She used a bucket tool belt but I wanted mine to be a little cuter and the belt was a little more than I was willing to spend.

One quick side note... I called this a light tutorial because I had a very sad thing happen while crafting this project, I filled up my Picasa storage space.  For those of you unfamiliar, Picasa is the site that automatically stores all of your blogger pictures.  Once your space is gone you can no longer add photos to your blog posts and you need to buy more space.  I've been really un-happy about my free hobby suddenly costing $5 a year (I know, it's only $5).  I was a little poutty about it so I just didn't take photos during my creation of the bucket, sorry.  I have now come to terms with the necessary $5 (unless you have an awesome suggestion for me) so the many photos can continue on future posts.  On to the tutorial...

Here's my bucket, naked and ready to be re-used.

I used a plain canvas type fabric for my cover and I started by tracing around the bottom of my bucket and then adding some seam allowance.  I also cut a rectangle that was wide enough to fit around the widest part of my bucket.  I made sure it was long enough to extend from the bottom of the bucket up to the top, over and down to the bottom again.

I sewed up the sides of my rectangle and slipped it inside my bucket to see how it fit.  I wanted the cover to fit nice and snug so I checked the fit a lot.  I thought a rectangle would work well because my bucket seemed really straight up and down, I was surprised just how much I ended up needed to cut off my original rectangle though, the slant was subtle but definitely there.  I placed the fabric in my bucket and then pinned the excess fabric so I could move my seam in where necessary.  I did this a bunch of times until my cover finally fit how I wanted and then I cut the excess fabric off the width leaving my length the same.

I would do one thing differently next time, the circle is going to fit the inside of the bucket which is smaller than the outside of the bucket which meant my circle was too big and I had to trim it, next time I would trace the outside and not add any seam allowance.  That extra size on the outside will become the seam allowance and the circle will fit the bottom.

I next pinned my circle onto my tube of fabric and sewed it together (a photo!)

At this point it looked like this.
I wanted the cover to stay snug on the bucket so I made a casing at the bottom and inserted some wide elastic.  I pulled the elastic as I went so everything is cinched into place.  You can see in the picture above the little hole where my handle goes (I removed it before I started), I marked that hole and then made a button hole.  I did the same on the other side so my handle could slip back into place (but I didn't put the handle on until my pockets were finished).

From this point I made my paintbrush pockets on the inside of the bucket (such a pain but it's like making a crayon roll), I then put pockets on the outside.  I made my pockets poof out a bit by not sewing them flat, I would pin one side and then lay the pocket flat but before pinning I'd move the second side an inch or two closer to the pinned side.  I'd make a little pleat on the bottom to give it the space to put stuff inside.  I did that all the way around the bucket making as many pockets as I had room.

Here's what I filled the pockets with (this little girl LOVES Dora)

I also plan on making some homemade play dough but I can't do that until closer to Christmas.  The art smock will slip in the bucket as well.  I've left plenty of room for supplies she already owns.

Here are some more pictures of the completed bucket (I added a few things to make it look more full).

I think the paint brush pockets are my favorite part and I just hope this Mommy and little girl enjoy it.


I'm going to link up to these fun parties and this one
Visit thecsiproject.com.

Thursday, November 18, 2010

Little Girl's Apron Tutorial

I went to a craft day on Saturday and learned how to make these adorable aprons.  There were adult size and child size, I thought the child ones were so cute so that's what I made.


I made a second one that's going to make a great Christmas gift for a cute little girl and I made a tutorial at the same time, here's the second modeled so you can see the finished product.


This next part involves a ton of pictures so if you don't want to make one of these aprons you may want to stop here.

We'll start with a cut list.


Front 14 1/2" sq
Back 17" Sq
Bottom Trim 2"x16" - cut two
Neck Strap 3"x19"
Waist Ties 3"x26" - cut two
Pocket template - cut two


Your pocket should be 6" from the top of the point to the bottom.

You'll start by taking your two waist ties and your neck strap and sewing them along the side, right sides together to make a tube. On the waist ties you'll angle the ends so you get a point.  Turn the three right side out and press them flat.  You'll end up with this.

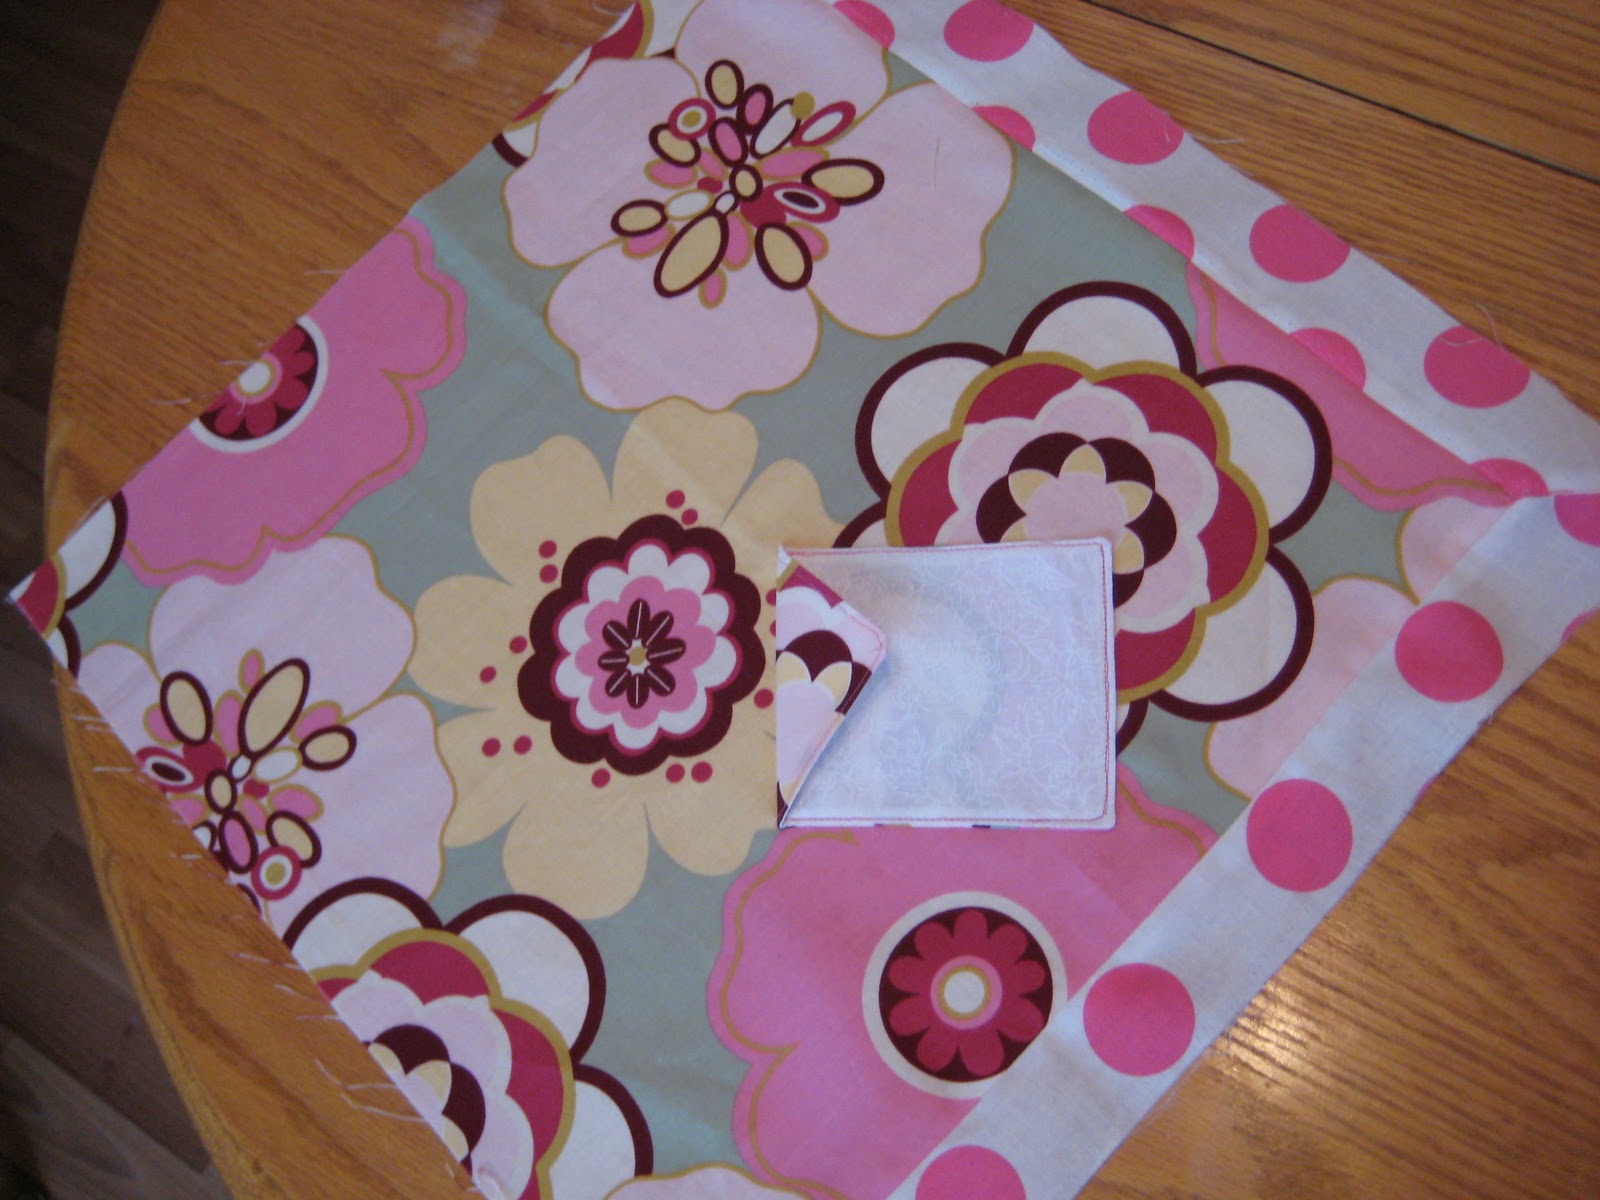
Next we'll work on the pocket.  Now ideally you'd want one side to be the flowered fabric and the other the polka dot but I used a fat quarter and just didn't have enough for the pocket.   The white made a nice stand in though.  I also think the neck strap would have been cute polka dot but I had to make do with what I had.

Take your two pocket pieces and put them right sides together, sew around leaving enough room to turn it the right way.  Trim your corners, turn right side out and press nice and flat.  Topstitch all the way around closing up your open gap.


You can see that after I turned my pocket my point is no longer very straight, I must not have sewn straight enough.  Oddly enough I did this later too giving a cute effect but try to sew nice straight lines.  For now put your pocket aside.

Next we're going to attach our bottom trim.  One quick note, since I had so little fabric my bottom trim is just a little bit more narrow that it should be, still worked great though.

Lay your front piece on the table and with right sides together layer your bottom trim on top lining up your raw edges, like so.  Line up the edges on the right side too, this will give you some over hang on the left but just leave it.  Sew this piece on and then move onto the next side.

Line it up opposite the first strip, like so

See how those two flaps overlap at the bottom?  The right one is sewn already, the left is the one we're working on.  When you get to the bottom you're going to lift up that right hand flap and sew as close as you can to your seam.  I put a pin in so you can see where my seam is going to end.

This is what it looks like with both sides sewn.

Now before these pictures get confusing let me point out that the fabric I'm using for the front of the apron is leftover fabric that I used to cover my ironing board.  See how one fabric is the right side and one is the wrong side?  The right side is the ironing board.

Press your seams open.  On the bottom trim you have a bottom flap and a top flat, fold the top flap out of the way for now.  Twist the bottom flap until you get that nice 45 degree angle like above.  Then fold your top flap back over top and pin in place.   If you flip everything over you can see that you'll end up with a perfect line.

You're going to sew right down that nice line where my thumb is.  Once it's sewn turn it to the back, cut off your excess and then press your seam open.

I swear that was the only complicated part, from here on out it's smooth sailing.

Time to attach the pocket.  Fold your fabric in half like this.

Your pocket goes on about 6 inches from the bottom point.

Place it on, unfold your fabric and sew in place but don't forget that this is a pocket.  Don't sew across it.  Your also only going to sew up to the bottom of the triangle so you can fold the flap over.

Once it's sewn on, fold and press your flap and add a cute button.


Time to add your waist ties.  Place your fabric wrong side up and measure about 4 inches from side point (I only did 3 1/2 since my trim was narrower).  Place your waist ties on and pin in place.  The tie goes on at an angle, if you're looking at your diamond shape of fabric you'd want to line your ties up parallel (sorry, I forgot to take a picture, I made this lovely diagram for you though).


Do the same on both sides sewing into place.

Now it's time to put the back piece on.  I felt quite certain that I would end up sewing a waist tie into this seam so I gathered mine into the center of my fabric and pinned them in place just to keep them out of the way.

With right sides together line up your fabric.  There will be some overlap but you cut it off later.

Pin in place and sew around making sure to leave a section open so you can turn it later.  Before you turn these pieces trim off your excess polka dot fabric and clip your corners.  Turn and press really well and then top stitch all the way around.

Fold the top point down about 3 1/2 inches and stitch in place going over the same seam you used to top stitch.

See how both my folded over points are kind of angled?  I don't know how I managed to angle both of them but since they match I like them.

Now all that's left is the neck ties.

You could just sew both sides nice and secure and I did that on the first apron only to come home and find out the strap was way too big.  I could have just made it smaller but instead I measured the fit on Catie and left one side sewn on and the second side I unpicked.  I put two button holes on the strap a couple of inches apart so that as she gets taller the strap can grow with her.  Don't judge my buttonholes, not sure how they turned out so wonky.


I sewed a button to the inside of the apron to attach the strap too.

Once it's buttoned you can't even tell they're there and it fits really well.

You could also choose to put some buttons right where the neck straps get sewn on, that would look really cute.  I chose not too on either of my aprons because my fabric was so busy.

I hope that seemed easy because it really was.  I made mine during Catie's nap.  These aprons are adorable and even though I have no reason too I want to make more.

Pretty nice bruise on her forehead hey?  Perhaps she should take note of where the wall starts.