
Wednesday, August 11, 2010

What I Wore Wednesday #1

This is a bit of a step away from what normally goes on here but I thought it would be good for me and it's just one post so bear with me.

Michelle decided to participate in Pleated Poppies What I Wore Wednesday (and you should check out Michelle's first week, it's so so cute!  It puts my week to shame so on second thought, maybe don't go check it out :).  What I Wore Wednesday, my interpretation of it anyway, is an attempt to get out of style ruts and wearing pajamas every day (for us stay at home Moms).  The thinking is if you take a picture of what you wore everyday and then share it you'll be more inclined to make an effort.

My first thought when I read about it was, "I think I could go three days before I started wearing the same thing again!"  Then I realized just how depressing that was so I went out and bought a couple new shirts and some new pants.  I'm by no means a very fashionable person but I am a person who had started to get really lazy about getting ready each day.  I only plan on participating this week and please don't judge my very small and unexciting wardrobe.

I did learn through the week that I desperately need a hair cut and that I don't particularly enjoy getting ready every day.  Also if I did this regularly I'd feel the need to shop a lot.  I'm looking forward to being a little more lazy this next week (I know, not the point of this at all). 

So here we go.

Wednesday
Not a great photo, taking them of yourself is hard! Next time I'll make the bed.


T-shirt, Old Navy.  It used to be long sleeve but I cut them off.
Tank Top - Shade.  You'll see these almost every day
Capris - Reitmans.  I realize you can't see the bottom but don't worry, you`ll see them tomorrow too.
I wore this with cheap Old Navy flip flops.  Perfect for a picnic at a spray park.

Thursday
I had Brad photograph me today, much better


 T-shirt - Old Navy.  It needs some of those cute fabric rosettes that are on every blog.
Capris - Reitmans.  yeah, the same from yesterday. Time for a wash, they look pretty wrinkly.
Earrings - my friend Brandy made them for me years ago
Shoes - Cheap $3 flip flops from Old Navy (you can expect to see these everyday.  It's what I wear in the summer since I have huge feet.

 It was at this point I realized how boring this was going to be for everyone so I decided to have Catie join in with me, her wardrobe is way more interesting than mine anyway.

Today was an eventful day for her.
  1. This was worn to the park for Mom & Tots this morning only no one else showed up... sad.  Her jeans are wet from crawling in the grass.
    Green shirt - Children's Place
    Jeans - Mexx Outlet
    Shoes - I know there's no photo but they're cute pink runners from Walmart
  2. Then she threw up on herself and ended up like this for a good chunk of the day.  Definitely an exception around here.
    Diaper - Teddy Ultra brand from Superstore
  3. After nap time this is what she wore for the afternoon
    Strawberry T-shirt - Carters, time to retire it as it's a little short but just so cute.
    Jean shorts - Old Navy
  4. The shoes are my favorite tiny flip flops from Old Navy, she wears them often
  5. One more photo to show them on her cute feet
Friday

 T-shirt - Motherhood, Yeah I know it`s a maternity shirt but it`s comfy and it was supposed to be 33 degrees today so I was looking for cool
Tank - Shade
Pants - Brown pants that covert to capris, Reitmans
Shoes - Flip flops from Payless


I`m learning that it`s real hard to photograph little girl`s outfitts so they tend to get taken at different times.  No way to show all pieces at once and still get a good photo.

T-Shirt - H&M
Jean Shorts - Old Navy
Belt - Made by Me
Shoes - Flower flip flops from Payless

We sported matchinig toenails today too


Saturday
I really don't have any mirrors that I can take a picture standing in front of so I've taken to sitting.  This may mean you get two photos, far away and sitting, close up and standing.  Especially since I thought the close up was a much better picture.

 T-shirt - Ruffled top from Jacob
Tank - Shade
Pants - Reitmans - The same from yesterday only rolled down
Flip flops from Payless
Earrings - The Plaid Giraffe in Edmonton


And now what you really care about...


T-shirt - Old Navy
Jeans - Double button Bookcut from Old Navy (I LOVE these on her)
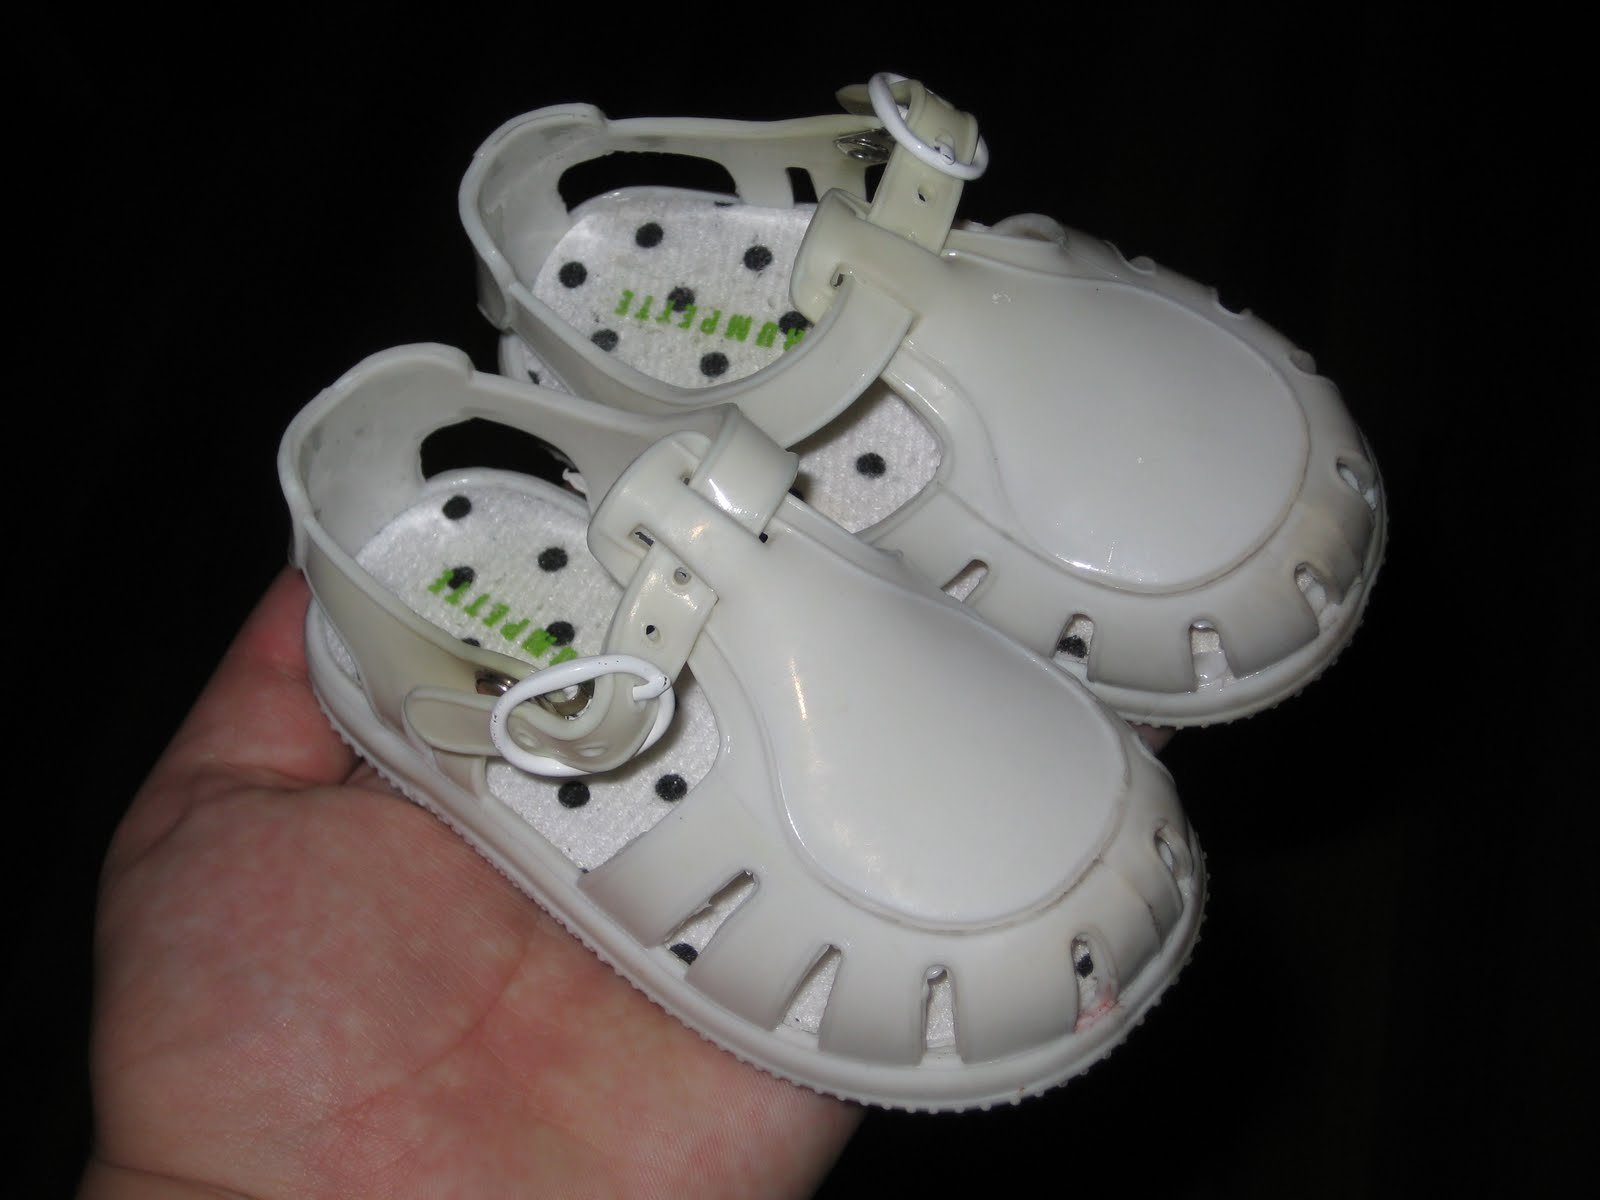
Shoes - White Jelly shoes from Anabanana (thanks Michelle, I bought these using that gift certificate you gave me)

I thought the shoes were so cute they deserved a close up

Sunday


Paisley Shirt - Walmart
Black Cotton Skirt - My Mom just gave it too me, not sure where it came from
Black flats - Herberger's


White puffed sleeve onsie - Carter's (it's a little snug I know)
Red polka dot skirt - Carter's as well
Shoes are the same as yesterday - Anabanana  (I just realized today that she only has 4 pairs of shoes that fit her right now so you're bound to see duplicates)
Necklace - Made by me


Monday

 Green shirt - Old Navy
Jeans - Additionelle
I didn't think you needed a photo of the cheap flip flops I wore with this
Headband - Made by me (sort of)


But if I'm honest it didn't take very long for the above to morph into the below, I just wanted to be comfortable.  I traded the headband for a ponytail.

Reitmans Capris, again.


Catie wore...

White T-shirt - H&M
Skirt - It's on loan from Gwen, from Please Mum.
Shoes - Gift from her Great Aunt Margo, Superstore.
Necklace - Made by Me

Tuesday
As you can see I'm now coming to the end of my summer wardrobe.  Everything I'm wearing I've worn in previous pictures so I won't bother with a breakdown of my clothing, we'll just move onto Catie's.


White Onsie - Carter's
Blue Tank - Children's Place
Bootcut Jeans - Old Navy
Pink Crocks - I'm not sure where they came from. I think there are two ways Crocks should ever be worn, on little kids feet or for gardening.


I'm Linking Up At
Poppy

Monday, August 9, 2010

Shoes!

I'm fairly certain these are the most adorable little shoes I've ever seen!

** Sorry, I should have been more clear... click on the picture to be taken to Sewing With Me's Etsy shop**


Catie's a little too big for these types of cloth shoes so I can't justify the purchase, even if it is only $4.50.  So if anyone else loves them and wants a pair for their little girl I'd love to make them for you, you buy the pattern I'll do the rest.

Friday, August 6, 2010

Kebob Salad

Brad and I have decided that our house is the hottest place on earth.  Never have I lived in a house that got more hot or cooled down more slowly.  I realize this is a bit dramatic but every day we sit and sweat in our little house with no basement to retreat to.  The heat, combined with Brad being home a lot lately has led to me not wanting to be anywhere near the stove.  All of this led us to Kebob Salad.  I'm sure it's not unique, others have probably been doing it for years but it was our first time and it was a success so I'll share.


 Start with some chicken (I only used one of the three breasts) and cut it in to nice chunky cubes.


 Toss it in a ziplock bag with a good squeeze of caesar dressing and squish it up until it looks like the below.


Then throw it in the fridge for a while (a couple hours is best).

As it gets closer to dinner time get your veggies ready. 


We used a red pepper, half a green pepper, a chunk of red onion and you can see a bowl of frozen shrimp there too, I happened to have it in the freezer.  Let the shrimp defrost and cut everything else into chunks (not too small because you have to kebob them all, you'll be hating yourself later if they're too small).  I used lots of red onion this time because we decided it was our favorite part of the last salad.


Get them all on your skewers.  I used a combination of metal ones and wooden ones, soaking the wooden ones for a few minutes before I skewered.  A word about skewering your chicken.  We marinated in a creamy dressing so this is not going to be a clean job.  Just be in the moment and go for it, you can always wash after.


Give the veggies and shrimp a drizzle of olive oil and send your hubby out to the BBQ (I don't BBQ, that's a blue job).


While he's cooking wash and dry your lettuce (I use a salad spinner Brad gave me).


Here's what your skewers look like when they're ready to come off, all yummy and slightly charred.


One great thing about this salad... since you're going to take all the food off the skewers to serve you don't have to make them pretty, you can put all the onion on one stick, all the chicken on another and so on.  This means that you don't need to worry about the food cooking at different times, when the chicken is ready you can take it off and give the veggies more time if they need it.  Small hint, peppers always take longer to cook than you think they will.

Once everything is cooked and still hot slide them all of the sticks and onto your lettuce.


I'm pretty sure this next part is what makes the salad so yummy.  I used a squeeze of creamy poppyseed dressing on it all, it adds such a nice sweetness.  Make sure you don't use too much though, this stuff is strong so a little goes a long way.


See how you can barely see any dressing in the picture?  It's enough, really.


Here's one more picture of the salad all mixed and ready to eat.  Such a great dinner and since you use so little dressing it's great for you.  The caesar dressing really keeps the chicken moist and the two dressings work well together.  You can add any veggies you want, these are just the ones we love.


It's a perfect summer dinner so give it a shot!


Kebob Salad
1 Chicken Breast
1 Red Pepper
1/2 Green pepper
1/2 Red Onion
Handful of Shrimp
Caesar Dressing
Poppy seed Dressing
Head of Green Leaf Lettuce

Thursday, August 5, 2010

Umbrella Stroller Re-cover


So I have a beautiful stroller that I re-covered and I'm very happy with it but it's kind of big.  Sometimes you just want the easy little umbrella stroller so I've been using this. 


 One day I realized that I push around this beautiful large stroller and an awful Umbrella so it's time to do something about it.  Let's be honest, this stroller obviously isn't finished.  As much as I love the classy black circles with the multi-coloured animals I do have plans to make them match.  The problem being that the sunshade is held on with rivets.  I looked up instruction on how to remove them, it involved a drill so I waited until Brad was ready to help me.  We got all set up, put in a bit and started to drill.  The rivet looks exactly like it did when we started and now we have a broken drill bit.  Time to come up with plan b.

This stroller cover was just like all of the others.  Take it apart, use the original as a pattern, put it all back together.  The only snag being I took my sewing machine in for some maintenance so the putting back together waited about a week.  I made sure to pin things how they should go so I wouldn't forget and it was a pretty smooth project only involving a small amount of unpicking.

My favorite part is the bright blue on the back.  The original fabric was kind of heavy duty but I wanted to use what I had on hand so I bought some cheap broadcloth and doubled up my fabric, black on the front and blue on the back.  I'll do the same on the sunshade and it will show a bit more.  You can see it best down by the seat of the cover.


Now I just need to get that sunshade taken care of, any suggestions on how to remove rivets?

Wednesday, August 4, 2010

Butterfly Specimen Case

This is certainly not a new project, they're starting to pop up all over but I think they're really cute.


I first saw this idea at least a month ago and knew I wanted to re-create it so I bought the frame but I was unwilling to buy a butterfly punch that I'd probably never use again.  My sister-in-law has a Cricut so I was waiting to make use of it.  This weekend was the right time to work on it so I headed over to find out she doesn't have a cartridge with what I wanted but she did have a punch and a ton of beautiful paper so I started flipping through and punching.  I'm sure this idea is pretty straight forward but tutorials are the thing to do so here goes.

For supplies I used an 11x17 frame I bought for real cheap at Liquidation World.  I really wanted a double matted one but they were all too expensive so I made do (more details on that further down).  I also used the borrowed butterfly punch and lots of pretty paper plus a couple magazine pages.  I used a nice cardstock page for the backing and some adhesive pop dots that I bought at the dollar store.


I started by cutting out all my butterflies (I have lots extra just in case) and then since I wanted them to be extra 3-D I bent all their wings a little.

Then it was time to space them.  I couldn't bear the idea of measuring and marking each spot so instead I came up with this using PowerPoint.


The large rectangle is 8x10 inches since that's how big my opening was.  I figured out how many rows of butterflies I wanted and then I used the computer to evenly space them.  The dots show the centre of each butterfly.  Much faster and easier than marking them by hand.  So I printed the above page, lined it up on top of my cardstock and using a pin (still loving my pink pins) I poked a little hole through the centre of each black dot.  That showed me exactly where to put each adhesive dot which I did using tweezers (those things are tiny!)


Then I layed out my butterflies on the counter with the patterns arranged the way I wanted them.


 I transferred them to my sticky dots using tweezers.  I tried not to place them down too well figuring I'd have to move a bunch of them to make my lines neat but somehow I manged to do that on the first go so very little moving was necessary.


All butterflies glued down, see how their wings stand up?

Here's where some creative thinking came in.  I wanted the wings to stand up so I bent them, remember?  The problem being when I put the picture in the frame the glass was going to squish them flat again (that's why I wanted a double mat).  I'd seen other bloggers just leave the glass out but I was worried about the stability of my foam dots and I also like the finished look of glass.  So I took the frame apart and it consisted of the mat, the page inside that tells the size and a really thick piece of cardboard to hold it all flat.  I pulled out some bbq skewers, taped them to the cardboard and reassembled (with my butterflies inside of course).

The page you see above was my test to make sure it would be raised high enough.  I had visions of using a glue gun to carefully and neatly attach my skewers but once I got to this point it all seemed so silly and it worked so well that I just left the masking taped and put it all back together.

Here's the finished picture all re-assembled and ready to hang.


I hung it up in Catie's room and I think it looks so sweet though it's almost a shame to waste such beautiful paper.  It's hard to tell but lots of them are glittery or shiny and on their own they looked so beautiful.


There are a few things about this that could be changed, like the cardstock colour and the mat colour don't go together all that awesome.  I also would have liked a little more space around the mat and the start of the butterflies but I'm happy enough with it to call it finished.
L