So I seem to have run out of projects. I don't have anything to work on right now and nothing new I want to start unless it involves paint and it's too cold outside for paint.
Here's where the giveaway comes in but let me explain why it's only sort of a giveaway. Unless you're willing to pay shipping costs or deliver this is for locals only. I will be in Calgary this weekend so Calgary friends feel free to participate.
I'm looking for a new project, something to re-cover. It could be a saucer chair, a bouncy chair, a stroller, a high chair, really just about anything will do. You can check out my Re-Covered page to see the projects I've already done but I'm not afraid to try something new. The only draw back is that you'll need to cover all expenses. So you provide me with an item to cover and the fabric (I'd even love to shop with you) and I'll do the work for free.
To enter just comment with whatever project you want me to tackle. I'll run the giveaway for a couple days or until there are a couple projects to pick from and then I'll announce the winner.
Hopefully at least one or two of you are actually interested in this and my plea doesn't go unanswered.

Monday, October 25, 2010


Parmesan Pesto Pizza - SAMM
Time for another round of SAMM (Share a Meal Monday). You should go link up to Michelle's blog, it's fun and you might find a recipe or two you like.
This week we made one of our favorite meals and probably the best dish I've ever created on my own.

Doesn't it look yummy? I was too excited to eat it so I forgot to take a picture before I cut it... oops.
Here's what you do.
Make up your favorite pizza dough recipe. I'll give you mine at the end of the post even though I don't think it's that great. It turns out pretty good but it's not very good leftover, it gets kind of tough. I'm sure there's a better one out there and if you have one you should give it to me.
One your dough has risen and is ready to go roll it out to fit your pan. I use a pizza stone and you should too, they make such a good crust. There was a time when Brad and I discovered BBQ pizza and we thought it was the best thing ever. Then one day we were out of propane so we decided to use the stone we got as a wedding gift, turns out the stone was much better and way less work. They're really cheap so you should get one.
So roll out your dough and then spread on top some pesto. You could make your own and I'm sure it would tase even better but that adds a lot of cost and time and dishes and the point of pizza is easy and yummy so I use a prepared pesto.
This one to be exact.

Once your pesto is spread, top with some tomatoes. I use vine ripened because I think they're yummier than hot house and I think they look prettier when they're sliced and layed on top but they're a lot easier to eat and you don't need as many if you dice them. Top your tomatoes with a generous amount of crumbled feta. I don't crumble it very finely because I think the big chunks.
The next and last ingredient is the most important, the Parmesan cheese. If you use that horrible bottle of kraft powdered cheese you will completely ruin this pizza, you may as well just not bother making it. And that pre-shredded stuff isn't much better, it really is worth it to spend the extra money on good, Parmigiano-Reggiano cheese. It makes a huge difference and you will not regret it, despite the price tag (usually you find it in the deli section with the specialty cheeses). There aren't many ingredients on this pizza so it's important that they're all really good ones.
Once your pizza is dressed it looks like this (You should try to spread your ingredients further to the edge than I did on this pizza. You can see there's a ring of pesto with nothing on it near the crust and I was disappointed while I was eating that there wasn't any good stuff there).

Now technically when you use a pizza stone you're supposed to pre-heat the stone. I've done it once and didn't notice any difference except that it's a pain to deal with a hot stone so I don't bother. I put the pizza in a hot oven, 375 ish and bake until it looks good, maybe 15 minutes to 30 minutes? Sorry, I don't ever time it, you want the crust to look slightly brown and the feta should look yummy and browned in places too.
This is an easy meal that we love, maybe it will become one of your favorites too!
Pizza Dough
1 1/4 cups water
3 cups bread flour (I always use all purpose)
2 tsp active dry yeast
1 1/2 tbsp white sugar
1 tsp salt
1 tsp powdered milk (I used milk once and I didn’t like the texture difference)
Place ingredients in the pan of the bread machine, in the order suggested by the manufacturer. Select Dough cycle. After cycle is completed, roll out dough on a lightly floured surface.
My bread machine died so instead I put all the ingredients in my Kitchen Aid and knead using the dough hook until it looks done. Then I spray my bowl with olive oil and cover with saran for a couple of hours. Or sometimes I pop it in the fridge and let it rise overnight.
This week we made one of our favorite meals and probably the best dish I've ever created on my own.

Doesn't it look yummy? I was too excited to eat it so I forgot to take a picture before I cut it... oops.
Here's what you do.
Make up your favorite pizza dough recipe. I'll give you mine at the end of the post even though I don't think it's that great. It turns out pretty good but it's not very good leftover, it gets kind of tough. I'm sure there's a better one out there and if you have one you should give it to me.
One your dough has risen and is ready to go roll it out to fit your pan. I use a pizza stone and you should too, they make such a good crust. There was a time when Brad and I discovered BBQ pizza and we thought it was the best thing ever. Then one day we were out of propane so we decided to use the stone we got as a wedding gift, turns out the stone was much better and way less work. They're really cheap so you should get one.
So roll out your dough and then spread on top some pesto. You could make your own and I'm sure it would tase even better but that adds a lot of cost and time and dishes and the point of pizza is easy and yummy so I use a prepared pesto.
This one to be exact.

Once your pesto is spread, top with some tomatoes. I use vine ripened because I think they're yummier than hot house and I think they look prettier when they're sliced and layed on top but they're a lot easier to eat and you don't need as many if you dice them. Top your tomatoes with a generous amount of crumbled feta. I don't crumble it very finely because I think the big chunks.
The next and last ingredient is the most important, the Parmesan cheese. If you use that horrible bottle of kraft powdered cheese you will completely ruin this pizza, you may as well just not bother making it. And that pre-shredded stuff isn't much better, it really is worth it to spend the extra money on good, Parmigiano-Reggiano cheese. It makes a huge difference and you will not regret it, despite the price tag (usually you find it in the deli section with the specialty cheeses). There aren't many ingredients on this pizza so it's important that they're all really good ones.
Once your pizza is dressed it looks like this (You should try to spread your ingredients further to the edge than I did on this pizza. You can see there's a ring of pesto with nothing on it near the crust and I was disappointed while I was eating that there wasn't any good stuff there).

Now technically when you use a pizza stone you're supposed to pre-heat the stone. I've done it once and didn't notice any difference except that it's a pain to deal with a hot stone so I don't bother. I put the pizza in a hot oven, 375 ish and bake until it looks good, maybe 15 minutes to 30 minutes? Sorry, I don't ever time it, you want the crust to look slightly brown and the feta should look yummy and browned in places too.
This is an easy meal that we love, maybe it will become one of your favorites too!
Pizza Dough
1 1/4 cups water
3 cups bread flour (I always use all purpose)
2 tsp active dry yeast
1 1/2 tbsp white sugar
1 tsp salt
1 tsp powdered milk (I used milk once and I didn’t like the texture difference)
Place ingredients in the pan of the bread machine, in the order suggested by the manufacturer. Select Dough cycle. After cycle is completed, roll out dough on a lightly floured surface.
My bread machine died so instead I put all the ingredients in my Kitchen Aid and knead using the dough hook until it looks done. Then I spray my bowl with olive oil and cover with saran for a couple of hours. Or sometimes I pop it in the fridge and let it rise overnight.
Friday, October 22, 2010
How I Plan To Spend My Summer
Kijiji has been good to me this week.
Now none of these pieces look very beautiful yet but I have plans, you'll have to envision with me. Normally I don't like to post before pictures until the after is ready but since the after will be some time coming I thought I'd share my excitement. Sadly I live in a region where we get some serious winters with lots of snow and lots of cold and no time suitable for spray painting. Also I think I've decided to get a paint sprayer and it's not in the budget until summer so I'll have to use these pieces as is until then. Anyone have any paint sprayer tips?
So it all started with my brother, he knows some people who are moving and they're getting new furniture. They were getting rid of a bunch of stuff so he picked up a table and 6 chairs for FREE! My parents badly need the chairs but they didn't need to table. We happen to really need one as ours is tiny. It comfortably seats 4 but don't try to put the food on the table if you're eating off dishes, there isn't room for sure. My brother generously handed over the table so I'm now the proud owner of this.

Don't mind the dressers in the background, they're not normally in the kitchen, really.
(here's where you use your imagination)
After - picture the table top and the skirt stained a really dark brown. I want it almost black and really rich looking. The pedestal will be painted slightly off white and glazed so it looks chippy and worn.
Our table was in really good condition but the chair are degrading, quickly. They've all been glued and screwed together multiple times so the hunt for chairs starts. I want 6 chairs and I want them to all be different but simiilar in style. I happened across these two gems the first time I looked.


They're old and may not last forever but I love all the details on them and I thought $30 for the two was reasonable. The gentleman I bought them from was a little horrified that I plan to paint them.
After - I think I'll paint these to match the pedestal. Slightly off white and glazed to really bring out all the details.
Next I was talking to Michelle one day who was idly looking at Kijiji and found exactly the type of dresser I've been looking for for $20! We currently have two, tall MALM style dressers from Ikea and I hate them. I hate how tall they are, I hate that they're not real wood and I hate that they don't match anything else in the bedroom. I've been looking for something old I could update but everything I'd seen was much too expensive. This dresser was perfect. I was sure it would be gone by the time we got there or it wouldn't actually be that cheap but surprise, surprise I'm now the proud owner of this new to me dresser. Picking it up was an adventure... Michelle and Porter in her van, Me, Catie and Rigby in my car following behind. As we loaded all three screamed in their car seats. Thanks for the van Michelle and I'm glad our babies survived.

After - I don't actually know what I want to do with this yet but I do know that the center drawers will look so great glazed. I could paint it to match my headboard and bedside tables but I think that's too matchy matchy. I'm thinking I'll paint it a colour so it becomes a feature. I'm also considering staining the top of the dresser. What do you think I should do with it? Our room has brown and purple in it.
Now none of these pieces look very beautiful yet but I have plans, you'll have to envision with me. Normally I don't like to post before pictures until the after is ready but since the after will be some time coming I thought I'd share my excitement. Sadly I live in a region where we get some serious winters with lots of snow and lots of cold and no time suitable for spray painting. Also I think I've decided to get a paint sprayer and it's not in the budget until summer so I'll have to use these pieces as is until then. Anyone have any paint sprayer tips?
So it all started with my brother, he knows some people who are moving and they're getting new furniture. They were getting rid of a bunch of stuff so he picked up a table and 6 chairs for FREE! My parents badly need the chairs but they didn't need to table. We happen to really need one as ours is tiny. It comfortably seats 4 but don't try to put the food on the table if you're eating off dishes, there isn't room for sure. My brother generously handed over the table so I'm now the proud owner of this.

Don't mind the dressers in the background, they're not normally in the kitchen, really.
(here's where you use your imagination)
After - picture the table top and the skirt stained a really dark brown. I want it almost black and really rich looking. The pedestal will be painted slightly off white and glazed so it looks chippy and worn.
Our table was in really good condition but the chair are degrading, quickly. They've all been glued and screwed together multiple times so the hunt for chairs starts. I want 6 chairs and I want them to all be different but simiilar in style. I happened across these two gems the first time I looked.


They're old and may not last forever but I love all the details on them and I thought $30 for the two was reasonable. The gentleman I bought them from was a little horrified that I plan to paint them.
After - I think I'll paint these to match the pedestal. Slightly off white and glazed to really bring out all the details.
Next I was talking to Michelle one day who was idly looking at Kijiji and found exactly the type of dresser I've been looking for for $20! We currently have two, tall MALM style dressers from Ikea and I hate them. I hate how tall they are, I hate that they're not real wood and I hate that they don't match anything else in the bedroom. I've been looking for something old I could update but everything I'd seen was much too expensive. This dresser was perfect. I was sure it would be gone by the time we got there or it wouldn't actually be that cheap but surprise, surprise I'm now the proud owner of this new to me dresser. Picking it up was an adventure... Michelle and Porter in her van, Me, Catie and Rigby in my car following behind. As we loaded all three screamed in their car seats. Thanks for the van Michelle and I'm glad our babies survived.

After - I don't actually know what I want to do with this yet but I do know that the center drawers will look so great glazed. I could paint it to match my headboard and bedside tables but I think that's too matchy matchy. I'm thinking I'll paint it a colour so it becomes a feature. I'm also considering staining the top of the dresser. What do you think I should do with it? Our room has brown and purple in it.
Thursday, October 21, 2010
Better After Feature
Yay! I'm so excited that my stroller re-cover was featured on Better After! This is one of my favorite sites and I get a lot of really great ideas here. If you've never read Better After you should get over there right now.

No Apologies
Just about every blog I read does the same thing, they post a photo of a project and apologize about the quality of their photography. Every time I think, "I didn't really think the photo was that bad". I've started to wish that people would stop apologizing about the quality of their pictures because I just don't care. I want to see what they made, they're not a photographer and I understand that, I just want to see the awesome thing they created. It's really that handful of amazing photographers that make us all wish we were better but we get better by experience.
Despite these thoughts I find I do exactly the same thing. I have a very simple point and shoot camera and I'm a crummy photographer but hopefully you don't care. I hope that you can interpret what the picture shows and see past the bad photography.
From here on out you'll get no more apologies out of me and I urge you to do the same.
Despite these thoughts I find I do exactly the same thing. I have a very simple point and shoot camera and I'm a crummy photographer but hopefully you don't care. I hope that you can interpret what the picture shows and see past the bad photography.
From here on out you'll get no more apologies out of me and I urge you to do the same.
Wednesday, October 20, 2010
What Catie Wore Wednesday #11
I think getting a good photo is getting more and more difficult, I suppose that happens when you first learn to run.
Thursday

Headband - Made by me
Grey Sweater - H&M (I know this picture doesn't show the sweater very well but she'll wear it again
Long Sleeve Onesie - Carters
Skinny Leg Jeans - Children's Place
Shoes - Zellers
Friday

Long Sleeve Onesie - Carters (you'll see a lot of these)
T shirt - Superstore? I can't remember. The strawberry is sequins and it says Naturally Sweet underneath
Jeans - Old navy
(you should check out my office chair makeover)
Saturday

Long Sleeve White Onesie - Carters
Pajama Pants - Walmart
I drove down to Cutbank today to mail off my giveaway and when I left Catie was in pajamas. She was in the same pajamas when I got home many hours later. That's how the day goes when Daddy's in charge. This picture was taken by Daddy, seems like things go a little differently when Mommy is gone :)
Sunday


Monday
 White Long Sleeve Onesie - Carters
Yellow Sweater - Old Navy
Embroidered Jeans - Esprit
She's discovered that she loves to carry around my purse
Tuesday

Navy Shirt - Old Navy
Jeans - Old Navy

Thursday

Headband - Made by me
Grey Sweater - H&M (I know this picture doesn't show the sweater very well but she'll wear it again
Long Sleeve Onesie - Carters
Skinny Leg Jeans - Children's Place
Shoes - Zellers
Friday

Long Sleeve Onesie - Carters (you'll see a lot of these)
T shirt - Superstore? I can't remember. The strawberry is sequins and it says Naturally Sweet underneath
Jeans - Old navy
(you should check out my office chair makeover)
Saturday

Long Sleeve White Onesie - Carters
Pajama Pants - Walmart
I drove down to Cutbank today to mail off my giveaway and when I left Catie was in pajamas. She was in the same pajamas when I got home many hours later. That's how the day goes when Daddy's in charge. This picture was taken by Daddy, seems like things go a little differently when Mommy is gone :)
Sunday

Headband - Made by Me
White Long Sleeve Onesie - Carters
Dress - I'm not sure where it's from, it's on loan
White Jelly Shoes - Anabanana
The above picture obviously shows the outfit the best but how could I leave this one out?

Monday

Yellow Sweater - Old Navy
Embroidered Jeans - Esprit
She's discovered that she loves to carry around my purse
Tuesday

Navy Shirt - Old Navy
Jeans - Old Navy
Linking up to
Tuesday, October 19, 2010
Office Chair Makeover
I've seen a couple of these projects and specifically this one that awed me. You'd think with all the re-covering I do I would have thought of an office chair makeover but I didn't, not until I was inspired.
Here's an after and then we'll talk details.

And the before.

It's one of the very few things that Brad brought with him when we got married, now that I think about it I'm pretty sure it was the only piece of furniture that came with him. The chair was in rough shape, in fact he picked it up off the curb as his neighbors were throwing it out so we hadn't ever seen it in it's prime. The chair functions fine enough but to help the sad foam he added this very stylish cushion on top. The cushion actually does very little to improve the comfort.

Luckily we inherited a much nicer office chair so this one is just back-up, not really necessary. I figured since it was free and is spare I could play around with it.
Here's the sad part of my story...
I decided to paint the chair so I headed off to buy some paint. I've done a few spray paint projects now and the one thing to keep in mind is your colour is going to be limited, there are only going to be so many colours available. I know this so I was careful to not have any preconceived ideas about colour and I just planned to find something I loved when I got there. I settled on Bahaus Gold by Krylon and it's an awesome colour. I then went and found some fabric I love that co-ordinates and couldn't wait to come home and start. It was only as I was half way home that I realized my problem, I hadn't picked a paint that works specifically on plastic.
Before I started the project I did a little research and every site said to make sure you use a paint designed for plastic. I went back to see my options and was so disappointed, I could have black, red, bright yellow, grey or hunter green. The worst part of this story is I actually would have been very happy with bright red if I had found fabric that matched it. I wasn't willing to spend more money on fabric when I didn't have a plan for the original stuff I bought so I stuck with it and here's what I did instead (I wouldn't recommend it).
I polled many people I know and came up with the same response, you think about this... the reason you can't use just any paint on plastic is because the paint won't bond, it will flake off. So why not put on a coat of plastic paint and then once that's dry cover it up with whatever you want, like primer. The plastic paint will bond to the plastic and the next coat will bond to the plastic paint. Makes sense right? Everyone I talked to agreed so that's what I did. I used a Fusion paint by Krylon in Almond and gave all the plastic parts a good coat. Once it was dry I sprayed the entire chair with my original Bahaus Gold. I also sprayed two coats of clear coat (3 on the bottom legs) on the entire chair to seal it.
It looks awesome, I'm happy with the colour but there are plastic parts where the paint is already starting to flake off. I'm pretty sure this chair will not look great for very long. So learn from me, just use the cherry red plastic paint. I'm still happy I re-covered the chair and I learned something so it wasn't a waste.
For the cushions.
I wrapped the backrest in a layer of batting and then stapled my fabric over top. For the seat I bought a thick square of foam from Walmart and added a layer of batting over that so I didn't have pointy corners. The fabric on the seat is actually pulled much tighter than I would prefer because I really should have bought a little extra fabric. I made it work though and the chair is actually comfortable now.
Here are a couple more angles of the new chair (I can admit that I should have painted that little purple plug on the back but I'm not going to)


and one more before and after.

Here's an after and then we'll talk details.

And the before.

It's one of the very few things that Brad brought with him when we got married, now that I think about it I'm pretty sure it was the only piece of furniture that came with him. The chair was in rough shape, in fact he picked it up off the curb as his neighbors were throwing it out so we hadn't ever seen it in it's prime. The chair functions fine enough but to help the sad foam he added this very stylish cushion on top. The cushion actually does very little to improve the comfort.

Luckily we inherited a much nicer office chair so this one is just back-up, not really necessary. I figured since it was free and is spare I could play around with it.
Here's the sad part of my story...
I decided to paint the chair so I headed off to buy some paint. I've done a few spray paint projects now and the one thing to keep in mind is your colour is going to be limited, there are only going to be so many colours available. I know this so I was careful to not have any preconceived ideas about colour and I just planned to find something I loved when I got there. I settled on Bahaus Gold by Krylon and it's an awesome colour. I then went and found some fabric I love that co-ordinates and couldn't wait to come home and start. It was only as I was half way home that I realized my problem, I hadn't picked a paint that works specifically on plastic.
Before I started the project I did a little research and every site said to make sure you use a paint designed for plastic. I went back to see my options and was so disappointed, I could have black, red, bright yellow, grey or hunter green. The worst part of this story is I actually would have been very happy with bright red if I had found fabric that matched it. I wasn't willing to spend more money on fabric when I didn't have a plan for the original stuff I bought so I stuck with it and here's what I did instead (I wouldn't recommend it).
I polled many people I know and came up with the same response, you think about this... the reason you can't use just any paint on plastic is because the paint won't bond, it will flake off. So why not put on a coat of plastic paint and then once that's dry cover it up with whatever you want, like primer. The plastic paint will bond to the plastic and the next coat will bond to the plastic paint. Makes sense right? Everyone I talked to agreed so that's what I did. I used a Fusion paint by Krylon in Almond and gave all the plastic parts a good coat. Once it was dry I sprayed the entire chair with my original Bahaus Gold. I also sprayed two coats of clear coat (3 on the bottom legs) on the entire chair to seal it.
It looks awesome, I'm happy with the colour but there are plastic parts where the paint is already starting to flake off. I'm pretty sure this chair will not look great for very long. So learn from me, just use the cherry red plastic paint. I'm still happy I re-covered the chair and I learned something so it wasn't a waste.
For the cushions.
I wrapped the backrest in a layer of batting and then stapled my fabric over top. For the seat I bought a thick square of foam from Walmart and added a layer of batting over that so I didn't have pointy corners. The fabric on the seat is actually pulled much tighter than I would prefer because I really should have bought a little extra fabric. I made it work though and the chair is actually comfortable now.
Here are a couple more angles of the new chair (I can admit that I should have painted that little purple plug on the back but I'm not going to)


and one more before and after.

Sunday, October 17, 2010
Monogram Quilling Tutorial
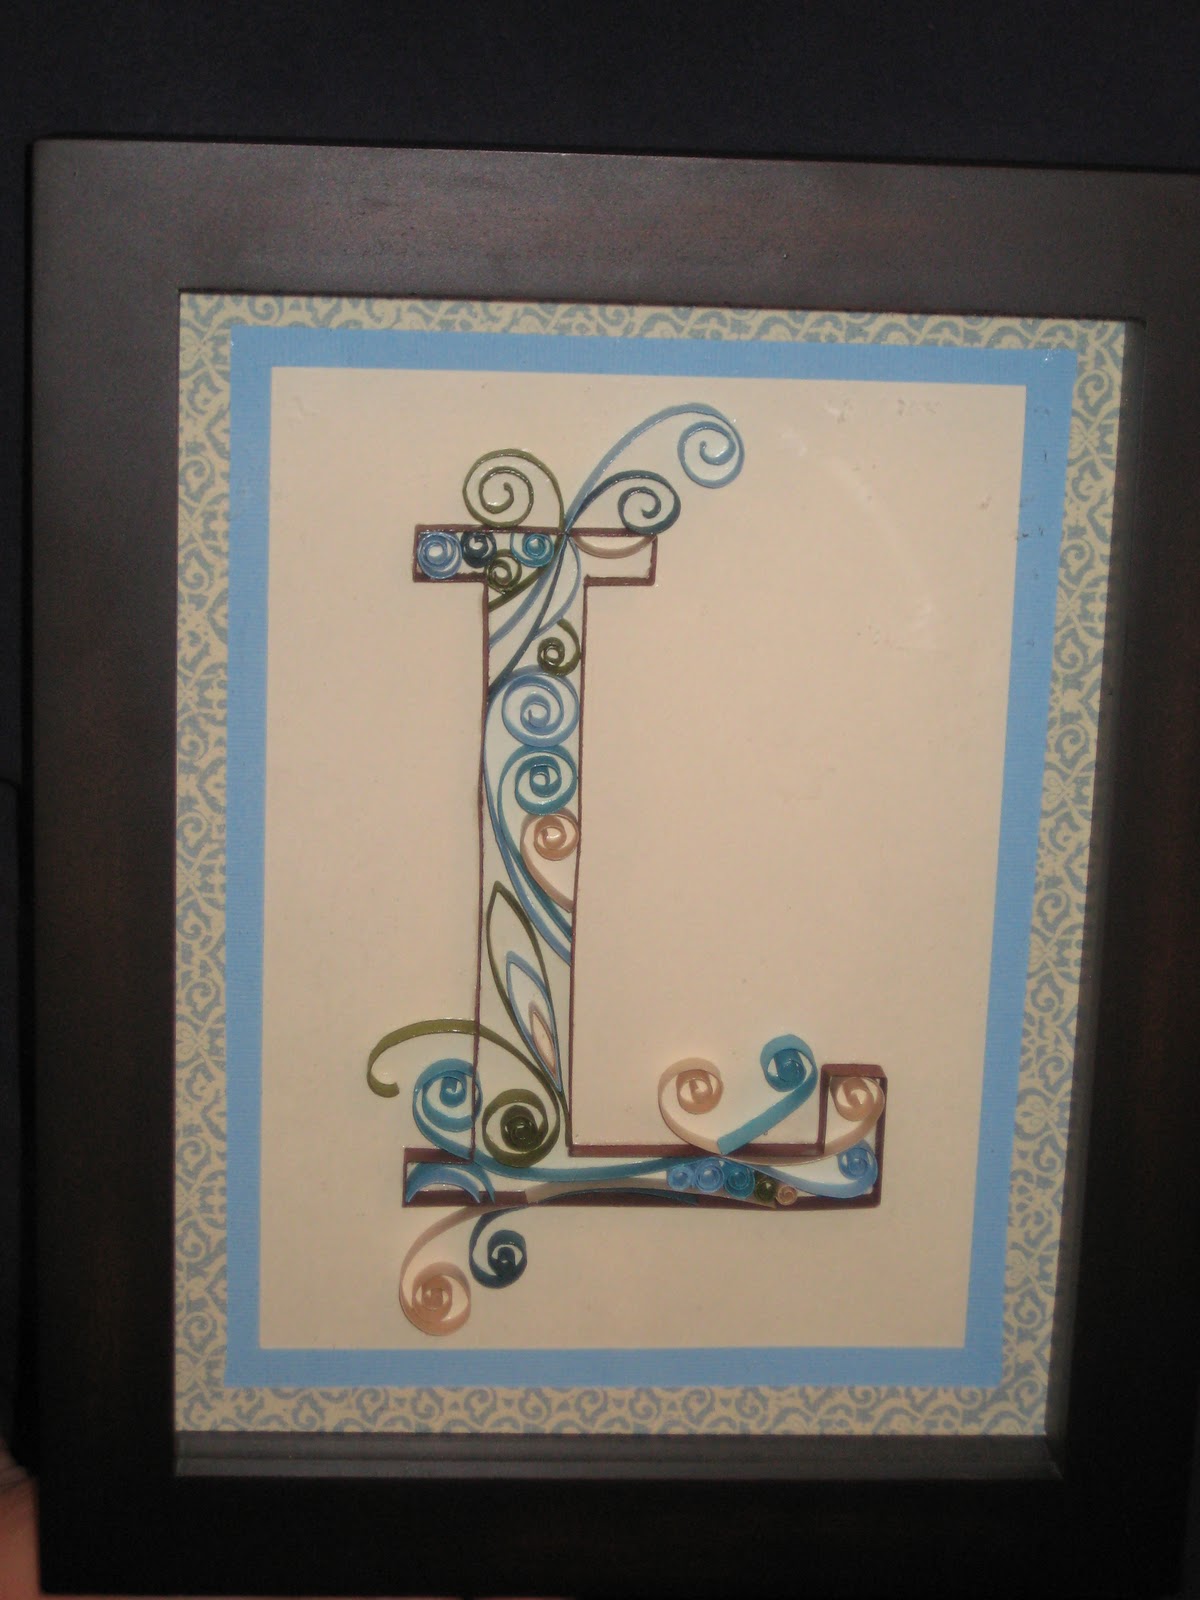
I finished Sara's Quilled monogram (she was the winner of the giveaway) and I dropped it in the mail on Saturday so here's a preview for her and a tutorial for all of you. I hope Sara loves it as much as I do. I feel like this picture doesn't really do it justice, it looks so great in person.

Before we get started I have one small disclaimer... the paper I used as the backing for the letter was pretty light in colour and I do all my quilling in the evening after Catie goes to bed. This means all my photos are taken at night so I need a flash but the flash bounces off the paper so most of them look pretty terrible. I did my best but some of them are really awful, I apologize. I took more photos of the steps than these but some of them just aren't usable.
To start here is a photo of your needed supplies


Next you're going to cut out your strips of paper. Measure 1/4 inch strips and cut them, you want to be really precise here making sure they're all straight and exactly 1/4 inch. I cut all my colours at once but I only cut this many before I was sick of measuring, I thought I would need way more but in the end I didn't need any extras, I did use all of these though.

To outline your letter take one brown strip lay it on top of your print out. You're going to measure from one corner to another and make a pencil mark. Using the pencil mark carefully bend your paper so you have a nice clean, straight bend (I bend the paper on my ruler).


Once you've made your first bend carry on measuring, marking and bending until you've used up an entire strip of paper. One strip of paper obviously isn't going to go around the entire letter, where you're two strips of paper meet make sure it's at a corner, it's much easier to hide.
Here's my first strip bent but not glued down.

next you're going to put a blog of Mod Podge on some sort of surface (I used an empty cracker box but paper plates work well). I dip a Q-tip in the glue and then pick up the strip of paper and apply the glue to the bottom edge. Your strip is pretty long though and if you put glue on the entire edge it's difficult to get it all down before it dries so I work in small sections. On this one I put glue on the top of the L but not extending down the length of it (I hope this is making some sort of sense). Once it's glued you carefully line up your cut paper with your printed template, you want to be really precise here too. Press the glue down and hold for a second, it doesn't take long to dry. Once the first part is down I switch to a toothpick, dip in glue and carefully move your unglued paper out of the way. Apply glue to the template down the line and then attach your paper. Do this until you're strip is all glued down.

See the little dobs of glue? Don't worry, they disappear when dry.
Then you can go ahead and measure, bend and glue your next piece until you've gone all the way around. I needed two and a little bit. Make sure to glue the edges where your two strips will meet so they are attached to each other.

Now it's time to fill in that letter.
I don't really plan ahead here. I suppose you could sketch out what you wanted to do but I don't. I did know before I started that I wanted some big curls coming off the top of the L and I wanted 3 curls coming down. I also wanted one corner full of tiny curls. I did those ones first and then filled in the rest as I liked. I like lots of curls but not enough to be overwhelming.
Take a strip of paper in the colour of your choice (not brown though, we're done with that) and you're going to wind it around an item. Here's where you need the toothpick, needle and pen. I use the toothpick 90% of the time because it's easier but the needle gives a tighter curl in the centre so sometimes's it's useful, especially if you're working on a small curl. I read once that you're suppose to slightly wet the end of your paper to help turn, I hope it doesn't gross you out to learn that I actually just use my tongue on the end a little. Press the end around the toothpick to give it a little bend and then wind around a couple times. The amount of times you wind depends on the size of the curl. Once you take the toothpick out you have a curl that stops pretty suddenly, the tail that you didn't wind has no curl at all, like in the diagram below.

You want the tail to have more of an arc so I use the pencil here to help give it some shape, just slightly bend it around the pencil. Before you cut your tails off hold your paper up to your letter to make sure it fits and then mark with your pencil and cut. Glue like you did before and hold until it's dry (the tweezers really help you fit everything in). If there is going to be a cluster of curls together I like to line them all up before I glue any of them.
Here's a couple of views of mine in progress.


And here's the finished L

Once you've glued all of your paper down take your paint brush and lightly brush glue over the entire letter to secure it. You want to be careful here because if you get little blogs of glue you can see them a little at the end, they look extra shiny. Try not to get blogs stuck in the corners.
Now it's time to frame. I use the back of the frame as a template for my patterned paper and cut out a rectangle. Then you need to cut out the centre. To decide the size I roughly measure my letter (curls and all), this one was about 4"x6". My Frame was 7"x9" so I decided I'd make a 1/2" patterned border with a 1/4" trim. I measured down that amount on all sides of my rectangle and connected the lines to make a rectangle inside my original. Then I use a straight edge and exaco knife to carefully cut out the centre rectangle. You're left with this (minus the blue trim, sorry).

For the trim I cut out 4 strips 3/4" thick. I cut them to length and then used a 45 degree ruler to give them that mitered look. I only cut 1 end of each diagonally because the straight edge will tuck under. I cut them 3/4" thick because I can then line them up with the edge of the frame to make sure they're straight. The paper left sticking out is 1/4" like I wanted. Here are two of my pieces cut, and two of them glued already. This is where you use your glue runner.

I like to cut my letter to size last and I just eyball it. I place it underneath my frame, line it up and then cut it to size. Glue it to the frame, re-assemble and it's finished.
I keep wanting to declare this one as my favorite yet but they're all so pretty that I'm not sure there can be a favourite.

You should all check out this link, it's where I saw the original idea. She also gives a tutorial and her H is beautiful.
Yay, I've been featured!

Before we get started I have one small disclaimer... the paper I used as the backing for the letter was pretty light in colour and I do all my quilling in the evening after Catie goes to bed. This means all my photos are taken at night so I need a flash but the flash bounces off the paper so most of them look pretty terrible. I did my best but some of them are really awful, I apologize. I took more photos of the steps than these but some of them just aren't usable.
To start here is a photo of your needed supplies

- You need a picture frame that is really deep, the letter is going to end up being at least a 1/4 of an inch tall so there needs to be room for that or you can leave the glass out. I personally prefer the look of glass. I found my frame at Winners for $7.99. For my W I found this square frame at Liquidation World for $8.99. You can get these deep frames at Michael's too but they're about $20 and that's after a 40% coupon.
- I use Mod Podge as my glue. It dries clear and is really easy to work with.
- You need some sort of paper cutter so you can cut your strips. Apparently you can buy already cut paper specifically for Quilling but I'm not willing to pay for that.
- You need some paper to work with. The light colour on top will be the background for the L. The brown will outline the letter, the green and the blues will make the coils to fill in the letter and the patterned piece on the bottom is for the matte. After I started I decided I needed one lighter colour too so I added a light browny paper.
- These are the tools I use, there is a needle (it's a big one), toothpicks, Q-tips and a chopstick. You can also buy a quilling too, it's basically a needle with the top chopped off.
- These are tools you'll use throught the process, a ruler, a paintbrush (mine is actually a makeup brush but it works), a pencil, and an exacto knife.
- You'll use a glue runner at the end to assemble the matte.
- I forgot to show in this picture some tweezers. They are super helpful and I use them a lot.

Next you're going to cut out your strips of paper. Measure 1/4 inch strips and cut them, you want to be really precise here making sure they're all straight and exactly 1/4 inch. I cut all my colours at once but I only cut this many before I was sick of measuring, I thought I would need way more but in the end I didn't need any extras, I did use all of these though.

To outline your letter take one brown strip lay it on top of your print out. You're going to measure from one corner to another and make a pencil mark. Using the pencil mark carefully bend your paper so you have a nice clean, straight bend (I bend the paper on my ruler).


Once you've made your first bend carry on measuring, marking and bending until you've used up an entire strip of paper. One strip of paper obviously isn't going to go around the entire letter, where you're two strips of paper meet make sure it's at a corner, it's much easier to hide.
Here's my first strip bent but not glued down.

next you're going to put a blog of Mod Podge on some sort of surface (I used an empty cracker box but paper plates work well). I dip a Q-tip in the glue and then pick up the strip of paper and apply the glue to the bottom edge. Your strip is pretty long though and if you put glue on the entire edge it's difficult to get it all down before it dries so I work in small sections. On this one I put glue on the top of the L but not extending down the length of it (I hope this is making some sort of sense). Once it's glued you carefully line up your cut paper with your printed template, you want to be really precise here too. Press the glue down and hold for a second, it doesn't take long to dry. Once the first part is down I switch to a toothpick, dip in glue and carefully move your unglued paper out of the way. Apply glue to the template down the line and then attach your paper. Do this until you're strip is all glued down.

See the little dobs of glue? Don't worry, they disappear when dry.
Then you can go ahead and measure, bend and glue your next piece until you've gone all the way around. I needed two and a little bit. Make sure to glue the edges where your two strips will meet so they are attached to each other.

Now it's time to fill in that letter.
I don't really plan ahead here. I suppose you could sketch out what you wanted to do but I don't. I did know before I started that I wanted some big curls coming off the top of the L and I wanted 3 curls coming down. I also wanted one corner full of tiny curls. I did those ones first and then filled in the rest as I liked. I like lots of curls but not enough to be overwhelming.
Take a strip of paper in the colour of your choice (not brown though, we're done with that) and you're going to wind it around an item. Here's where you need the toothpick, needle and pen. I use the toothpick 90% of the time because it's easier but the needle gives a tighter curl in the centre so sometimes's it's useful, especially if you're working on a small curl. I read once that you're suppose to slightly wet the end of your paper to help turn, I hope it doesn't gross you out to learn that I actually just use my tongue on the end a little. Press the end around the toothpick to give it a little bend and then wind around a couple times. The amount of times you wind depends on the size of the curl. Once you take the toothpick out you have a curl that stops pretty suddenly, the tail that you didn't wind has no curl at all, like in the diagram below.

You want the tail to have more of an arc so I use the pencil here to help give it some shape, just slightly bend it around the pencil. Before you cut your tails off hold your paper up to your letter to make sure it fits and then mark with your pencil and cut. Glue like you did before and hold until it's dry (the tweezers really help you fit everything in). If there is going to be a cluster of curls together I like to line them all up before I glue any of them.
Here's a couple of views of mine in progress.


And here's the finished L

Once you've glued all of your paper down take your paint brush and lightly brush glue over the entire letter to secure it. You want to be careful here because if you get little blogs of glue you can see them a little at the end, they look extra shiny. Try not to get blogs stuck in the corners.
Now it's time to frame. I use the back of the frame as a template for my patterned paper and cut out a rectangle. Then you need to cut out the centre. To decide the size I roughly measure my letter (curls and all), this one was about 4"x6". My Frame was 7"x9" so I decided I'd make a 1/2" patterned border with a 1/4" trim. I measured down that amount on all sides of my rectangle and connected the lines to make a rectangle inside my original. Then I use a straight edge and exaco knife to carefully cut out the centre rectangle. You're left with this (minus the blue trim, sorry).

For the trim I cut out 4 strips 3/4" thick. I cut them to length and then used a 45 degree ruler to give them that mitered look. I only cut 1 end of each diagonally because the straight edge will tuck under. I cut them 3/4" thick because I can then line them up with the edge of the frame to make sure they're straight. The paper left sticking out is 1/4" like I wanted. Here are two of my pieces cut, and two of them glued already. This is where you use your glue runner.

I like to cut my letter to size last and I just eyball it. I place it underneath my frame, line it up and then cut it to size. Glue it to the frame, re-assemble and it's finished.
I keep wanting to declare this one as my favorite yet but they're all so pretty that I'm not sure there can be a favourite.

You should all check out this link, it's where I saw the original idea. She also gives a tutorial and her H is beautiful.
Yay, I've been featured!
Friday, October 15, 2010
Halloween Scrooge
I openly admit it, I'm a Halloween Scrooge, specifically when it comes to decorating. I decorate minimally for Christmas and that's the only season I decorate for. I suppose part of that comes from always living in rental units with limited storage but it's not something I plan on changing any time soon.
The problem though is this, I read a whole lot of blogs and I can't even begin to estimate how many Halloween projects I've seen. They're very cute but I have no use for them and I'll be so happy when this holiday is over so I don't have to look at another craft project involving ghosts, spiders, skeletons or pumpkins for another year. Also I feel I have no place calling myself a crafty blogger since I don't have a fireplace mantel to decorate, that seems to be required.
(I am quite concerned that once Halloween is over the Christmas projects will start and I'll be just as sick of them)
Please forgive my Halloween rant.
The problem though is this, I read a whole lot of blogs and I can't even begin to estimate how many Halloween projects I've seen. They're very cute but I have no use for them and I'll be so happy when this holiday is over so I don't have to look at another craft project involving ghosts, spiders, skeletons or pumpkins for another year. Also I feel I have no place calling myself a crafty blogger since I don't have a fireplace mantel to decorate, that seems to be required.
(I am quite concerned that once Halloween is over the Christmas projects will start and I'll be just as sick of them)
Please forgive my Halloween rant.
Thursday, October 14, 2010
Saucer Chair Re-Cover
Tonight I got to work on a saucer chair re-cover again. This is the third chair I've re-covered, you can see the first here and the second here. This is a project I really enjoy so when my friend asked for help with one for her daughter I happily said yes. In just a couple of hours we created this beautiful, unique chair.

It started out looking like this. I'm sure High School Musical is lovely but not something she needs to advertise in her home. I think the dots are a great improvement.

Teddy did all the work, I just instructed and she did an awesome job with all of the sewing, it's definitely a project she can be proud of. Hopefully Taeya thinks it's a fun present.

It started out looking like this. I'm sure High School Musical is lovely but not something she needs to advertise in her home. I think the dots are a great improvement.

Teddy did all the work, I just instructed and she did an awesome job with all of the sewing, it's definitely a project she can be proud of. Hopefully Taeya thinks it's a fun present.
Subscribe to:
Posts (Atom)