Wednesday, October 13, 2010

What Catie Wore Wednesday #10

Another round to prove just how cute she is.

Wednesday

An outfit you've seen already but it's still cute.
White T - H&M
Grey Pants - H&M
Pink sparkly runners - Zellers


Thursday

She didn't actually wear this all day but when she wasn't wearing this Carter's onesie she was wearing an outfit you've already seen.  This picture was much more fun.  Her hair looks so awesome because I gave her a bath and then put her down for a nap right after.

Friday

Pink T - Superstore
Brown Pants - Old navy
Shoes - Zellers
Mr. Brown - Toys R Us

(You can check out the car seat re-cover I did here)

Saturday

We went to the zoo today and Catie rode the carousel for the first time and she loved it.  She looks a little nervous but she warmed up to it pretty quick.

Striped dress shirt - Superstore
Cardigan - H&M
Skinny leg jeans - Children's Place
Shoes - Zellers

Sunday

It's a shame she didn't see Grandma West at all today because this will be her favorite dress that Catie has ever worn.  It's as close to a lamp shade dress as she's ever worn and it has tulle underneath to help it be big and adorable.

This dress is on loan so I'm not sure where it's from.
Headband - made by me
White Onesie - Carter's
White Jelly Shoes - Anabanana

Monday

Again she didn't wear this all day but she did wear it long enough to earn a picture.  Her real clothes were ones you've seen before.

Sleeper - Sears

Tuesday

White long sleeve onesie - Carters
Navy T - Superstore (it has cute embroidery on the front)
Jeans - Old Navy
Shoes - Zellers

There you have it, hope you think she's as cute as I do.

Linking up to

the pleated poppy blog

Monday, October 11, 2010

Car Seat Re-cover 2

Remember when I re-covered Catie's car seat and it was awesome?  It was less than awesome to discover that there was no tether strap meaning it couldn't be turned forward facing.  My parents had given me two carseats though, one was on loan to my sister-in-law.  We got that one back temporarily while we called the car seat manufacturer and arranged for a new tether strap.  While we waited I decided to re-cover the temporary car seat and then I loved the fabric so much that this is now the permanent car seat, the other will go back to my sister-in-law, tether strap attached.

Here she is, transformed.


She started out as this (we'd already taken the headrest off, sorry), not too offending but nothing special.  The worst part being how dirty it was.

Here's a gross story.  I gave Catie a drink of water while she was in the car and the water spilled a little onto the neck strap cover.  When we took her out of the car she had a huge, gross brown spot on her shirt.  Filthy stuff had leaked out of the strap when it was wet... super gross, I know.


I took the seat apart and stripped it down to this.


The last seat made me a little smarter, I discovered on that one, unexpectedly that the fabric was glued directly to the foam meaning if you want to re-use the foam (which I did) then you have to cover up the old fabric instead of removing it.  I expected the same on this seat so before I started I threw the seat, the neck straps and the seatbelt into the washing machine.  I used the gentle cycle and cold water and I didn't put it in the dryer, this time I had a nice clean seat to start with and wasn't just covering up that filth.  One other tip that comes out of this, since you're covering up the original fabric your new fabric should probably be something dark so the old doesn't show through the new.  The fabric on the last car seat had quite a bit of white and I felt like it ended up looking not as crisp because the dark fabric showed though slightly.

Once my seat was clean I started unpicking.  I could tell pretty quickly that this seat was a little more complicated than the last so I started by unpicking one side only.  I left the other in tact so I could use it as a reference (this photo shows the one side unpicked as well as a piecve on the bottom).


A brief pause to talk about my fabric.  As I drove to Fabric Addict I remember thinking that I really need to make sure I don't choose something that's directional, it would be really difficult to work with.  That thought disappeared when I grabbed the stripes to go with that awesome gold-y brown.  I love the combination and I had visions of carefully cutting my fabric so the stripes were all going exactly the same way.  I spent nearly an hour trying to make this happen before I decided that the shape of my pieces made that impossible.  I was right that the stripes were hard to work with but I'm not unhappy with my choice.

After finally giving up on lining up the strpes this project went much quicker, I  doubled my fabric so the two sides would at least be the same and then I used my foam as a pattern.

Occasionally when I'm working on a project I'll do something that adds time but really improves the quality and when I do it I often wonder if other people would think I'm crazy, I'm going to share one of those moments.  Since I've done a lot of re-covering I've decided that when working with foam or batting, no matter how carefully you cut out your pieces it's really difficult to make sure your fabric lines up just right once it's all sewn together.  I was always trimming away a little bit of foam or batting making the new piece slightly smaller than the original so once it was re-covered it would fit a little snug.  To fix that I've started cutting out my piece a little too big, like this.

I then sew the fabric to the foam, really close to the edge (of the foam) using a large stitch (I use a large stitch because I tend to make mistakes and a big stitch is much easier to unpick than a little stitch).  There are going to be other seams to re-enforce so this step is just to secure the fabric temporarily.  I sew really close to the edge to make sure this seam is covered up by your following seams so it's never seen. Once my fabric is on I trim it to be exactly the right size.  This means I cut things twice but I get a really good fit.

I also decided on this piece to not remove any of the elastic.  It has elastic to hold the seat snugly on the frame and it was attached to the back of the foam and I knew I'd need to re-attach it anyway so I just left it on, it made a couple pieces tricky to work with but I liked not having to unpick.

Once my new fabric was all sewn on and trimmed I re-assembled my side pieces, using the still intact side as a guide.  I tried it on the frame and it looked like this, pretty good start hey?

I unpicked the second side, used my already cut out fabric to end up with this

Originally I had thought I would put fabric on both the front and the back of the foam but the back had a nice black coating and looked fine as is so on all the pieces except one I only covered the front.  The piece I changed was the one in the very middle because there was no way I was going to unpick those 8 button holes.

Now we'll talk about the odd design of this car seat...I have no idea what the purpose of it is but the middle piece flaps forward (circled in white), the top of it isn't attached to the piece above it (so hard to explain).  That meant that there were 4 seams that were hidden (the 4 red arrows). 


Since I don't understand the usefulness of this design I wasn't willing to change it, what if one day I figured out what it was for but I'd made it not work anymore?  (I've since discovered that the cut out allows for the headrest to be secured, it's a good thing I didn't change the design.).

To re-create this piece I used the original as a pattern to get my size and I cut out 2 rectangles, making sure to leave seam allowance where the seams were hidden.  Then, putting right sides together I sewed up those 4 sides where the arrows were.  I trimmed the top two corners to make them turn better (in hindsight I sort of wish I hadn't, I think rounded corners would have looked better).  You can see the two sides that I left open.


I turned it right side out and stuffed the foam in through the openings on the side. 

Before I stuffed in the foam I measured my button holes to know just how big they were, this helped later.


To make the button holes I used my finger to feel where they started and marked it with a pin.  Since the foam is cut you can feel the original, I used that as a guide and drew a line with a sharpie, using my ruler to mark how long they should be.  I only marked two at a time knowing that my fabric would shift a bit as I worked on them.

Sewing 8 really long button holes takes a surprisingly long time and I wish I'd used a thread that coordinated with the fabric better, I just didn't think of it at the time and I'd used black everywhere else.  Also, you should probably only put in a couple pins in at a time, I put a pin at the start of all 8 button holes and ended up gouging myself so good I needed a band aid.

For the bottom piece I was able to unpick the black covering (not the button holes though), tuck it up out of the way, sew on my new fabric and then untuck and re-sew, all so I didn't have to unpick those 3 button holes.  I didn't measure these holes first, I just used my finger to feel how big they were.  I did make the centre one (the one the buckle comes out of) bigger because I had a heck of a time getting the buckle through it when I took the cover off.

For the remainder of the pieces I just used a basting stitch to secure the new fabric then I re-attached everything and added some black bias tape (possibly the worst part of the entire project, it was so awkward).  I then re-assembled everything.  So now it looked like this.


At this point I put the seat in the car and we used it for two weeks while I waited to come to Calgary to pick up the headrest (we first started using it when we were in Calgary and she seemed too little for the headrest and we forgot to take it home).  I then took my time re-covering those two pieces (they were not fun to do) and finally attached them back on.  She looks far more comfortable with the headrest and I love the way it looks.

Here are a couple more before and afters (most of the afters are without the headrest because those photos were much better).

I did the neck strap covers different on this seat, they're not removable, just little rectangles with rounded corners with bias tape that got folded in half and sewed up one side.  The seat belt slips through them before the seat was re-assembled.  I like the look of them better and I'll always do them this way from now on.

This one shows the fabric combination close up.


Yay, I was featured!
Wallet-Friendly Wednesday

Wednesday, October 6, 2010

Quilled Monogram Giveaway Winner (Again)

I gave her over a week, I tried to contact her multipe times yet I haven't ever heard from my giveaway winner.  I've decided it's time to pick a new winner.  Kelly, I'm so sorry but it's time.

Once again I used a random number generator and came up with number 10.


I'm really excited to make one of these for Sarah, she said, "I am a new follower of your blog and I LOVE it. I have been lusting over the Framed Quilled Monograms ever since you posted about them. I NEED one of my own! ;-)"  Makes it even more fun when I know she really loves them.


So we can avoid the confusion again I'll give Sarah a week to contact me.


Sarah, I need the following info:

  1. What letter do you want?
  2. What sort of color scheme, do you want browns and blacks?  What accent colours can I add?
  3. I'll also need your address so I can ship it once completed.


You can contact me at westlaur@gmail.com


Hopefully this ends our Quilled Monogram Giveaway and I can make a great tutorial.

What Catie Wore Wednesday #9

This week we seem to have taken a style nosedive.  Nothing is new and there are two outfits in particular that are not good, you'll see what I mean.

Wednesday

White Long Sleeve Onsie - H&M (I'm thrilled to finally have a nice long sleeve onesie.  I only have one because H&M isn't nearly as cheap as Carter's buy my Mother-in-law happens to be in the States right now with a Carter's order for me. )
Argyle Sweater Vest - H&M
Jeans - Old Navy
Sunglasses - $1 store.  She puts them on and then struts around feeling so cool because she has glasses on.

Thursday

I know this is a crummy picture but she's worn this before.
White Onsie - H&M
Green Dress - Superstore
Pink Striped Tights - Sears
(you can see this outfit much better in this weeks photo)

Friday

Striped long shirt - Superstore
Grey Pants - Mexx.  The pants are really cute but don't go with very many shirts, all of her white ones were dirty today.  I ended up switching the pants for jeans later.

Saturday


Navy T - Superstore
Embroidered Jeans - Esprit


Sunday

Today was General Conference (www.mormon.org) so we stayed home in our pajamas all day.

Tuesday

Such a special outfit today...
Blue shirt - Superstore
Awful pink pants - I think they're from Walmart.  Don't you just love how they're tight at the ankle and super baggy at the knee?

Catie seems to have some sort of stomach thing going, after the 4th diaper change before noon I gave up on the jeans and switched them for these awesome pink pants.

Rigby came to play today for a couple hours so I thought I'd share just how cute he is.  Catie loved to rub his head and shortly after this picture she gave him the toy she's holding.  They were pretty fascinated with each other.


So there's the week.  WIWW seems to be getting harder lately because Brad's has more school meaning I have a car less often so Catie and I spend more time at home.  There's no point dressing up if we're just hanging out at home all day.  I'll try harder next week.


Linking up to

Tuesday, October 5, 2010

Mini Caramel Apples

Everybody loves a caramel apple but nobody actually likes to eat them. They're a pain and you end up with caramel on your nose, plus the apple to caramel ratio is not good, far too much apple.

I've seen these floating around lately and I thought they were such a fun idea.

Mini Caramel Apples


I didn't take a picture tutorial because I only had one nap to complete them in, there wasn't time, also I didn' t know they'd be so cute. I will tell you what I did though.

I started with 3 apples, I meant to get more than that but I forgot to write it on my grocery list. Two were granny smith and one was a braeburn (can't wait until the Ambrosia's come back). I washed them well and then dried them. I then took a melon baller and made as many little scoops as I could. I think I got just under 30 so in the end 3 apples was plenty. I dropped those scoops in lemon water to keep them from going brown and then I dried them as well as I could.

Once they were dry I laid them out on a sheet of parchment paper (put a cookie sheet underneath, it was later that I realized how silly it was not to have). I didn't have any sucker sticks and I didn't want to buy any but I did have a small handful of bamboo skewers so I cut each one into 4 pieces and pressed those down into my apples (next time I'll probably use toothpicks).

It was here that I was grateful I'd read a few other people's experience with these apples and had formulated a good plan. I noticed as I pushed my sticks down that some apple juice would raise up and even trickle down the side sometimes. I had read that people have a hard time getting the caramel to stick to the apple since there's no skin, it just peels right off because there's no way to dry the apple well enough. I had decided to first dip in chocolate.

I melted a handful of chocolate chips in the microwave and once it was melted I decided it was much too thick. I thinned it with a little olive oil though I'm not sure why I didn't use milk, it was just the first thing that came to mind and it worked just fine.

Once my chocolate was a consistency I was happy with I dipped my apples in, one at a time. I used an extra skewer to help get the chocolate right up to the stick so there wasn't any apple showing. I did run out of chocolate halfway though and had to melt a little more. I replaced the dipped apples to my parchment and once they were done I slipped them into the fridge. Here's where I was wishing for a cookie sheet. I used some creative sliding with cutting boards and left them on that until the chocolate was set and I could replace the cutting boards with a cookie sheet.

While the chocolate set I got out my toppings (I should have done this while my caramel cooled). I used peanuts, teddy grahams and skor bits. The peanuts and teddy graham I crushed with a hammer. I put the three in small bowls and then I worked on the caramels.

I used a bag of Kraft caramels, unwrapped and microwaved with 2 tbsp of cream. Again I thought this was way too thick so I added probably another 4 tbsp, maybe even a little more than that.

It seemed like it was so thick it would just push off my chocolate.

At some point I realized my apples weren't setting fast enough so I transferred them to the freezer. I wanted them to be good and cold so my caramel wouldn't melt the chocolate so I only pulled out a couple at a time. The first two were casualties as the caramel was too hot and my chocolate melted. I gave it some time and then I resumed, I got better as I went on and here's what worked best.

I dipped one apple with my right hand and then tipped it upside down and transferred it to my left hand turning occasionally to give the caramel a little time to cool so it wouldn't all slide off. As I did that I dipped a second and transferred it to my left hand as well so I'm now holding and turning two apples. Then I dipped a third. While my third was being turned and cooled by my right hand I used my left to dunk the two in topping and then place on the parchment. By the time those two were done I could dunk the remaining one. I repeated that until I was finished (sounds tricky but it was really no big deal).

Start to finish they took about an hour and a half which I thought was not bad for such a delicious result.

I do think they were a little fragile, It seemed like if I left them out of the fridge the caramel would start to slide off the chocolate and it got really sticky. This could have been for a couple reasons. Maybe the oil in the chocolate was a bad idea, or maybe I used too much milk in my caramel. I think I'll give them one more try to see if I can improve them but even as is they were a big hit and just so cute.


Monday, October 4, 2010

Blogger Issues

Is anyone else having a hard time with Blogger? I'm so frustrated I'm about ready to go to Wordpress, let my share my annoyances.

I use Firefox as my browser of choice, I'm very happy with it and it works great until recently. Anyone else notice how the way you upload pictures is different? Well when I try to upload a picture is says "Server Error".  Every stinking time.  I figured it was a problem with Firefox so I switched to Internet Explorer and it worked okay.  I'm not a fan of IE though so I didn't want to use it all the time until I read a glowing review of IE 9.  It's still in the Beta stage (testing) but I thought now big deal.  Apparently it's a big deal because in the IE 9 none of the buttons on my editor work.  So I click on the button to add a picture and nothing happens.

So now I can't use Firefox or Internet Explorer.  Brad uses Chrome so I switched to his profile and used Chrome and it sort of functions though pictures are miserable to upload.  So lately I've been composing in Firefox and then switching to Brad's profile so I can use Chrome to add photos.  A ridiculous set up.  Something better get fixed soon or I'm outta here.

Polynesian Satay (Meat on a Stick) - SAMM

This is a dish that we had with Brad's family as an appetizer and it was a huge hit.  It was so good that Brad and I made it again the next week and ate it for dinner.

Here's what you start with


Combine 3/4 cup Soy Sauce, 1/2 cup brown sugar, 2 Tbsp oil, 1 minced garlic and 1/2 tsp ground ginger.  Give it a good whisk and it looks like this.

Then you take your sirlion steak and you're going to slice it nice and thin.  The trick to this is to put it in the freezer for about an hour and a half, you want it to be not frozen solid but a little stiff, it helps you get some awesome thin slices.

Here's what mine looked like when I pulled it out of the freezer.

Then slice it against the grain.  The recipe says 3mm but I think you really want to get it as thin as you can.  I aimed for 3mm and they would have been nice if they were thinner.


Slice until you have this nice pile.

Then toss all your neat slices into your marinate and coat all the pieces.

The recipe says to marinade for at least 30 minutes, I gave it a good 3 hours.  Make sure you give your container a shake and a rotate occasionally so all your meat is coated.

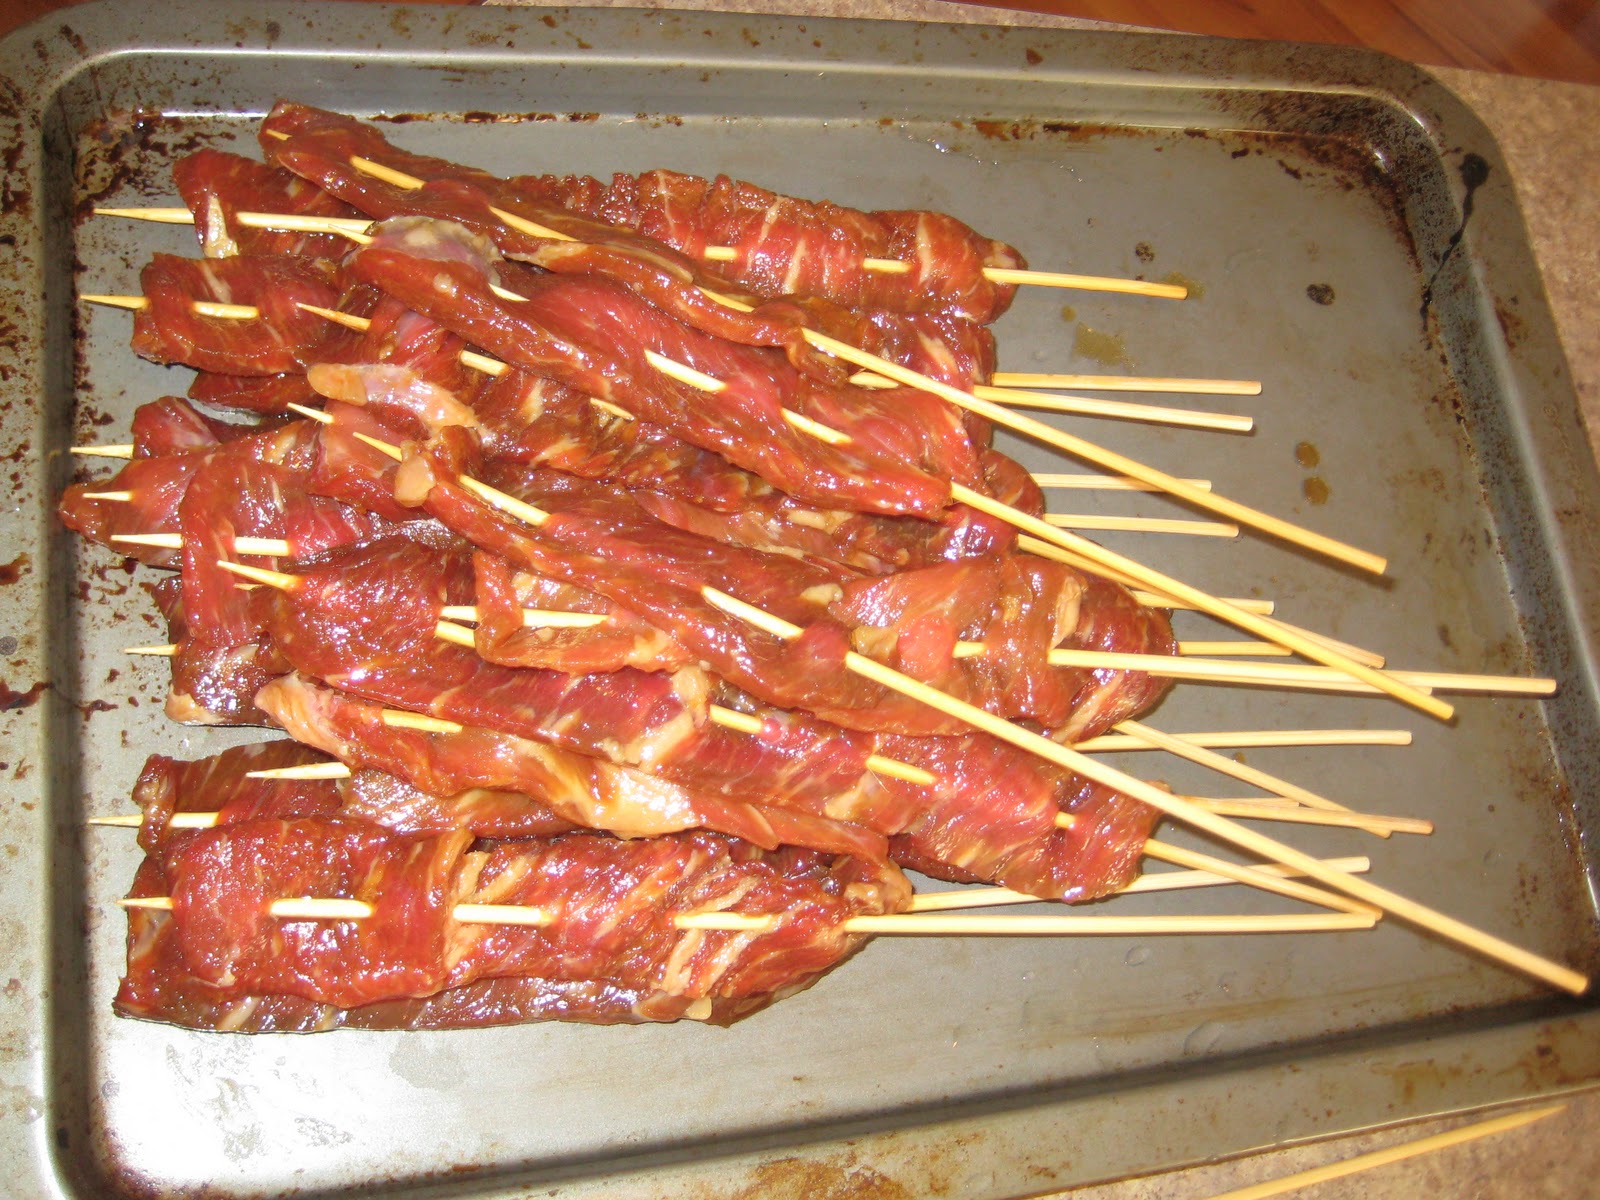
Here's mine post marinade.

This next part is slightly time consuming but until now it's all been a snap.  You thread your meat accordian style onto bamboo skewers that you've soaked in water.


Here's where I parted from the recipe, it says to broil them but why broil when you can bbq?

We gave them about 2 minutes per side and until they were all yummy and the sugar had carmelized.

That's it.  Since this was dinner I served it with cesear salad and carrots and it was delish.  They were even just as good the next day.


Polynesian Satay
3/4 cup soy sauce
1/2 cup brown sugar
2 tbsp cooking oil (I used olive)
1 minced garlic clove
1/2 tsp ground ginger
Thick sirloin, cut across grain into 1/8 (3mm) thick slices
Bamboo skewers

In a bowl with a tight fitting cover, mix soy sauce, sugar, oil, garlic and ginger powder. Add beef and allow to marinate for at least 1/2 hour.

Thread meat onto wooden skewers accordion fashion.
Broil on top rack for 2 min per side until medium rare.

Store covered in refrigerator.

To serve, pile on baking sheet. Heat in 400F oven for 5 – 10 minutes until hot.


Linking to Share a Meal Monday

Friday, October 1, 2010

Ribbon Rose Ring

I link up to a lot of different parties which gives me the opportunity to see a ton of really original idea.  My favorites tend to jump out at me and this was one of those.  I like how easy and quick this idea was so I took 15 minutes and made my own.


Ucreat's looks a little smoother than mine and perhaps a second or third attempt would look just a bit better but I think it's a cute accessory.


It does stand up a little tall so it's not something I'd wear all the time but I think it's a fun piece to be pulled out occasionally.